Tag: Tally for Beginners

  • Tally Student Edition vs Full Version: Complete Comparison Guide for Beginners, Students, and Businesses

    Tally is one of the most widely used accounting software solutions in India and many other countries. From small businesses to large enterprises, organizations rely on Tally for managing accounting, taxation, inventory, payroll, and financial reporting. However, many learners and beginners often get confused between Tally Student Edition vs Full Version.

    Understanding the difference between these two versions is extremely important for accounting students, job seekers, and business owners. While the Student Edition is designed mainly for learning purposes, the Full Version is meant for real business operations.

    In this detailed guide, we will explore the complete comparison between Tally Student Edition and Full Version, including features, limitations, pricing differences, usability, benefits, and which one you should choose depending on your needs.


    Understanding Tally Software

    Tally is a powerful accounting and business management software used for:

    • Financial accounting
    • GST compliance
    • Inventory management
    • Payroll processing
    • Financial reporting
    • Taxation management

    Thousands of training institutes teach Tally because accounting professionals and businesses frequently require these skills.

    Two main variants commonly discussed are:

    1. Student Edition
    2. Full Version (Licensed Version)

    Both versions share a similar interface but differ significantly in capabilities and restrictions.


    What is Tally Student Edition?

    Tally Student Edition is a restricted version of Tally software designed specifically for learning and practice. It is commonly used in computer training institutes and accounting courses.

    This edition allows students to understand the fundamentals of accounting and practice creating ledgers, vouchers, and financial reports without purchasing the commercial license.

    Key Characteristics of Student Edition

    • Completely free for educational purposes
    • Limited data usage
    • Restricted company creation
    • Certain business features disabled
    • Used primarily for learning accounting concepts

    Training institutes often install this version in computer labs so that students can gain hands-on experience.


    What is the Full Version of Tally?

    The Full Version of Tally is the licensed commercial version used by businesses and professional accountants.

    It includes the complete functionality required for managing real business operations such as GST filing, inventory management, payroll processing, multi-user access, and financial reporting.

    This version requires a valid license or subscription to operate without restrictions.

    Key Characteristics of Full Version

    • Designed for business operations
    • Unlimited data handling
    • Advanced accounting features
    • GST compliance support
    • Multi-user capability
    • Real-time reporting

    Businesses across retail, manufacturing, trading, and service sectors use this version daily to manage their accounts.


    Tally Student Edition vs Full Version: Quick Comparison Table

    Below is a simplified comparison to understand the major differences.

    FeatureDescription
    PurposeStudent Edition is for learning while Full Version is for real business use
    CostStudent Edition is free, Full Version requires paid license
    Data CapacityStudent Edition allows limited transactions and companies
    Business UseStudent Edition cannot be used for commercial operations
    GST FeaturesFull Version supports full GST compliance and filing
    Multi UserAvailable only in Full Version
    Inventory ManagementLimited in Student Edition, complete in Full Version
    Payroll ProcessingMostly restricted in Student Edition
    Technical SupportAvailable for Full Version users
    UpdatesRegular updates available in Full Version

    This table highlights that while both versions look similar, the Full Version is significantly more powerful.


    Major Feature Differences Between Student Edition and Full Version

    1. Licensing and Cost

    The most obvious difference lies in licensing.

    The Student Edition is free, making it ideal for educational institutions and learners who want to practice accounting.

    The Full Version requires a valid license, which provides access to the entire feature set and technical support.

    Businesses typically purchase either a single-user license or a multi-user license depending on their needs.


    2. Transaction Limits

    One of the biggest limitations of the Student Edition is the restriction on transactions.

    Students can create sample companies and enter transactions, but the number of entries allowed per session is limited. This prevents the software from being used for actual business operations.

    The Full Version does not impose such restrictions, allowing businesses to handle thousands of transactions daily.


    3. Company Creation Restrictions

    In the Student Edition, company creation is restricted to specific educational modes or limited company data.

    The Full Version allows businesses to:

    • Create multiple companies
    • Manage multiple financial years
    • Maintain complete financial records

    This flexibility is essential for accountants who manage accounts for multiple clients.


    4. GST Compliance Features

    GST compliance is one of the most important features of Tally.

    The Full Version provides:

    • GST invoice generation
    • Tax calculation
    • GST reports
    • Return filing preparation

    The Student Edition allows users to learn how GST works but may not support the complete workflow required for real business filings.


    5. Inventory Management

    Inventory management is critical for trading and manufacturing businesses.

    The Full Version supports:

    • Stock groups
    • Stock categories
    • Batch tracking
    • Manufacturing features
    • Order processing

    Student Edition may provide only a simplified environment for practice.


    6. Multi-User Access

    In many businesses, accounting work is handled by multiple employees.

    The Full Version supports multi-user access, enabling different users to work on the same company data simultaneously.

    The Student Edition does not support multi-user environments.


    7. Payroll Processing

    Payroll management allows companies to calculate salaries, deductions, and employee benefits.

    Full Version supports:

    • Employee records
    • Salary structures
    • Statutory deductions
    • Payroll reports

    Student Edition usually allows basic practice but does not support full payroll operations.


    Advantages of Using Tally Student Edition

    Although it has limitations, the Student Edition provides several benefits for learners.

    Free Learning Opportunity

    Students can learn accounting software without paying for a license.

    Hands-On Practice

    The interface is identical to the commercial version, allowing learners to gain real software experience.

    Ideal for Training Institutes

    Institutes teaching accounting and taxation courses can train large numbers of students using this version.

    Beginner Friendly

    Students can practice:

    • Ledger creation
    • Voucher entries
    • Trial balance
    • Balance sheet
    • GST concepts

    This builds strong accounting fundamentals.


    Advantages of Using Tally Full Version

    The Full Version is designed for professional accounting and business management.

    Complete Accounting Management

    Businesses can maintain full accounting records including sales, purchases, expenses, and financial statements.

    GST Compliance

    Companies can generate GST invoices and prepare tax reports quickly.

    Inventory Control

    Businesses dealing with physical products can track stock movement accurately.

    Data Security

    Full Version provides better security and backup features.

    Business Scalability

    The software can handle large data volumes and multiple financial years.


    Who Should Use Tally Student Edition?

    The Student Edition is ideal for:

    • Accounting students
    • Beginners learning bookkeeping
    • Training institutes
    • Job seekers preparing for accounting roles
    • Individuals learning GST accounting

    Anyone who wants to practice accounting without running a business can use this version.


    Who Should Use Tally Full Version?

    The Full Version is suitable for:

    • Small business owners
    • Medium-sized enterprises
    • Chartered accountants
    • Professional accountants
    • Retail stores
    • Manufacturing companies
    • Service businesses

    Businesses need the Full Version because it supports real financial operations.


    Real-World Example: How Businesses Use the Full Version

    Consider a retail store that sells electronics.

    Every day the store performs several accounting tasks:

    • Sales invoice creation
    • Purchase entry recording
    • GST tax calculation
    • Inventory tracking
    • Profit analysis

    These operations require unlimited transactions and full reporting features, which are available only in the Full Version.


    Learning Path for Students

    Students who want to build a career in accounting should follow a structured learning path.

    Step 1 – Learn Accounting Basics

    Understand debit, credit, journal entries, and financial statements.

    Step 2 – Practice in Student Edition

    Create companies, record vouchers, and generate reports.

    Step 3 – Learn GST Accounting

    Understand tax structure and compliance.

    Step 4 – Upgrade to Full Version Experience

    Practice with real business data or internships.

    Following this path increases employability in accounting roles.


    Future of Tally Skills in the Job Market

    Accounting software skills remain in high demand. Businesses across India rely heavily on digital accounting tools.

    Professionals who understand software like Tally can work in roles such as:

    • Accountant
    • Accounts executive
    • GST consultant
    • Financial analyst
    • Payroll manager

    Learning Tally significantly improves job prospects for commerce students.


    Conclusion

    The difference between Tally Student Edition vs Full Version primarily lies in purpose and functionality.

    The Student Edition is designed for learning and practice, allowing students to understand accounting concepts and software operations without purchasing a license.

    The Full Version, on the other hand, is a complete business accounting solution that supports GST compliance, inventory management, payroll processing, and unlimited transactions.

    Students should begin with the Student Edition to build practical skills, while businesses must use the Full Version to manage real financial operations efficiently.

    Understanding the strengths and limitations of each version helps learners and business owners choose the right option based on their requirements.


    Frequently Asked Questions (FAQ)

    What is the difference between Tally Student Edition and Full Version?

    The Student Edition is a free learning version with limited features and transaction restrictions. The Full Version is a licensed commercial software used by businesses for complete accounting and GST management.


    Can businesses use Tally Student Edition?

    No. The Student Edition is designed only for educational purposes and cannot be used for real business accounting.


    Is the interface different between Student Edition and Full Version?

    No. Both versions have a very similar interface, which helps students easily transition to the Full Version when working in real companies.


    Does Student Edition support GST learning?

    Yes. Students can learn GST accounting concepts, but real GST filing and full compliance features are available only in the Full Version.


    Is Tally Student Edition good for beginners?

    Yes. It is one of the best tools for beginners to practice accounting entries and understand financial reports.


    Do companies prefer candidates who know Tally?

    Yes. Many companies prefer candidates who have practical knowledge of Tally because it is widely used for business accounting.


    Can I upgrade from Student Edition to Full Version?

    Yes. Once you start working in a business environment, you can use the licensed Full Version without difficulty because the interface and workflow are similar.


    Does Tally Full Version support multiple users?

    Yes. Multi-user access is available in the licensed version, allowing several employees to work on the same company data.


    Disclaimer

    This article is intended for educational and informational purposes only. Software features and capabilities may change depending on the version and updates released by the software provider. Users should verify official documentation before making business or licensing decisions.



  • 50 GST Voucher Entries in TallyPrime (With Free Excel Download) – Real-World Accounting Practice

    Goods and Services Tax (GST) has transformed the way Indian businesses record and report transactions. TallyPrime—India’s most widely used accounting software—offers built-in GST features to ensure compliance and efficiency. But simply enabling GST is not enough; understanding how to pass accurate voucher entries is what makes you a competent accountant.

    In this guide, we’ll explore 50 real-world GST voucher entries with explanations. Whether you are a student, fresher accountant, or business owner, this tutorial will help you:

    • Practice authentic GST scenarios
    • Reduce entry errors
    • Build confidence for audit and filing

    A free Excel sheet with all entries is provided for hands-on practice.


    Why GST Voucher Practice is Important

    BenefitExplanation
    Accuracy in ComplianceCorrect vouchers ensure correct GSTR-1, GSTR-3B filings.
    Faster WorkflowsFamiliarity with entry types reduces repetitive mistakes.
    Better Decision MakingAccurate books give better insights into sales, purchases, and cash flow.
    Audit ReadinessWell-classified vouchers speed up statutory audit.

    How GST Works in TallyPrime (Quick Recap)

    1. Enable GST under Features (F11) > Statutory & Taxation.
    2. Set your GSTIN, State, and Registration Type.
    3. Create GST-rated ledgers for Sales, Purchases, and Taxes (CGST, SGST, IGST).
    4. Select the correct Voucher Type (Sales, Purchase, Payment, Receipt, Contra, Journal).
    5. Apply GST Tax Rate at ledger or stock item level.

    50 Real-World GST Voucher Entries for TallyPrime

    #ScenarioVoucher TypeKey Ledgers / AccountsGST Impact
    1Local sale of goods @18% to registered dealerSalesCustomer, Sales-18%, CGST-9%, SGST-9%Output GST
    2Local purchase of raw material @5%PurchaseSupplier, Purchase-5%, CGST-2.5%, SGST-2.5%Input GST
    3Interstate sale @12% to Maharashtra dealerSalesDebtor-MH, Sales-12%, IGST-12%Output IGST
    4Interstate purchase @18% from GujaratPurchaseSupplier-GJ, Purchase-18%, IGST-18%Input IGST
    5Cash sales under GST composition (no ITC)SalesCash, Sales-CompositionNo GST credit
    6Sales return @18% (credit note)Credit NoteDebtor, Sales Return-18%, CGST-9%, SGST-9%Reverse Output
    7Purchase return @5% (debit note)Debit NoteSupplier, Purchase Return-5%, CGST-2.5%, SGST-2.5%Reverse Input
    8Freight paid on inward goods @5%Journal / PurchaseFreight Ledger, CGST-2.5%, SGST-2.5%Input GST
    9Advance receipt from customer ₹50,000 @18%ReceiptCustomer Advance, CGST-9%, SGST-9%Output GST on Advance
    10Advance payment to supplier ₹1,00,000 @5%PaymentSupplier Advance, CGST-2.5%, SGST-2.5%Input GST on Advance
    11Export sale under LUT (zero-rated)SalesDebtor-Export, Export Sales-0%No GST (Zero-rated)
    12Import of goods ₹5,00,000 @18%Journal / PurchasePurchase-Import, IGST-18% (Customs)Input IGST
    13Reverse charge on legal fees @18%JournalLegal Fees, CGST-9%, SGST-9%RCM Payable
    14Reverse charge on GTA services @5%JournalFreight-Inward (RCM), CGST-2.5%, SGST-2.5%RCM Payable
    15Rent paid for office @18%Journal / PaymentRent Ledger, CGST-9%, SGST-9%Input GST
    16Professional consultancy @18%JournalConsultancy Ledger, CGST-9%, SGST-9%Input GST
    17Telephone expense @18%JournalTelephone, CGST-9%, SGST-9%Input GST
    18Insurance premium @18%JournalInsurance, CGST-9%, SGST-9%Input GST
    19Stationery purchased locally @12%PurchaseSupplier, Stationery, CGST-6%, SGST-6%Input GST
    20Advertising expense @18%JournalAdvertisement, CGST-9%, SGST-9%Input GST
    21Vehicle maintenance @28%JournalVehicle Repairs, CGST-14%, SGST-14%Input GST
    22Bank charges (GST exempt)PaymentBank ChargesNo GST
    23Sale of exempt goodsSalesCustomer, Exempt SalesNo GST
    24Purchase of exempt goodsPurchaseSupplier, Exempt PurchaseNo GST
    25Discount allowed post-sale (credit note) @18%Credit NoteDebtor, Discount, CGST-9%, SGST-9%Reverse Output
    26Year-end GST input credit reversalJournalInput CGST/SGST, GST ReversalReduce Input
    27Round-off GST adjustmentJournalRound-Off, CGST/SGSTMinor Adjust
    28Branch transfer under GST (stock)Stock JournalBranch A, Branch B, CGST-9%, SGST-9%Output GST
    29Job-work charges received @18%SalesJob Work, CGST-9%, SGST-9%Output GST
    30Job-work charges paid @18%JournalJob Charges, CGST-9%, SGST-9%Input GST
    31AMC (Annual Maintenance Contract) invoice @18%SalesCustomer, AMC Income, CGST-9%, SGST-9%Output GST
    32AMC charges paid @18%JournalAMC Expense, CGST-9%, SGST-9%Input GST
    33Advance adjusted against invoiceReceipt / SalesCustomer Advance, CustomerGST Already Paid
    34ITC mismatch reversalJournalITC Ledger, GST ReversalReduce Input
    35E-way bill penalty (no GST)PaymentPenalty ChargesNo GST
    36Cash purchase under RCM from unregistered dealer @5%JournalPurchase-URD, CGST-2.5%, SGST-2.5%RCM Payable
    37Goods given as free sample @18%JournalPromotional Expense, CGST-9%, SGST-9%Output GST
    38Debit note to customer for price revision @18%Debit NoteDebtor, Sales Adj, CGST-9%, SGST-9%Output GST
    39Credit note from supplier for price revision @18%Credit NoteSupplier, Purchase Adj, CGST-9%, SGST-9%Input GST
    40GST on director remuneration (RCM) @18%JournalDirectors Fees, CGST-9%, SGST-9%RCM Payable
    41Purchase of capital goods @18%PurchaseSupplier, Capital Goods, CGST-9%, SGST-9%Input GST
    42Sale of fixed asset @18%SalesCustomer, Fixed Asset Disposal, CGST-9%, SGST-9%Output GST
    43Export of services (zero rated)SalesDebtor-Foreign, Export Services-0%No GST
    44Import of services (RCM) @18%JournalImport Services, CGST-9%, SGST-9%RCM Payable
    45Interest on delayed payment (no GST)JournalInterest IncomeNo GST
    46Bad debt write-off (already taxed)JournalBad Debt, DebtorNo GST Reversal
    47GST paid via challanPaymentElectronic Cash LedgerGST Payment
    48GST refund receivedReceiptBank, GST RefundGovt Receipt
    49Opening balance carry-forward of ITCJournalITC LedgerOpening Input
    50Closing stock valuation (no GST entry)Inventory / JournalClosing StockNo GST

    Quick Tips for Using the Table

    Tag parties with the correct GSTIN & state code.

    Voucher Path in TallyPrime: Gateway > Vouchers > Sales (F8) / Purchase (F9) / Journal (F7)

    Always press Alt+A for Tax Analysis before saving.


    Download Free Excel Practice Sheet

    Prepare like a professional! Our Excel sheet includes:

    • Columns for Date, Voucher Type, Ledger, Amount, CGST, SGST, IGST, Narration
    • 50 scenarios pre-filled for practice
    • Space for your own notes

    Download GST Voucher Excel Sheet (Free)


    Best Practices for Error-Free GST Entries

    • Match GST Rates: Ensure the stock item / ledger tax rate matches GST law.
    • Use Correct Voucher Type: Wrong voucher = wrong GST return.
    • Validate Party GSTIN: Avoid mismatch by storing correct GSTIN in ledger master.
    • Reconcile Monthly: Cross-verify with GSTR-2B and GSTR-1.

    Conclusion

    Practicing with real-life entries builds mastery far beyond theoretical knowledge. With TallyPrime and our Excel sheet, you’ll develop speed, accuracy, and compliance confidence. Download the file, start passing vouchers, and watch your GST accounting skills grow.


  • Tally Multi GST Rate Entry in Tally Prime – Step-by-Step Guide with Examples for Tally Interview

    In modern business accounting, it’s common for companies to deal with products or services taxed at different GST rates. For example, a company may sell two categories of products:

    • Category 1: 18% GST
    • Category 2: 12% GST

    If you are a Tally user or preparing for a Tally interview, knowing how to handle multiple GST rate entries is crucial. In this guide, we will explain step-by-step how to enter multiple GST rates in Tally Prime.


    What is Multi GST Rate Entry?

    Multi GST Rate Entry in Tally Prime refers to the ability to record transactions with different GST rates in a single invoice or voucher. This is useful when your company sells products or services under different GST slabs.

    Benefits of Multi GST Rate Entry

    • Reduces manual effort of creating multiple invoices
    • Ensures accurate GST calculation for all categories
    • Simplifies reporting for GST returns
    • Commonly tested in Tally interviews

    Scenario Example

    Suppose your company sells:

    Product CategoryGST RateSale Amount
    Electronics18%₹50,000
    Stationery12%₹20,000

    You want to record both sales in a single invoice.


    Step-by-Step Procedure in Tally Prime

    1. Enable GST in Tally Prime

    1. Go to Gateway of Tally → F11: Features → Statutory & Taxation
    2. Enable Goods and Services Tax (GST)
    3. Set GST details like state, GSTIN, and registration type

    2. Create GST Ledgers

    1. Navigate to Accounts Info → Ledgers → Create
    2. Create GST ledgers for each rate:
      • CGST 9% (for 18% GST)
      • SGST 9% (for 18% GST)
      • CGST 6% (for 12% GST)
      • SGST 6% (for 12% GST)

    Tip: Tally automatically calculates CGST and SGST based on GST rate selected.


    3. Create Stock Items

    1. Navigate to Inventory Info → Stock Items → Create
    2. Enter details for each product:
      • Name
      • Unit of Measure
      • GST rate (e.g., 18% for Electronics, 12% for Stationery)

    4. Record Sales Voucher with Multi GST Rates

    1. Go to Accounting Vouchers → F8: Sales
    2. Select Party Name (customer)
    3. Add stock items with respective GST rates
    4. Tally will calculate GST automatically for each category
    5. Verify tax amount for each GST rate

    Example Voucher Table

    ProductQuantityRateAmountGST RateCGSTSGSTTotal
    Electronics105,00050,00018%4,5004,50059,000
    Stationery10020020,00012%1,2001,20022,400
    Total70,0005,7005,70081,400

    5. Verify GST Report

    • Navigate to Display → Statutory Reports → GST → GST Liability
    • Check CGST and SGST separately for each GST rate
    • Ensure all entries are accurately reflected

    Key Points for Tally Interview

    • Always mention stock items assigned with correct GST rates
    • Explain CGST and SGST calculation
    • Demonstrate multi GST rate entry in a single invoice
    • Show how to verify using GST reports in Tally Prime

    Conclusion

    Handling multiple GST rates in Tally Prime is essential for accurate accounting in businesses dealing with diverse products or services. By mastering Multi GST Rate Entry, you can save time, ensure compliance, and impress in Tally interviews.

    💡 Pro Tip: Always double-check GST ledgers and stock items before recording the voucher to avoid errors in GST calculation.

    Tally Interview Questions & Answers – Multi GST Rate Entry

    Q1: What is Multi GST Rate Entry in Tally Prime?

    A1: Multi GST Rate Entry allows you to record transactions where different GST rates apply to different products or services in a single invoice. For example, electronics may have 18% GST, while stationery has 12% GST. Tally automatically calculates CGST and SGST for each category.


    Q2: How do you enable GST in Tally Prime?

    A2: To enable GST in Tally Prime:

    1. Go to Gateway of Tally → F11: Features → Statutory & Taxation
    2. Enable Goods and Services Tax (GST)
    3. Enter GST details such as state, GSTIN, and registration type
      This allows Tally to manage GST for all transactions.

    Q3: How do you record a sales transaction with multiple GST rates?

    A3: Steps to record multi-GST rate sales:

    1. Create stock items with respective GST rates.
    2. Create GST ledgers for CGST and SGST at different rates.
    3. Go to Accounting Vouchers → F8: Sales, select customer, and add products with their GST rates.
    4. Tally calculates GST automatically for each item.

    Q4: How can you verify that GST is calculated correctly for multiple rates?

    A4: You can verify GST calculations in Tally Prime by:

    1. Navigating to Display → Statutory Reports → GST → GST Liability
    2. Checking CGST and SGST totals for each GST rate
    3. Drilling down into vouchers to ensure correct GST amounts for each product category

    Q5: Why is knowledge of Multi GST Rate Entry important for Tally interviews?

    A5: Multi GST Rate Entry is commonly tested in Tally interviews because it shows:

    • Understanding of GST concepts
    • Ability to record complex invoices
    • Accuracy in financial reporting
    • Practical knowledge of Tally Prime accounting features

  • Outstanding Report in Tally Prime | Complete Guide with Credit Sales Entries

    Tally Prime is one of the most popular accounting software used by businesses of all sizes. One of its most important features is the Outstanding Report, which helps users track credit transactions efficiently. Whether you are a Tally user, an accountant, or preparing for a Tally interview, understanding this report is crucial.


    What is an Outstanding Report in Tally Prime?

    The Outstanding Report in Tally Prime shows all pending credit transactions with customers (receivables) and suppliers (payables). It helps in monitoring who owes you money and whom you owe, along with due dates and balances.

    Key Features:

    • Tracks pending receivables (debtors)
    • Tracks pending payables (creditors)
    • Shows credit sales and purchase entries
    • Displays due dates and aging of outstanding amounts

    Importance of Outstanding Report

    PurposeExplanation
    Monitor Credit SalesTrack which customers have pending payments and how much they owe.
    Track PaymentsMonitor pending payments to suppliers to avoid late fees.
    Financial PlanningHelps in forecasting cash inflow and outflow for business planning.
    Interview PreparationCommonly asked in Tally interviews to test your knowledge of accounting features.

    Credit Sales Entries in Tally Prime

    Credit sales are sales made on credit, where payment is received at a later date. Recording credit sales in Tally Prime ensures that:

    • The transaction is reflected in the Outstanding Report automatically.
    • You can track amount due from each customer.
    • It helps in maintaining proper accounts receivable management.

    Example of Credit Sales Entry

    DateParty NameInvoice NoAmountStatus
    01-Sep-2025ABC TradersINV001₹50,000Pending
    05-Sep-2025XYZ EnterprisesINV002₹30,000Pending
    10-Sep-2025PQR IndustriesINV003₹25,000Paid

    This table shows how each credit sale is recorded and tracked in the Outstanding Report.


    How to Generate Outstanding Report in Tally Prime

    Follow these steps to view the report:

    1. Open Tally Prime.
    2. Navigate to Display → Statements of Accounts → Outstandings.
    3. Choose the type of outstanding:
      • Receivables (Money to receive from customers)
      • Payables (Money to pay to suppliers)
    4. View the list of parties with pending balances and due dates.
    5. Drill down into individual ledgers to see detailed transactions.

    Additional Tips:

    • Filter report by age of outstanding (0–30 days, 31–60 days, etc.)
    • Export report in Excel or PDF for easy sharing or record-keeping
    • Regularly check to avoid overdue payments

    Benefits of Using Outstanding Report

    BenefitExplanation
    Easy TrackingKeep track of credit sales and purchases effortlessly.
    Reduces ErrorsMinimizes manual calculation mistakes.
    Better Cash Flow ManagementHelps plan finances and avoid liquidity issues.
    Professional AccountingMaintains a structured and professional accounting system.

    Conclusion

    The Outstanding Report in Tally Prime is a must-know feature for anyone handling accounts. It not only simplifies tracking credit transactions but also helps in financial planning and interview preparation. Mastering this report ensures that you stay on top of your receivables and payables, improving efficiency in accounting operations.

    💡 Pro Tip: Always update credit sales and purchase entries regularly to maintain an accurate Outstanding Report.


  • 100 Essential Ledger Accounts for a Logistics Company with Tally Prime Groups & Setup Guide

    ✅ What Are Ledgers?

    Ledgers in accounting are books or digital records where all financial transactions related to a particular account (e.g., fuel expense, customer, vendor) are recorded.


    🧾 100 Ledger Names for a Logistics Company (Categorized)

    🔹 Assets (Group: Assets)

    Ledger NameGroup
    1. Cash in Hand | Cash-in-Hand
    2. Cash at Bank – ICICI | Bank Accounts
    3. Cash at Bank – HDFC | Bank Accounts
    4. Accounts Receivable – ABC Pvt Ltd | Sundry Debtors
    5. Accounts Receivable – XYZ Logistics | Sundry Debtors
    6. Fixed Assets – Office Equipment | Fixed Assets
    7. Fixed Assets – Vehicles | Fixed Assets
    8. Fixed Assets – Computers | Fixed Assets
    9. Fuel Inventory | Stock-in-Hand
    10. Tyres Inventory | Stock-in-Hand
    11. Prepaid Insurance | Current Assets
    12. Prepaid Maintenance | Current Assets
    13. Input GST | Duties & Taxes
    14. TDS Receivable | Current Assets
    15. Advances to Staff | Loans & Advances (Asset)

    🔹 Liabilities (Group: Liabilities)

    Ledger NameGroup
    1. Accounts Payable – DEF Transporters | Sundry Creditors
    2. Accounts Payable – LMN Fuel Suppliers | Sundry Creditors
    3. TDS Payable | Duties & Taxes
    4. GST Payable | Duties & Taxes
    5. Loan – HDFC | Secured Loans
    6. Loan – ICICI | Secured Loans
    7. Provident Fund Payable | Current Liabilities
    8. ESI Payable | Current Liabilities
    9. Salary Payable | Current Liabilities
    10. Bonus Payable | Current Liabilities

    🔹 Income (Group: Indirect Incomes)

    Ledger NameGroup
    1. Freight Income – Domestic | Sales Accounts
    2. Freight Income – International | Sales Accounts
    3. Loading Charges Income | Indirect Incomes
    4. Warehousing Income | Indirect Incomes
    5. Handling Charges Income | Indirect Incomes
    6. Demurrage Income | Indirect Incomes
    7. Detention Charges Received | Indirect Incomes
    8. Packaging Income | Indirect Incomes
    9. Customs Clearance Income | Indirect Incomes
    10. Other Miscellaneous Income | Indirect Incomes

    🔹 Expenses (Group: Indirect Expenses)

    Ledger NameGroup
    1. Fuel Expense | Indirect Expenses
    2. Vehicle Maintenance | Indirect Expenses
    3. Toll Charges | Indirect Expenses
    4. Insurance – Vehicle | Indirect Expenses
    5. Insurance – Office | Indirect Expenses
    6. Driver Salary | Indirect Expenses
    7. Cleaner Salary | Indirect Expenses
    8. Staff Salary | Indirect Expenses
    9. Bonus Expense | Indirect Expenses
    10. Conveyance | Indirect Expenses
    11. Office Rent | Indirect Expenses
    12. Godown Rent | Indirect Expenses
    13. Electricity Charges | Indirect Expenses
    14. Water Charges | Indirect Expenses
    15. Telephone Expenses | Indirect Expenses
    16. Mobile Expenses | Indirect Expenses
    17. Internet Expenses | Indirect Expenses
    18. Postage & Courier | Indirect Expenses
    19. Printing & Stationery | Indirect Expenses
    20. Legal & Professional Fees | Indirect Expenses
    21. Audit Fees | Indirect Expenses
    22. Bank Charges | Indirect Expenses
    23. Loading & Unloading Expense | Indirect Expenses
    24. Packaging Expense | Indirect Expenses
    25. Demurrage Charges Paid | Indirect Expenses
    26. Detention Charges Paid | Indirect Expenses
    27. Security Charges | Indirect Expenses
    28. Repairs – Building | Indirect Expenses
    29. Repairs – Equipment | Indirect Expenses
    30. Repairs – Vehicles | Indirect Expenses
    31. Training Expenses | Indirect Expenses
    32. Marketing & Advertisement | Indirect Expenses
    33. Business Promotion | Indirect Expenses
    34. Licenses & Permits | Indirect Expenses
    35. IT Support Charges | Indirect Expenses
    36. Software Subscription | Indirect Expenses
    37. ERP Charges | Indirect Expenses
    38. Interest on Loan – HDFC | Indirect Expenses
    39. Interest on Loan – ICICI | Indirect Expenses
    40. Penalty Charges | Indirect Expenses
    41. Miscellaneous Expenses | Indirect Expenses

    🔹 Customers (Group: Sundry Debtors)

    Ledger NameGroup
    1. ABC Pvt Ltd | Sundry Debtors
    2. XYZ Logistics | Sundry Debtors
    3. JKL Exporters | Sundry Debtors
    4. MNO Traders | Sundry Debtors
    5. PQR Enterprises | Sundry Debtors
    6. STU Distributors | Sundry Debtors
    7. VWX Manufacturers | Sundry Debtors
    8. BCD Retailers | Sundry Debtors
    9. HIJ Warehousing | Sundry Debtors
    10. LMN Shipping | Sundry Debtors

    🔹 Vendors (Group: Sundry Creditors)

    Ledger NameGroup
    1. Diesel Supplier – Reliance | Sundry Creditors
    2. Diesel Supplier – HP | Sundry Creditors
    3. Spare Parts Supplier – ABC Auto | Sundry Creditors
    4. Tyre Supplier – MRF | Sundry Creditors
    5. Insurance – ICICI Lombard | Sundry Creditors
    6. Mechanic – Local Garage | Sundry Creditors
    7. Transport Union Fees | Sundry Creditors
    8. Toll Vendor – FASTag | Sundry Creditors
    9. Loading Labor Contractor | Sundry Creditors
    10. Internet Provider – Airtel | Sundry Creditors
    11. Security Contractor | Sundry Creditors
    12. Advertising Agency | Sundry Creditors
    13. Accounting Consultant | Sundry Creditors
    14. Legal Advisor | Sundry Creditors

    📌 How to Create a Ledger in Tally Prime

    Steps:

    1. Gateway of Tally → Create → Ledger
    2. Enter:
      • Name of the ledger (e.g., “Fuel Expense”)
      • Group (e.g., “Indirect Expenses”)
      • Enable GST/TDS/Bank details if required
    3. If there’s any opening balance, enter it (positive for assets, negative for liabilities)
    4. Press Ctrl + A to save

    💼 When to Enter Opening Balances?

    • For Sundry Debtors/Creditors → Opening balance is the amount pending to be received/paid at the start of books.
    • For Cash/Bank → Enter the actual balance on the start date.
    • For Loans or Liabilities → Enter the outstanding amount as a negative balance.
    • For Assets like vehicles → Enter the book value at the time of starting Tally.

    ✅ Maintaining ledgers with proper groups ensures accurate reporting, correct GST calculations, and easy audit trail.


  • 100 Ledger Examples in Tally with Correct Groups – Complete Guide for Beginners

    Here is a list of 100 practical ledger examples commonly used in Tally (ERP 9 / Prime), along with the correct group classification under which each ledger should be created. This is extremely useful for learners, accountants, and professionals managing accounts setup in Tally.


    📘 Ledger Creation Examples in Tally with Group Classification

    S.NoLedger NameGroup in Tally
    1CashCash-in-Hand
    2Axis BankBank Accounts
    3SBI Current AccountBank Accounts
    4Petty CashCash-in-Hand
    5Ram Traders (Debtor)Sundry Debtors
    6Shyam Suppliers (Creditor)Sundry Creditors
    7Sales – DomesticSales Account
    8Sales – ExportSales Account
    9Purchase – Raw MaterialPurchase Account
    10Purchase – Capital GoodsPurchase Account
    11Rent ReceivedIndirect Incomes
    12Rent PaidIndirect Expenses
    13Electricity ChargesIndirect Expenses
    14Salary ExpensesIndirect Expenses
    15Telephone ExpensesIndirect Expenses
    16Commission IncomeIndirect Incomes
    17Commission PaidIndirect Expenses
    18GST PayableDuties & Taxes
    19GST Input CGSTDuties & Taxes
    20GST Input SGSTDuties & Taxes
    21GST Input IGSTDuties & Taxes
    22GST Output CGSTDuties & Taxes
    23GST Output SGSTDuties & Taxes
    24GST Output IGSTDuties & Taxes
    25Provident Fund PayableCurrent Liabilities
    26TDS PayableDuties & Taxes
    27TDS ReceivableLoans & Advances (Assets)
    28Provident Fund Employer ContributionIndirect Expenses
    29Travelling ExpensesIndirect Expenses
    30Legal FeesIndirect Expenses
    31Professional ChargesIndirect Expenses
    32Audit FeesIndirect Expenses
    33Printing & StationeryIndirect Expenses
    34Advertising ExpensesIndirect Expenses
    35Marketing ExpensesIndirect Expenses
    36Interest on LoanIndirect Expenses
    37Interest ReceivedIndirect Incomes
    38DepreciationIndirect Expenses
    39Loan from DirectorSecured Loans
    40Loan from HDFC BankSecured Loans
    41Unsecured Loan from FriendUnsecured Loans
    42Fixed DepositBank Accounts / Investments
    43Share CapitalCapital Account
    44DrawingsCapital Account
    45Investments in SharesInvestments
    46Advance to SupplierLoans & Advances (Assets)
    47Advance from CustomerCurrent Liabilities
    48Outstanding RentCurrent Liabilities
    49Prepaid InsuranceCurrent Assets
    50Insurance PremiumIndirect Expenses

    ✅ Continued — More Ledger Examples

    S.NoLedger NameGroup in Tally
    51Accrued InterestCurrent Assets
    52Sundry IncomeIndirect Incomes
    53Repair & MaintenanceIndirect Expenses
    54AMC ChargesIndirect Expenses
    55Car Fuel ExpensesIndirect Expenses
    56Vehicle MaintenanceIndirect Expenses
    57Office EquipmentFixed Assets
    58Furniture & FixturesFixed Assets
    59ComputersFixed Assets
    60Land & BuildingFixed Assets
    61MachineryFixed Assets
    62ITC ReversalDuties & Taxes
    63RCM PayableDuties & Taxes
    64Freight InwardDirect Expenses
    65Freight OutwardIndirect Expenses
    66Customs DutyDirect Expenses / Duties & Taxes
    67Packing MaterialDirect Expenses
    68Production WagesDirect Expenses
    69Administrative ExpensesIndirect Expenses
    70DonationIndirect Expenses
    71PenaltyIndirect Expenses
    72Bank ChargesIndirect Expenses
    73Bank Interest PaidIndirect Expenses
    74Bad DebtsIndirect Expenses
    75Provision for Bad DebtsProvisions
    76Director’s RemunerationIndirect Expenses
    77Security Deposit PaidLoans & Advances (Assets)
    78Security Deposit ReceivedCurrent Liabilities
    79Office Rent DepositLoans & Advances (Assets)
    80Telephone Bill PayableCurrent Liabilities
    81Office AdvanceLoans & Advances (Assets)
    82ESI PayableCurrent Liabilities
    83Income Tax PayableDuties & Taxes
    84Income Tax AdvanceLoans & Advances (Assets)
    85Dividend PayableCurrent Liabilities
    86Dividend ReceivedIndirect Incomes
    87Partner’s Capital A/cCapital Account
    88Partner’s Drawings A/cCapital Account
    89Partner’s Current A/cCapital Account
    90Salary PayableCurrent Liabilities
    91Outstanding ExpensesCurrent Liabilities
    92Accrued IncomeCurrent Assets
    93Advance TaxLoans & Advances (Assets)
    94Bonus PaidIndirect Expenses
    95GratuityIndirect Expenses
    96House Rent Allowance (HRA)Indirect Expenses
    97Medical ReimbursementIndirect Expenses
    98Loan to EmployeeLoans & Advances (Assets)
    99Vehicle Loan PayableSecured Loans
    100Temporary ImprestLoans & Advances (Assets)

    ✅ Notes:

    • Always ensure to enable GST in Tally for auto-ledger creation of Input/Output tax ledgers.
    • Classify advance ledgers correctly depending on whether they are receivable (Assets) or payable (Liabilities).
    • For accurate reporting, avoid using Miscellaneous Expenses unless absolutely required.

    Download 100 Examples of Ledger in Excel and XML

    📥 How to Import This into Tally Prime / ERP 9:

    ✅ Option 1: Manual Copy-Paste into Tally via Excel

    1. Open the Excel file.
    2. Manually create ledgers in Tally using this list as a reference.
    3. Use “Multiple Ledgers” creation to save time.

    ✅ Option 2: Import via XML (Advanced Users)

    1. Open Tally (ERP 9 or Prime)
    2. From Gateway of Tally, press Alt + O (Import)
    3. Choose Masters
    4. In “Import File Name”, enter the path to the downloaded XML file
      • Example: C:\Users\YourName\Downloads\Tally_100_Ledger_Import.xml
    5. Press Enter to start import

    ✔️ All 100 ledgers will be created in your selected company.


    🧾 How to Create Ledger in Tally (ERP 9 & Prime)

    ✅ Step 1: Open Tally

    • Open Tally ERP 9 or Tally Prime
    • Select or create your Company where ledgers need to be added

    ✅ Step 2: Gateway of Tally > Accounts Info > Ledgers

    For Tally ERP 9:

    1. Gateway of Tally → Accounts Info
    2. Select Ledgers
    3. Choose Create (under Single Ledger for one-by-one creation)

    For Tally Prime:

    1. Press Alt + G and search Create Ledger
    2. Or go to Gateway of Tally → Create → Ledger

    ✅ Step 3: Fill Ledger Details

    You’ll now see the Ledger Creation Screen. Fill the following fields:

    FieldWhat to Fill
    NameName of the ledger (e.g., “Axis Bank”)
    Alias(Optional) Short name or reference
    UnderSelect the Group (e.g., “Bank Accounts”)
    Inventory ValuesSelect Yes if applicable (for stock ledgers only)
    GST ApplicableYes / No based on ledger use (for taxable ledgers)
    Opening BalanceIf applicable, enter amount with Dr/Cr selection

    Use arrow keys to move between fields and press Enter to confirm.


    🔁 Step 4: Repeat for Each Ledger

    • Repeat the same steps for all the 100 ledgers.
    • For batch creation, use “Multiple Ledgers” option:
      • In ERP 9: Gateway of Tally → Accounts Info → Ledgers → Multiple Ledgers → Create
      • In Prime: Go to Create → Ledgers (Multiple) or search from Go To (Alt + G)

    💡 Example: Creating a Ledger for “Axis Bank”

    FieldEntry
    NameAxis Bank
    UnderBank Accounts
    Opening Balance₹50,000 Dr (if available)
    GST ApplicableNo

    Press Enter until Tally saves the entry.


    🛠️ Tips for Accurate Ledger Entry

    • Cash Ledger: Only one is allowed per company. Default is “Cash”.
    • Sundry Debtors/Creditors: Used for customer and vendor ledgers.
    • GST Ledgers: Enable GST and set proper tax rates under “Statutory Details”.
    • Fixed Assets: Use for machines, furniture, etc., to calculate depreciation.
    • Direct vs Indirect Expenses:
      • Direct = used in production (e.g., Freight Inward)
      • Indirect = post-production/admin expenses (e.g., Salary, Rent)

    📌 Shortcut Keys You’ll Use

    FunctionKey
    Create LedgerAlt + C
    Multiple LedgersAlt + H
    Save EntryCtrl + A
    Search (Tally Prime)Alt + G
    Company SelectionAlt + F3

  • Last-Minute Tally Interview Booster 🚀✅ Questions + Answers Inside

    Last-Minute Tally Interview Booster 🚀✅ Questions + Answers Inside

    Here’s a Last-Minute Tally Interview Preparation Guide tailored for quick revision, including key topics, interview questions, and a cheat sheet. Ideal for accounting, finance, or data entry roles using TallyPrime or Tally ERP 9.


    ✅ Key Topics to Revise

    1. Basics of Tally
      • What is Tally, versions (Tally ERP 9 vs TallyPrime)
      • Company creation, features, security
    2. Ledger & Groups
      • Default groups
      • Creating ledgers for Assets, Liabilities, Income, Expenses
      • Differences between Single and Multiple ledger creation
    3. Voucher Entry
      • Types: Payment, Receipt, Contra, Journal, Sales, Purchase
      • Shortcut keys (F4 – Contra, F5 – Payment…)
    4. Inventory Management
      • Stock Groups, Stock Items, Units of Measurement
      • Godowns and Batches
    5. GST in Tally
      • Enabling GST, setting GST rates
      • Invoicing with GST
      • GSTR reports in Tally
    6. Bank Reconciliation
      • Steps to reconcile bank statement with Tally records
    7. Payroll
      • Enabling Payroll
      • Employee creation, Payslip generation
    8. TDS / TCS / VAT (if applicable)
    9. Reports
      • Trial Balance, P&L, Balance Sheet
      • Day Book, Ledger, Stock Summary
    10. Data Backup & Restore

    💬 Common Interview Questions

    1. What is Tally and what are its features?
    2. How do you create a ledger and assign it to a group?
    3. Explain different types of vouchers and their uses.
    4. How is GST handled in Tally?
    5. How do you record a purchase and sale entry with GST?
    6. What is the use of a Contra voucher?
    7. How do you back up data in Tally?
    8. What is the difference between a ledger and a group?
    9. How do you view the Profit & Loss Report?
    10. What is the shortcut key for Day Book?

    📝 Cheat Sheet (Printable Highlights)

    ShortcutAction
    Alt+F1Detailed Report
    F11Features
    F12Configuration
    F4-F9Voucher types
    Ctrl+CCopy
    Ctrl+VPaste
    Alt+DDelete entry
    SectionExample
    LedgerPurchase A/c → Purchase Group
    VoucherSale of goods → Sales Voucher (F8)
    GST SetupEnable GST → Configure GST for ledgers/items
    Stock ItemAdd: Mobile, Qty: 10, Rate: ₹15,000

    📌 Tips for the Interview

    • Be ready to open Tally and demonstrate entries if asked.
    • Keep GST invoice formats in mind.
    • If you have done any course/project, be prepared to explain what you did.
    • Practice 3-5 key entries before the interview (e.g., Sale, Purchase, GST).

    Top Tally Interview Questions & Answers

    1. What is Tally and what are its main features?

    Answer:
    Tally is an accounting software used for recording financial transactions. Its features include ledger management, voucher entry, inventory tracking, GST compliance, payroll processing, and financial reporting. The latest version is TallyPrime.


    2. How do you create a ledger and assign it to a group?

    Answer:
    Go to Gateway of Tally → Accounts Info → Ledgers → Create.
    Enter the ledger name (e.g., “Rent Expense”) and assign it to a group (e.g., “Indirect Expenses”).


    3. Explain different types of vouchers and their uses.

    Answer:

    • Payment (F5): To record outgoing payments
    • Receipt (F6): For incoming funds
    • Contra (F4): Bank-to-bank or cash-to-bank transactions
    • Journal (F7): For adjustments and non-cash entries
    • Sales (F8): For recording sales
    • Purchase (F9): For recording purchases

    4. How is GST handled in Tally?

    Answer:
    Enable GST from F11 → Statutory & Taxation.
    Set GST rates in ledgers and stock items.
    While recording sales/purchase, select proper GST ledgers. Tally auto-calculates IGST, CGST, or SGST based on the party location.


    5. How do you record a purchase and sale entry with GST?

    Answer:
    Purchase:

    1. Use Purchase Voucher (F9)
    2. Select supplier ledger
    3. Add stock item(s), quantity, rate
    4. GST ledgers (Input CGST, SGST or IGST)

    Sales:

    1. Use Sales Voucher (F8)
    2. Select customer ledger
    3. Enter items
    4. Add GST ledgers (Output CGST, SGST or IGST)

    6. What is the use of a Contra voucher?

    Answer:
    A Contra voucher records internal fund transfers like:

    • Cash deposited to bank
    • Withdrawal from bank
    • Bank-to-bank transfers

    Shortcut: F4


    7. How do you back up and restore data in Tally?

    Answer:

    • Backup: Go to Gateway of Tally → Alt+Y (Data) → Backup → select source and destination
    • Restore: Use Restore option from the same Data menu and select the backup folder

    8. What is the difference between a ledger and a group?

    Answer:
    A ledger is an account used to record transactions (e.g., Cash, Sales).
    A group is a category used to classify ledgers (e.g., Current Assets, Sales Accounts).


    9. How do you view the Profit & Loss report in Tally?

    Answer:
    Gateway of Tally → Profit & Loss A/c
    Shortcut: Alt+F1 for detailed view


    10. What is the shortcut key for Day Book and what is it used for?

    Answer:
    Shortcut: D → O → Day Book or press Ctrl+F12
    Used to view all transactions (voucher-wise) on a selected date.


    INSTALL THE NO 1 FREE TRAINING APP

    Recommended products

  • Step-by-Step Guide to Ledger Creation in Tally

    Step-by-Step Guide to Ledger Creation in Tally

    Creating a ledger in Tally is a fundamental part of accounting, as all financial transactions are recorded through ledgers. In TallyPrime, ledgers are created under Groups (like Capital Account, Sales, Purchase, Cash-in-Hand, etc.).


    🎯 What is a Ledger in Tally?

    A Ledger in Tally is a record of all transactions related to a specific account, such as a bank account, customer, supplier, or expense type.

    Every transaction in Tally must be linked to at least two ledgers.


    🛠️ Steps to Create a Ledger in TallyPrime

    🔹 Method 1: Single Ledger Creation

    1. Gateway of Tally → Create → Accounts Info → Ledgers → Create (Single Ledger)
    2. Fill in the following fields:
      • Name: Name of the ledger (e.g., Cash, State Bank of India, Rent A/c).
      • Alias (Optional): Short name for easier reference.
      • Under: Select the appropriate group (e.g., Cash under Cash-in-Hand, SBI under Bank Accounts, Rent under Indirect Expenses).
      • Inventory values are affected?: Choose Yes only if you’re creating stock-related accounts.
      • Opening Balance: If any, enter it with the correct sign (Dr/Cr).
    3. Press Ctrl + A to save.

    🔹 Method 2: Multiple Ledgers Creation

    1. Gateway of Tally → Create → Accounts Info → Ledgers → Create (Multiple Ledgers)
    2. Select group as “All Items” or a specific group (e.g., Sundry Debtors).
    3. Enter ledger names, group, and opening balances for each.
    4. Press Ctrl + A to save.

    📋 Common Ledger Examples with Groups

    Ledger NameGroupOpening BalanceNature
    CashCash-in-Hand₹10,000 DrAsset
    State Bank of IndiaBank Accounts₹25,000 DrAsset
    Purchase A/cPurchase Accounts₹0Expense
    Sales A/cSales Accounts₹0Income
    Rent Paid A/cIndirect Expenses₹0Expense
    Electricity ChargesIndirect Expenses₹0Expense
    Capital A/cCapital Account₹1,00,000 CrLiability
    Raj TradersSundry Creditors₹15,000 CrLiability
    Om EnterprisesSundry Debtors₹8,000 DrAsset

    🧾 Explanation of Some Ledgers

    1. Cash Ledger

    • Group: Cash-in-Hand
    • Used to record all cash transactions.
    • Only one cash ledger can be created in Tally.

    2. Bank Ledger (e.g., State Bank of India)

    • Group: Bank Accounts
    • Used for bank-related transactions like deposits, withdrawals, cheques, etc.

    3. Customer Ledger (e.g., Om Enterprises)

    • Group: Sundry Debtors
    • Used when you sell goods/services on credit.

    4. Supplier Ledger (e.g., Raj Traders)

    • Group: Sundry Creditors
    • Used for purchases made on credit.

    5. Indirect Expenses (e.g., Rent, Electricity)

    • Group: Indirect Expenses
    • Used to record operational expenses not directly linked to production.

    6. Sales & Purchase Ledger

    • Group: Sales Accounts / Purchase Accounts
    • Required to record daily sales and purchases.

    ✅ Important Notes

    • Avoid duplicating ledger names.
    • Ensure the “Group” selected is correct—Tally uses this for reporting.
    • You can alter, display or delete a ledger anytime through:
      • Gateway of Tally → Alter / Display / Delete → Ledgers

    📌 Practical Example Scenario

    Let’s say you’re starting a business with ₹1,00,000 capital and opening a bank account with ₹25,000 and keeping ₹10,000 as cash.

    You purchase goods worth ₹15,000 on credit from Raj Traders and sell items worth ₹8,000 to Om Enterprises on credit.

    You pay ₹2,000 for Rent and ₹1,000 for Electricity.

    Here’s how you’d create ledgers:

    1. Capital A/c (Under Capital Account, Cr ₹1,00,000)
    2. Cash (Under Cash-in-Hand, Dr ₹10,000)
    3. State Bank of India (Under Bank Accounts, Dr ₹25,000)
    4. Raj Traders (Under Sundry Creditors, Cr ₹15,000)
    5. Om Enterprises (Under Sundry Debtors, Dr ₹8,000)
    6. Purchase A/c (Under Purchase Accounts)
    7. Sales A/c (Under Sales Accounts)
    8. Rent Paid (Under Indirect Expenses)
    9. Electricity Charges (Under Indirect Expenses)

    🧠 Pro Tips

    • Use Alt + G → Chart of Accounts to see all created ledgers.
    • Regularly back up your company data after creating or modifying ledgers.
    • Use Gateway of Tally → Display → Account Books → Ledger to view ledger reports.

    Here are 10 interview questions on the topic of Ledger Creation in Tally, suitable for beginner to intermediate levels:


    ✅ Interview Questionnaire: Ledger Creation in Tally

    1. What is a ledger in Tally? Why is it important in accounting?

    Expected Answer: A ledger is an account used to record all financial transactions related to a specific item or party. Every transaction in Tally is recorded using ledgers, making them essential for maintaining accurate accounts.


    2. How do you create a single ledger in TallyPrime?

    Expected Answer:
    Path: Gateway of Tally → Accounts Info → Ledgers → Create (Single Ledger)
    Fill in fields like Name, Under Group, Opening Balance, etc., then press Ctrl + A to save.


    3. What is the difference between Single Ledger and Multiple Ledger creation in Tally?

    Expected Answer:
    Single Ledger allows creation of one ledger at a time with detailed input.
    Multiple Ledger allows creation of several ledgers on one screen quickly under the same or different groups.


    4. Which group will you select while creating the following ledgers?

    a) Cash
    b) State Bank of India
    c) Rent Paid
    d) Raj Traders
    e) Om Enterprises

    Expected Answer:
    a) Cash-in-Hand
    b) Bank Accounts
    c) Indirect Expenses
    d) Sundry Creditors
    e) Sundry Debtors


    5. Can you create more than one cash ledger in Tally? Why or why not?

    Expected Answer: No, Tally allows only one cash ledger under the “Cash-in-Hand” group because cash must be tracked centrally for compliance and reporting.


    6. What happens if you select the wrong group while creating a ledger?

    Expected Answer: Reports and financial statements will be inaccurate. For example, if Rent Paid is placed under Assets instead of Expenses, it will distort profit & loss calculations.


    7. What is the significance of ‘Opening Balance’ in ledger creation? How do you decide if it’s debit or credit?

    Expected Answer: Opening Balance shows the existing amount in the account.
    Assets and Expenses usually have Debit (Dr) balances, while Liabilities and Incomes have Credit (Cr) balances.


    8. How do you display or alter an existing ledger in Tally?

    Expected Answer:
    Path: Gateway of Tally → Accounts Info → Ledgers → Alter / Display
    Select the ledger from the list to modify or view.


    9. Name five common groups used while creating ledgers in Tally.

    Expected Answer:

    1. Capital Account
    2. Bank Accounts
    3. Cash-in-Hand
    4. Sundry Debtors
    5. Indirect Expenses

    10. What are the consequences of duplicating ledger names in Tally?

    Expected Answer: Tally does not allow exact duplicates, but similar names may cause confusion and errors in data entry, misreporting, and incorrect voucher classification.


    Watch Video on Create Ledger in Tally ERP 9


    Install the No 1 Free Training App

    On sale products

  • Applying VAT on Fixed Assets in Tally.ERP 9 – Step-by-Step Tutorial with Examples

    In Tally.ERP 9, applying VAT (Value Added Tax) on fixed assets involves a few steps. Here’s a comprehensive guide on how to apply VAT on fixed assets in Tally.ERP 9:

    Step 1: Creating Fixed Assets Ledger:

    1. Go to Gateway of Tally > Accounts Info > Ledger > Create.
    2. Create a ledger named “Fixed Assets” under the group “Fixed Assets”.

    Step 2: Enabling VAT in Tally.ERP 9:

    1. Go to Gateway of Tally > F11: Features > F3: Statutory & Taxation.
    2. Enable VAT by selecting “Yes” in the option “Enable Value Added Tax (VAT)?”

    Step 3: Creating VAT Ledger:

    1. Go to Gateway of Tally > Accounts Info > Ledger > Create.
    2. Create a ledger named “VAT @ X%” (replace X with your applicable VAT rate) under the group “Duties & Taxes”.

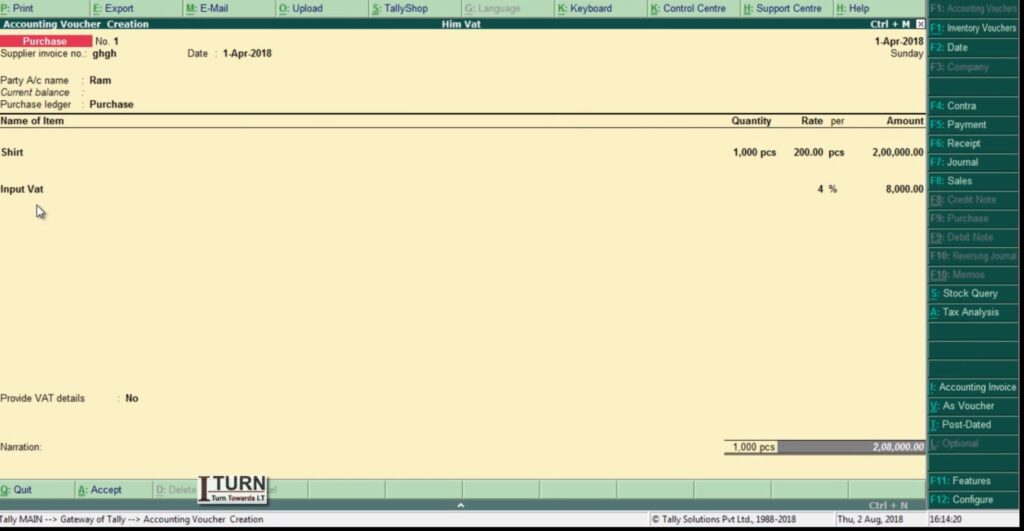
    Step 4: Recording Purchase of Fixed Asset with VAT:

    1. Go to Gateway of Tally > Accounting Vouchers > F9: Purchase.
    2. Enter the date of purchase, supplier invoice number, and other details.
    3. Debit the “Fixed Assets” ledger with the total amount (excluding VAT).
    4. Debit the “VAT @ X%” ledger with the VAT amount.
    5. Credit the supplier’s ledger with the total amount (including VAT).

    Step 5: Calculating Input VAT Credit:

    1. Go to Gateway of Tally > Display > Statutory Reports > VAT > VAT Computation.
    2. Check the Input VAT credit available against the VAT ledger.

    Step 6: Adjusting Input VAT Credit:

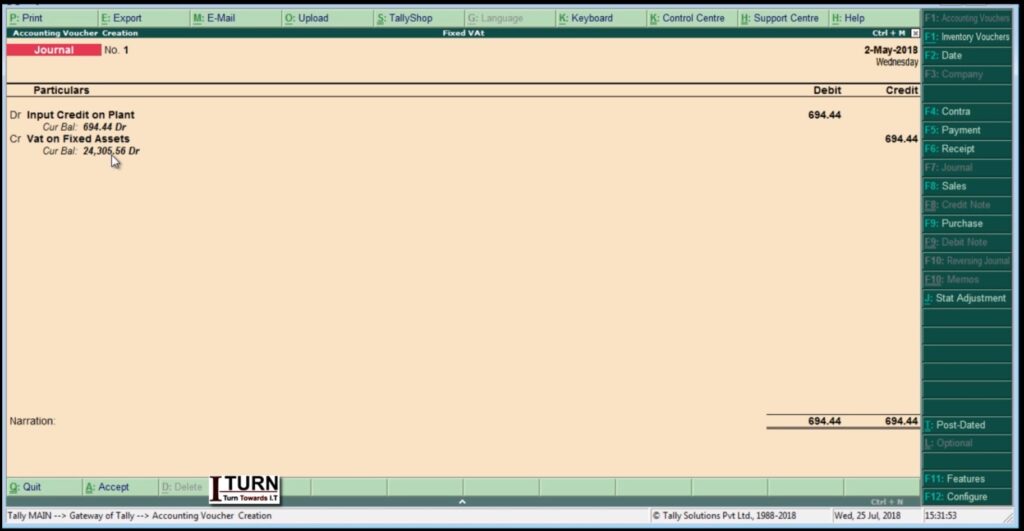
    1. Go to Gateway of Tally > Accounting Vouchers > F7: Journal.
    2. Debit the Input VAT ledger and credit the VAT Payable ledger to adjust the input VAT credit against the VAT liability.

    Step 7: Calculating Depreciation:

    1. Go to Gateway of Tally > Accounts Info > Ledger > Create.
    2. Create a ledger named “Depreciation” under the group “Indirect Expenses”.
    3. Record depreciation entries as per the applicable rates and methods.

    Step 8: Recording Sale of Fixed Asset:

    1. Go to Gateway of Tally > Accounting Vouchers > F8: Sales.
    2. Enter the date of sale, buyer details, and other necessary information.
    3. Debit the buyer’s ledger with the sales amount (excluding VAT).
    4. Credit the “Fixed Assets” ledger with the original purchase cost.
    5. Credit the “VAT @ X%” ledger with the VAT amount charged on the sale.

    Step 9: Paying VAT Liability:

    1. Go to Gateway of Tally > Display > Statutory Reports > VAT > VAT Challan Reconciliation.
    2. Check the VAT payable amount.
    3. Go to Gateway of Tally > Accounting Vouchers > F5: Payment.
    4. Debit the VAT Payable ledger and credit the bank ledger for paying the VAT liability.

    Step 10: Updating VAT Returns:

    1. Go to Gateway of Tally > Display > Statutory Reports > VAT > VAT Returns.
    2. Generate VAT returns and file them as per legal requirements.

    Throughout these steps, ensure compliance with VAT regulations and consult with a tax advisor if needed.


    Professional Courses

  • Recording VAT Entries in Tally.ERP 9 with Detailed Steps and Examples

    VAT entry in Tally.ERP 9 is essential for businesses to accurately record Value Added Tax transactions. Below, I will guide you through the process step-by-step, including examples and explanations:

    Step 1: Create VAT Ledgers

    1. Access Ledger Creation: Open Tally.ERP 9 and navigate to Gateway of Tally > Accounts Info > Ledgers > Create.
    2. Create VAT Ledger: Create a ledger named ‘VAT Input’ and ‘VAT Output’ under the group ‘Duties & Taxes’.

    Step 2: Enable VAT in Tally

    1. Activate VAT: Go to Gateway of Tally > F11: Features > F3: Statutory & Taxation.
    2. Enable VAT: Set ‘Enable Value Added Tax (VAT)’ to ‘Yes’.

    Step 3: Make Sales Entry with VAT

    1. Create Sales Voucher: Go to Gateway of Tally > Accounting Vouchers > F8: Sales.
    2. Enter Sales Details: Fill in the necessary details like the party’s name, invoice number, date, and sales amount (e.g., Rs. 10,000).
    3. Select VAT Ledger: In the Accounting Voucher screen, under Particulars, select the sales ledger and enter the sales amount.
    4. Specify VAT Rate: In the Tax Analysis screen, select the VAT ledger and enter the applicable VAT rate (e.g., 12.5%).

    Step 4: Record Purchase Entry with VAT

    1. Create Purchase Voucher: Go to Gateway of Tally > Accounting Vouchers > F9: Purchase.
    2. Enter Purchase Details: Fill in the necessary details like the supplier’s name, invoice number, date, and purchase amount (e.g., Rs. 8,000).
    3. Select VAT Ledger: In the Accounting Voucher screen, under Particulars, select the purchase ledger and enter the purchase amount.
    4. Specify VAT Rate: In the Tax Analysis screen, select the VAT ledger and enter the applicable VAT rate (e.g., 12.5%).

    Step 5: View VAT Reports

    1. Access VAT Reports: Go to Gateway of Tally > Display > Statutory Reports > VAT.
    2. Generate VAT Computation: Select the period for which you want to view the VAT computation.
    3. Review VAT Details: You can view details like total sales, total purchases, input VAT, output VAT, and VAT payable.

    Example:

    Let’s consider a scenario:

    • Sales amount: Rs. 50,000
    • Purchase amount: Rs. 30,000
    • VAT rate: 12.5%

    Sales Entry:

    1. Create a sales voucher.
    2. Enter the sales details: Party name, invoice number, date, and sales amount (Rs. 50,000).
    3. Select the sales ledger and enter the sales amount.
    4. Specify the VAT rate as 12.5%.

    Purchase Entry:

    1. Create a purchase voucher.
    2. Enter the purchase details: Supplier’s name, invoice number, date, and purchase amount (Rs. 30,000).
    3. Select the purchase ledger and enter the purchase amount.
    4. Specify the VAT rate as 12.5%.

    Summary:

    • Enable VAT in Tally.
    • Create VAT ledgers for input and output.
    • Record sales and purchase transactions separately.
    • Specify the VAT rate for each transaction.
    • Review VAT reports to ensure accurate computation.

    By following these steps and example, you can effectively manage VAT entries in Tally.ERP 9 for your business transactions.

  • Comprehensive Guide to Sales Order Management in Tally ERP 9

    Let’s walk through the stages and voucher entries in the sales order process in Tally ERP 9:

    1. Sales Order:

    Definition: A sales order is a document issued by a seller to a buyer, confirming the details of the products or services the buyer intends to purchase.

    Steps to Create a Sales Order in Tally ERP 9:

    1. Navigate to Gateway of Tally > Inventory Vouchers > F5: Sales Order.
    2. Enter the sales order number, date, and other relevant details.
    3. Select the customer from the list.
    4. Enter details of the items to be sold including quantity, rate, and any applicable taxes.
    5. Save the sales order.

    Example: ABC Company receives a sales order from Customer XYZ for 50 units of Product A at a rate of $20 per unit. They create a sales order with these details.

    2. Delivery Note:

    Definition: A delivery note is prepared by the seller to confirm the delivery of goods to the buyer. It serves as an acknowledgment of the transfer of goods.

    Steps to Create a Delivery Note in Tally ERP 9:

    1. Go to Gateway of Tally > Inventory Vouchers > F8: Delivery Note.
    2. Select the sales order against which goods are to be delivered.
    3. Enter the delivery note number, date, and other relevant details.
    4. Specify the quantity and condition of goods being delivered.
    5. Save the delivery note.

    Example: ABC Company prepares a delivery note to confirm the delivery of 50 units of Product A to Customer XYZ as per the sales order.

    3. Rejection In:

    Definition: If the goods delivered are not as per the buyer’s specifications or are damaged, a rejection in voucher is prepared to return the goods to the seller.

    Steps to Create a Rejection In Voucher in Tally ERP 9:

    1. Navigate to Gateway of Tally > Inventory Vouchers > F7: Rejection In.
    2. Select the delivery note against which goods are to be rejected.
    3. Specify the quantity and condition of goods being returned.
    4. Save the rejection in voucher.

    Example: Customer XYZ rejects 5 units of Product A delivered by ABC Company due to damage. They create a rejection in voucher to return these 5 units.

    4. Sales Bill:

    Definition: A sales bill is issued by the seller to the buyer, requesting payment for the goods or services supplied.

    Steps to Create a Sales Bill in Tally ERP 9:

    1. Go to Gateway of Tally > Accounting Vouchers > F8: Sales.
    2. Select the customer from the list.
    3. Enter the sales bill number, date, and other relevant details.
    4. Specify the details of the items sold including quantity, rate, and taxes.
    5. Save the sales bill.

    Example: ABC Company sends a sales bill to Customer XYZ for the 45 units of Product A that were accepted.

    5. Credit Note:

    Definition: If there are discrepancies in the sales bill, such as over-delivery or damaged goods, the seller may issue a credit note to the buyer for adjustments in the amount owed.

    Steps to Create a Credit Note in Tally ERP 9:

    1. Navigate to Gateway of Tally > Accounting Vouchers > F7: Journal.
    2. Select Credit Note as the voucher type.
    3. Enter the credit note number, date, and other relevant details.
    4. Specify the reason for issuing the credit note and the amount to be adjusted.
    5. Save the credit note.

    Example: If ABC Company over-delivered 5 units of Product A, they issue a credit note to Customer XYZ to adjust the sales bill accordingly.

    These are the stages and voucher entries involved in the sales order process in Tally ERP 9. Each step ensures proper documentation and tracking of transactions between the seller and the buyer.

    Reports

    After completing the stages and voucher entries for sales orders in Tally ERP 9, you can view various reports related to sales transactions and inventory management. Here’s where you can find relevant reports:

    1. Sales Register:

    • Location: Gateway of Tally > Display > Account Books > Sales Register.
    • Description: The Sales Register provides a comprehensive view of all sales transactions, including sales bills and credit notes, within a specified period.

    2. Sales Summary:

    • Location: Gateway of Tally > Display > Account Books > Sales Summary.
    • Description: The Sales Summary report gives an overview of sales transactions summarized by customer, product, or sales group.

    3. Outstanding Receivables:

    • Location: Gateway of Tally > Display > Statements of Accounts > Outstandings > Receivables.
    • Description: The Outstanding Receivables report helps track pending payments from customers based on sales invoices and credit notes issued.

    4. Stock Summary:

    • Location: Gateway of Tally > Display > Inventory Books > Stock Summary.
    • Description: The Stock Summary report provides an overview of all stock items, including opening balance, inward and outward movements, and closing balance.

    5. Delivery Note Register:

    • Location: Gateway of Tally > Display > Inventory Books > Delivery Note Register.
    • Description: The Delivery Note Register displays details of all delivery notes issued, including quantities delivered and pending deliveries.

    6. Rejection In Register:

    • Location: Gateway of Tally > Display > Inventory Books > Rejection In Register.
    • Description: The Rejection In Register shows details of all goods returned by customers, helping to track rejected items and reasons for rejection.

    7. Credit Note Register:

    • Location: Gateway of Tally > Display > Accounts Books > Credit Note Register.
    • Description: The Credit Note Register provides a summary of all credit notes issued to customers, including reasons for issuing the credit notes.

    8. Inventory Ageing Analysis:

    • Location: Gateway of Tally > Display > Inventory Books > Inventory Ageing Analysis.
    • Description: The Inventory Ageing Analysis report helps identify slow-moving or obsolete inventory items based on their age.

    These reports in Tally ERP 9 enable you to monitor sales transactions, track inventory movements, analyze receivables, and manage customer accounts effectively. They provide valuable insights into your business operations and help in making informed decisions for business growth and optimization.

  • Setting Up and Executing Purchase Order Processes in Tally ERP 9

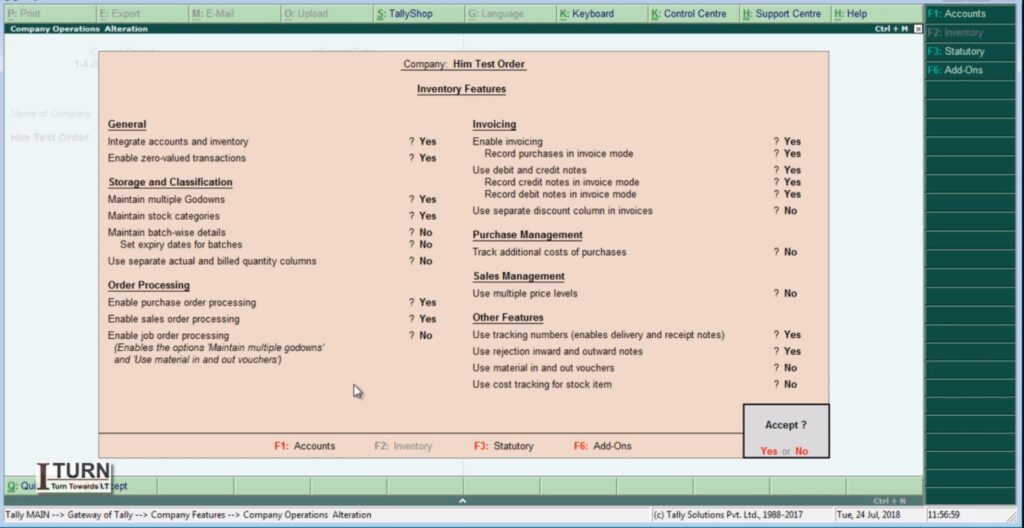
    Before performing the entries related to purchase orders, receipt notes, rejection outs, purchase bills, and debit notes in Tally ERP 9, it’s important to ensure that relevant features are activated. Here’s how you can activate these features:

    1. Enable Inventory Management:

    1. Go to Gateway of Tally.
    2. Select ‘F11: Features’ or press F11.
    3. Under ‘F1: Accounting Features’, ensure that ‘Maintain Accounts only’ is set to ‘No’.
    4. Set ‘Maintain Inventory’ to ‘Yes’.

    2. Set Up Inventory Features:

    1. Go to Gateway of Tally.
    2. Select ‘F11: Features’ or press F11.
    3. Under ‘F2: Inventory Features’, ensure that the required options such as ‘Maintain Multiple Godowns’, ‘Use Tracking Numbers (Batch Numbers)’, ‘Use Expiry Dates for Batches’, etc., are set according to your business needs.

    3. Configure Purchase and Sales Vouchers:

    1. Go to Gateway of Tally.
    2. Select ‘F12: Configure’ or press F12.
    3. Under ‘Accounting Features’, ensure that ‘Allow Purchase Orders’ and ‘Allow Sales Orders’ are set to ‘Yes’.

    4. Activate Rejection In and Out Vouchers:

    1. Go to Gateway of Tally.
    2. Select ‘F11: Features’ or press F11.
    3. Under ‘Inventory Features’, ensure that ‘Enable Rejection In/Out Voucher’ is set to ‘Yes’.

    5. Enable Debit and Credit Notes:

    1. Go to Gateway of Tally.
    2. Select ‘F11: Features’ or press F11.
    3. Under ‘Accounting Features’, ensure that ‘Enable Invoicing’ is set to ‘Yes’.
    4. Additionally, check if ‘Use Rejection In/Out for Purchase Returns’ and ‘Use Debit/Credit Notes’ are set to ‘Yes’ as required.

    6. Set Up Stock Groups, Stock Categories, and Units of Measure:

    1. Go to Gateway of Tally.
    2. Under ‘Inventory Info’, set up stock groups, stock categories, and units of measure as per your business requirements.

    7. Configure Godowns (if applicable):

    1. Go to Gateway of Tally.
    2. Under ‘Inventory Info’, set up multiple godowns if your business involves maintaining inventory at different locations.

    By activating these features and configuring settings in Tally ERP 9, you ensure that the software is ready to handle inventory management, purchase orders, sales orders, rejection vouchers, purchase bills, and debit notes efficiently. This setup enables seamless recording and tracking of transactions related to inventory and purchase/sales operations.

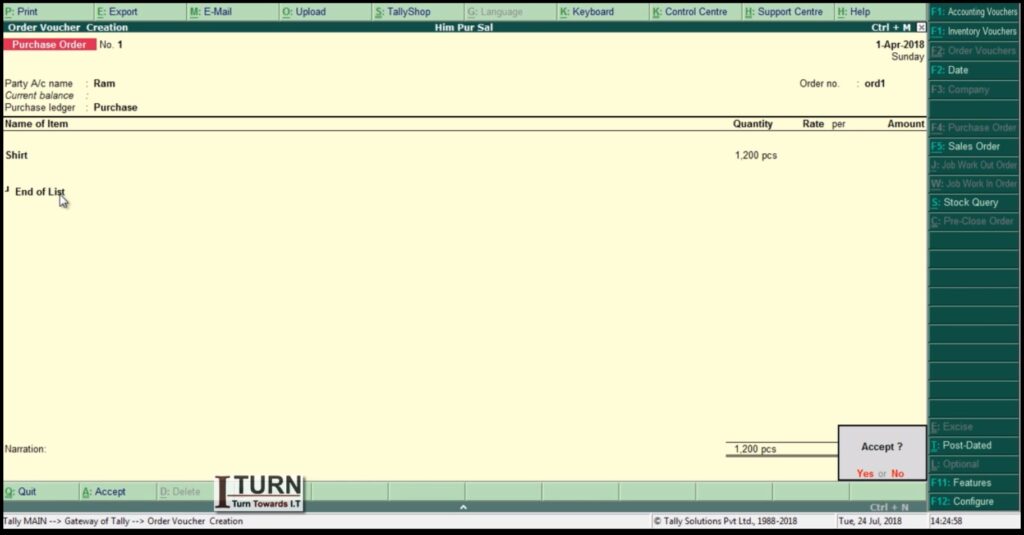
    1. Purchase Order (PO):

    Definition: A purchase order is a document issued by a buyer to a seller, specifying the details of the goods or services the buyer intends to purchase.

    Steps to Create a Purchase Order in Tally ERP 9:

    1. Navigate to Gateway of Tally > Inventory Vouchers > F4: Purchase Order.
    2. Enter the purchase order number, date, and other relevant details.
    3. Select the supplier/vendor from the list.
    4. Enter details of the items to be purchased including quantity, rate, and any applicable taxes.
    5. Save the purchase order.

    Example: Let’s say your company, XYZ Enterprises, needs to purchase 100 units of Product A from Supplier ABC at a rate of $10 per unit. The purchase order would specify these details along with other terms such as delivery date and payment terms.

    2. Receipt Note:

    Definition: A receipt note is prepared by the buyer upon receiving goods from the seller. It serves as acknowledgment of receipt of goods.

    Steps to Create a Receipt Note in Tally ERP 9:

    1. Go to Gateway of Tally > Inventory Vouchers > F9: Purchase Order.
    2. Select the purchase order for which goods have been received.
    3. Enter the receipt note number, date, and other relevant details.
    4. Specify the quantity and condition of goods received.
    5. Save the receipt note.

    Example: Using the previous example, if Supplier ABC delivers 100 units of Product A, XYZ Enterprises creates a receipt note to acknowledge the receipt of these goods.

    3. Rejection Out:

    Definition: If the goods received are damaged or do not meet the buyer’s specifications, a rejection out voucher is prepared to return the goods to the seller.

    Steps to Create a Rejection Out Voucher in Tally ERP 9:

    1. Navigate to Gateway of Tally > Inventory Vouchers > F6: Rejection Out.
    2. Select the receipt note against which goods are to be rejected.
    3. Specify the quantity and condition of goods being returned.
    4. Save the rejection out voucher.

    Example: If XYZ Enterprises finds that 10 units of Product A received from Supplier ABC are damaged, they create a rejection out voucher to return these 10 units to the supplier.

    4. Purchase Bill:

    Definition: A purchase bill is issued by the seller to the buyer, requesting payment for the goods or services supplied.

    Steps to Create a Purchase Bill in Tally ERP 9:

    1. Go to Gateway of Tally > Accounting Vouchers > F9: Purchase.
    2. Select the supplier/vendor from the list.
    3. Enter the purchase bill number, date, and other relevant details.
    4. Specify the details of the items purchased including quantity, rate, and taxes.
    5. Save the purchase bill.

    Example: Supplier ABC sends a purchase bill to XYZ Enterprises for the 90 units of Product A that were accepted.

    5. Debit Note:

    Definition: If there are discrepancies in the purchase bill, such as overcharging or damaged goods, the buyer may issue a debit note to the seller requesting adjustments to the amount owed.

    Steps to Create a Debit Note in Tally ERP 9:

    1. Navigate to Gateway of Tally > Accounting Vouchers > F7: Journal.
    2. Select Debit Note as the voucher type.
    3. Enter the debit note number, date, and other relevant details.
    4. Specify the reason for issuing the debit note and the amount to be adjusted.
    5. Save the debit note.

    Example: If XYZ Enterprises finds that Supplier ABC has overcharged for 5 units of Product A, they issue a debit note requesting a reduction in the purchase amount accordingly.

    These are the stages and voucher entries involved in the purchase order process in Tally ERP 9. Each step ensures proper documentation and tracking of transactions between the buyer and the seller.

    Check Reports

    After completing the entries for purchase orders, receipt notes, rejection out, purchase bills, and debit notes in Tally ERP 9, you can check various stock-related aspects including reports to ensure accurate inventory management. Here’s where you can find relevant information and reports:

    Stock Summary:
    • Go to Gateway of Tally > Display > Inventory Books > Stock Summary.
    • This report provides a summary of all stock items, including their opening balance, inward and outward movements, and closing balance.
    Stock Item Vouchers:
    • Navigate to Gateway of Tally > Display > Inventory Books > Stock Item Vouchers.
    • Here, you can view all transactions related to a specific stock item including purchase orders, receipts, sales, rejection outs, etc.
    Inventory Reports:
    • Under Gateway of Tally > Display > Inventory Books, you can access various reports such as Stock Item Vouchers, Movement Analysis, and Inventory Ageing Analysis.
    • These reports provide insights into the movement and status of inventory items over time.
    Stock Query:
    • You can use the Stock Query feature in Tally ERP 9 to check the availability, location, and other details of specific stock items.
    • Go to Gateway of Tally > Display > Inventory Books > Stock Query.
    Stock Valuation Reports:
    • To analyze the valuation of your inventory, you can access reports such as Stock Valuation Summary and Stock Valuation Tally.
    • These reports help you understand the total value of your inventory based on different valuation methods (FIFO, LIFO, Weighted Average, etc.).
    Movement Analysis:
    • This report provides insights into the movement of goods in and out of the organization over a specified period.
    • Go to Gateway of Tally > Display > Inventory Books > Movement Analysis.
    Sales and Purchase Register:
    • You can review the sales and purchase registers to track transactions, invoices, and payments.
    • Go to Gateway of Tally > Display > Account Books > Journal Register / Purchase Register / Sales Register.

    By utilizing these reports and features in Tally ERP 9, you can effectively monitor your inventory, track stock movements, analyze valuation, and ensure accurate financial reporting. It helps in making informed decisions related to inventory management and optimizing stock levels to meet business requirements.