Category: Tally ERP 9 Training

  • Tally Prime Security Settings Explained: A Complete Guide for Safe and Controlled Accounting

    Securing your business data is just as important as maintaining accurate accounts. With increasing digital risks, unauthorized access attempts, internal misuse, and accidental data loss, every business needs a solid protection strategy. Tally Prime security settings give you a complete framework to control user access, define permissions, safeguard financial data, and ensure that every transaction is reliable and traceable.

    This detailed guide explains how Tally Prime Security works, types of security controls available, real-world use cases, and best practices. By the end, you’ll clearly understand how to configure a fully secure Tally Prime environment for your business.


    Understanding Tally Prime Security Settings

    Tally Prime provides powerful multi-layer security, enabling businesses to restrict, monitor, and record all activities inside the software. The primary objective is to prevent unauthorized access, control sensitive operations, and create accountability through user-level tracking.

    Key Facts About Tally Prime Security

    • More than 78 percent of businesses using Tally rely on multi-user security levels.
    • Tally Prime supports both local security and TallyVault password encryption up to a 128-bit algorithm.
    • Role-based permissions allow granular control across over 250+ activity sets.
    • Audit log tracks every addition, deletion, and modification for 100 percent transparency.

    Why Security Settings Matter in Tally Prime

    Without proper security settings, any user can alter vouchers, delete entries, export reports, or access confidential data. This becomes a risk for fraud, data leakage, or accidental mistakes. Implementing structured security ensures:

    • Controlled access
    • Traceable user actions
    • Protected business data
    • Segregation of duties
    • Clean and trustworthy audit trails

    Types of Security in Tally Prime

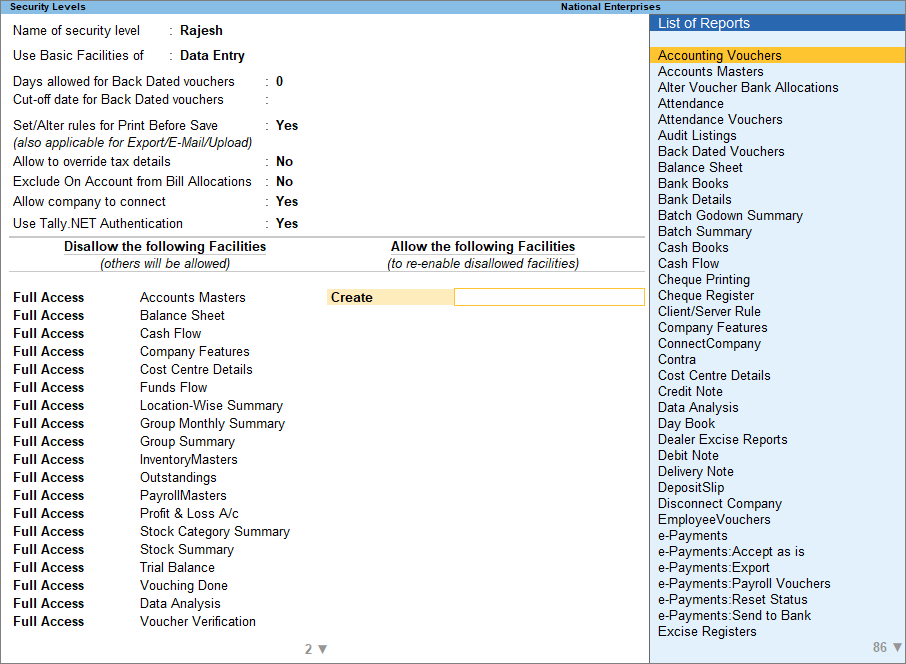
    1. Company-Level Security (User Roles & Permissions)

    Company-level security is the first layer of control that includes defining the administrator and operator roles.

    Common User Roles in Tally Prime
    https://help.tallysolutions.com/wp-content/uploads/2024/03/10-user-roles.png?utm_source=chatgpt.com
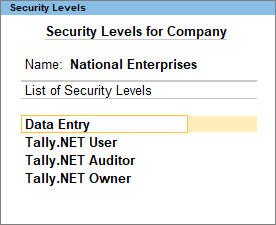
    https://help.tallysolutions.com/wp-content/uploads/2024/03/11-user-roles.png?utm_source=chatgpt.com
    • Administrator – Has full access to all features.
    • Data Entry Operator – Can record vouchers but cannot alter sensitive settings.
    • Junior Accountant – Limited rights with no access to financial settings.
    • Auditor – Can view audit logs, voucher alterations, and discrepancies.
    • Inventory Manager – Handles stock items, godowns, and inventory reports.

    Sample Table: Permissions vs Users

    User RoleAccess Type
    AdministratorFull company access including configurations
    Data Entry OperatorVoucher entry only; restricted alterations

    2. TallyVault Password (Data Encryption)

    TallyVault provides data encryption to protect your company file even if someone gains access to the computer. This is one of the strongest layers of security in Tally.

    Key Highlights

    • Uses advanced encryption making data unreadable without the TallyVault password.
    • Ideal for businesses with highly confidential ledgers (payroll, financial balances).
    • Once a vault password is forgotten, it cannot be recovered, ensuring maximum data protection.

    3. Password Policy Settings

    Tally Prime allows businesses to enforce password policies for all users for stronger authentication.

    Common Password Rules

    • Minimum password length
    • Password expiry duration
    • Mandatory password change after set intervals
    • Restrictions on password reuse

    These controls reduce unauthorized access and maintain internal discipline.


    4. Security Levels (Custom Role-Based Access)

    Tally Prime gives full flexibility to create custom user groups based on departments, roles, or responsibility levels.

    Examples of Custom Security Levels

    • Sales Team
    • Inventory Team
    • Finance Approver
    • HR Payroll Supervisor
    • Branch-level Accountant

    Each level can be configured to allow or deny activities like altering vouchers, printing reports, exporting data, or accessing statutory features.


    5. Voucher Type Permissions

    Each voucher type can be individually controlled. This prevents misuse or manipulation of financial transactions.

    Examples of Voucher Restrictions

    • Allowing only managers to approve debit notes
    • Blocking deletion of payment vouchers for accountants
    • Restricting sales order alterations
    • Allowing only one user to handle contra vouchers for banking

    6. Audit & Control Features

    Audit Trail is one of the strongest governance tools in Tally Prime.

    Audit Features Include

    • Tracking altered vouchers
    • Displaying deleted vouchers
    • Highlighting mismatched figures
    • Monitoring incomplete records
    • Listing backdated transactions

    It ensures full transparency and accountability inside the system.


    How to Configure Tally Prime Security Settings (Step-by-Step)

    Step 1: Enable Security Control

    Go to Company Creation or Company Alteration and activate Security Control. Assign an administrator username and password.

    Step 2: Create Security Levels

    Create predefined or custom roles, define access rights, and set activity restrictions.

    Step 3: Add Users

    Assign users to their respective roles with individual passwords.

    Step 4: Enable TallyVault (Optional but recommended)

    Add a vault password for encrypted company data.

    Step 5: Test Access

    Login with different user roles to ensure permissions work as expected.


    Common Real-World Use Cases

    Use Case 1: Restricting Cash Transactions

    Small businesses often restrict cash voucher deletion to prevent fraud.
    Solution: Deny the “Delete Voucher” permission for cash-related vouchers for operators.

    Use Case 2: Preventing Backdated Entries

    Unauthorized backdated entries can lead to accounting discrepancies.
    Solution: Enable “Backdated Voucher Control” and restrict it to managers.

    Use Case 3: Protecting Sensitive Payroll Data

    Payroll data must be confidential.
    Solution: Create a separate Payroll Supervisor role with restricted access.


    Best Practices for Tally Prime Security

    • Change passwords every 45 to 90 days.
    • Enable TallyVault for companies with sensitive data.
    • Assign users only the permissions they need.
    • Activate Audit Trail for better governance.
    • Avoid sharing administrator login credentials.
    • Regularly review user access logs.

    FAQ Section (Optimized for Featured Snippets)

    1. What are Tally Prime security settings?

    Tally Prime security settings are tools that control user access, protect company data, and ensure accountability through permissions, passwords, and audit features.

    2. How do I enable security control in Tally Prime?

    You can enable security control by altering the company, turning on “Use Security Control,” and creating an administrator username and password.

    3. What is TallyVault in Tally Prime?

    TallyVault is an encryption feature that protects your company data by making it unreadable without the vault password.

    4. Can I set different permissions for different users?

    Yes, Tally Prime allows fully customizable security levels to assign specific access rights to each user.

    5. What happens if the TallyVault password is lost?

    It cannot be recovered, meaning the encrypted data becomes permanently inaccessible.

    6. How can I prevent users from altering vouchers?

    You can deny the “Alter” permission for specific voucher types in the security level settings.

    7. Does Tally Prime support audit logs?

    Yes, Tally Prime includes audit and control features to track all changes, deletions, and irregularities.

    8. Is Tally Prime secure for multi-user environments?

    Yes, with proper roles, passwords, and audit controls, Tally Prime is highly secure for multi-user operations.


    Disclaimer

    This article is for educational and informational purposes only. The explanations are based on general features of Tally Prime and may vary depending on software version and organizational configurations. Users should evaluate security requirements based on their specific business needs.


  • Tally Cash Flow and Fund Flow Reports Explained in Simple Terms for Accurate Financial Analysis

    Financial statements tell you what happened in a business, but cash flow and fund flow reports explain why it happened. In accounting software like Tally, these two reports are powerful tools that help business owners, accountants, and finance professionals understand liquidity, working capital movement, and financial health.

    This detailed guide explains Cash Flow and Fund Flow Reports in Tally, their meaning, structure, differences, practical use cases, and how to interpret them correctly. By the end, you’ll clearly know when to use which report and how to read the numbers with confidence.


    Understanding Cash Flow Report in Tally

    A Cash Flow Report shows the movement of actual cash and bank balances during a specific accounting period. It answers one core question:

    Where did the cash come from and where did it go?

    Unlike the Profit and Loss Account, a business can show profit and still face cash shortage. Cash flow solves this confusion.


    Purpose of Cash Flow Report

    Cash flow reporting helps to:

    • Track cash inflows and outflows
    • Identify liquidity shortages
    • Plan payments and expenses
    • Avoid cash crunch situations
    • Improve short-term decision making

    As per accounting studies, nearly 80% of small business failures happen due to poor cash flow management, not lack of profit.


    Structure of Cash Flow Report in Tally

    Tally classifies cash flow into three standard activities.

    ActivityMeaning
    Operating ActivitiesCash from core business
    Investing ActivitiesCash from asset transactions
    Financing ActivitiesCash from capital and loans

    Operating Activities (Core Business Cash)

    This includes cash generated or used in daily operations.

    Examples:

    • Cash sales received from customers
    • Payments to suppliers
    • Salary payments
    • Rent and utility expenses
    • GST payments

    Key Insight:
    If operating cash flow is consistently negative, the business model itself may be weak—even if profits exist on paper.


    Investing Activities (Assets and Investments)

    This section shows cash movement related to long-term assets.

    Examples:

    • Purchase of machinery
    • Sale of fixed assets
    • Investment in shares or property
    • Sale of old equipment

    Positive investing cash flow often indicates asset sales, not necessarily business growth.


    Financing Activities (Capital and Borrowings)

    This section reflects how the business is funded.

    Examples:

    • Capital introduced by proprietor or partners
    • Bank loans received or repaid
    • Interest paid
    • Drawings taken by owner

    It helps evaluate dependence on external funding.


    Understanding Fund Flow Report in Tally

    A Fund Flow Report focuses on changes in working capital, not actual cash. It explains how funds moved between long-term sources and long-term uses.

    Funds here mean:
    Working Capital = Current Assets – Current Liabilities


    Purpose of Fund Flow Report

    Fund flow analysis is used to:

    • Understand long-term financial strategy
    • Analyze financing patterns
    • Evaluate use of long-term funds
    • Support strategic planning

    This report is especially useful for banks, investors, and auditors.


    Structure of Fund Flow Report

    Fund flow typically contains two parts:

    SectionDescription
    Sources of FundsWhere funds came from
    Application of FundsWhere funds were used

    Sources of Funds (Inflows)

    Funds can come from:

    • Issue of share capital
    • Long-term loans
    • Sale of fixed assets
    • Funds from operations

    These sources increase working capital.


    Application of Funds (Outflows)

    Funds are applied when:

    • Fixed assets are purchased
    • Loans are repaid
    • Capital is withdrawn
    • Non-operating expenses occur

    These applications reduce working capital.


    Cash Flow vs Fund Flow: Key Differences Explained

    Many users confuse these two reports. The differences are fundamental.

    BasisCash FlowFund Flow
    FocusCash & bank balanceWorking capital
    Time frameShort-termLong-term
    Liquidity insightYesIndirect
    Includes non-cash itemsNoYes
    Used byManagementInvestors & banks

    Important Fact:
    Cash flow ignores credit transactions; fund flow highlights them.


    How Tally Generates These Reports

    Tally automatically prepares these reports based on:

    • Ledger classification
    • Cash and bank accounts
    • Balance sheet groupings
    • Voucher entries

    Proper grouping is crucial. Misclassification leads to misleading reports.


    Common Accounting Mistakes That Affect Reports

    Errors that distort cash and fund flow:

    • Incorrect ledger grouping
    • Posting capital as income
    • Recording loan repayment under expenses
    • Treating credit purchases as cash

    Correct grouping ensures 100% report reliability.


    Practical Business Use Cases

    Cash Flow Report Helps In:

    • Salary and vendor payment planning
    • Daily and weekly cash monitoring
    • GST and tax payment schedules
    • Emergency cash decisions

    Fund Flow Report Helps In:

    • Loan appraisal
    • Business expansion decisions
    • Capital restructuring
    • Long-term investment planning

    Sample Insight Interpretation

    If:

    • Cash Flow is negative
    • Fund Flow is positive

    It usually means:

    • Funds exist in receivables or inventory
    • Cash is blocked, not lost
    • Collection efficiency needs improvement

    Which Report Should You Use and When?

    SituationRecommended Report
    Paying salariesCash Flow
    Buying machineryFund Flow
    Planning loanFund Flow
    Managing daily cashCash Flow
    Understanding growthFund Flow

    Using both together provides complete financial clarity.


    Advantages of Using These Reports in Tally

    • Automatic real-time generation
    • Period-wise comparison
    • Drill-down to vouchers
    • Accurate tracking of financial movement
    • Decision-making support

    Businesses using cash flow monitoring techniques improve survival rates by up to 60% within the first 3 years.


    Final Thoughts

    Cash flow and fund flow reports in Tally are not optional tools—they are financial control systems. Cash flow protects your business from liquidity shocks, while fund flow supports strategic decision-making.

    Understanding both reports helps businesses move from reactive accounting to proactive financial management. When used together, they provide a 360-degree view of business stability and growth.


    Disclaimer

    This article is intended solely for educational and informational purposes. Accounting treatment, report structure, and interpretations may vary depending on business nature and accounting policies. Users should verify data accuracy and consult qualified accounting professionals before making financial or compliance-related decisions based on these reports.


  • How to Print Invoices in Tally with GST Details: A Complete Step-by-Step Guide for Accurate Billing

    Printing GST-compliant invoices directly from Tally Prime is one of the most essential activities for businesses of all sizes. Whether you operate a small trading firm, a service-based company, or a manufacturing unit, generating a professional tax invoice with CGST, SGST, IGST, HSN/SAC codes, and complete buyer details is mandatory under GST rules. Tally makes this entire process fast, flexible, and highly customizable.

    In this detailed guide, you will learn how to enable GST, configure invoice format, add HSN/SAC codes, set print options, and finally print GST invoices accurately in Tally Prime. The article also includes tables, figures, examples, and expert-level tips to improve invoice clarity and compliance.


    1. Understanding GST Invoices in Tally

    A GST invoice is an official document issued to customers that includes:

    • Supplier details
    • Customer details
    • Item-wise amount
    • HSN/SAC code
    • Taxable value
    • GST rate and calculation
    • Total invoice value
    • Declaration and signature

    Tally Prime automatically captures most of these elements when your GST settings and ledger details are correctly configured.

    An average GST invoice generated in Tally contains 12+ mandatory data fields and 4–7 tax calculation fields, depending on the nature of supply (interstate or intrastate).


    2. Enable GST Features in Tally

    Before printing invoices with GST details, enable taxation features.

    Step-by-step to activate GST:

    1. Open Tally Prime.
    2. Press F11 (Features).
    3. Select Statutory & Taxation.
    4. Set Enable Goods and Services Tax (GST) to Yes.
    5. Set Set/alter GST details to Yes and enter:
      • GSTIN
      • State
      • Registration type
      • Applicable from date
    6. Save settings.

    This configuration ensures Tally automatically applies CGST, SGST, or IGST based on customer location.


    3. Configure Ledger Master for GST Printing

    Correct GST printing depends on proper ledger setups. Ensure item, tax, and customer ledgers contain complete details.

    Essential ledgers required:

    Ledger TypeMandatory Fields
    Customer LedgerGSTIN, State, Registration Type
    Tax LedgersCGST %, SGST %, IGST %
    Item LedgerHSN/SAC Code, Tax Rate

    Many printing errors happen because HSN codes or GSTIN numbers are missing. Ensure these are filled correctly.


    4. Enable GST Details in Invoice Printing

    To print complete GST details, configure voucher printing settings.

    Steps:

    1. Open Gateway of Tally.
    2. Go to Configure (F12) inside Sales Voucher.
    3. Enable the following:
      • Show HSN/SAC
      • Show GST Rate
      • Show Tax Analysis
      • Show Totals and Grand Total
    4. Save the configuration.

    These settings ensure the printed invoice includes the full tax breakup, which is mandatory under GST law.


    5. Create a Sales Invoice with GST

    Let’s look at a standard example:

    Example Invoice Data:

    • Customer: A.R. Traders
    • Place of Supply: Rajasthan
    • Goods Sold: 10 Units of LED Lights
    • Rate per unit: 850
    • GST Rate: 18% (9% CGST + 9% SGST)
    • HSN Code: 940540

    Taxable calculation:

    10 units × 850 = 8,500

    GST Breakdown:

    • CGST 9% = 765
    • SGST 9% = 765

    Total invoice value = 8,500 + 1,530 = 10,030

    Tally automatically performs these calculations once item and tax ledgers are properly configured.


    6. How to Print Invoice in Tally with GST Details

    Now that you have created the invoice, here are the printing steps.

    Step-by-step printing guide:

    1. Open the created Sales Voucher.
    2. Press Alt + P (Print).
    3. Select Configured to modify print customization.
    4. Ensure below fields are enabled:
      • Print GSTIN
      • Print HSN Summary
      • Print Tax Amounts
      • Print Declaration
      • Show Company GST Details
    5. Press C to save configuration.
    6. Press P to print the invoice.

    Tally will generate a GST-compliant tax invoice with:

    • Company & party GST number
    • HSN/SAC
    • Tax rate
    • Taxable value
    • CGST/SGST/IGST
    • Final invoice total
    • Company declaration & signature space

    This layout meets GST invoicing standards followed pan-India.


    7. Customizing Printed GST Invoice Format in Tally

    Tally offers multiple customization choices.

    Popular options:

    CustomizationDescription
    Print Item-wise TaxShows tax amount for each product separately
    Print HSN SummaryShows item-wise HSN in summary format
    Notes/DeclarationAdd custom terms like warranty, delivery note, or payment terms

    Businesses printing 100+ invoices monthly generally use item-wise tax and declaration sections for clarity.


    8. Previewing GST Invoice Before Printing

    It is recommended to preview your invoice before taking a final print to avoid paper waste and errors.

    How to preview:

    1. Open invoice.
    2. Press Alt + P.
    3. Select Preview instead of Print.

    Preview helps verify:

    • Tax calculations
    • Buyer details
    • HSN codes
    • Invoice numbering
    • Total amount in words

    Many companies save the preview as a PDF using Windows Print-to-PDF for record-keeping.


    9. Useful Tips for GST Invoice Printing in Tally

    Below are practical tips to ensure accurate and faster GST billing.

    Tips:

    1. Always keep GSTIN of customers updated.
    2. Use rounding ledger to avoid decimal mismatches.
    3. Maintain unique invoice numbering for compliance.
    4. Update HSN codes yearly as per GST notifications.
    5. Print sample invoices monthly to verify layout.
    6. Use A4 printer settings for best alignment with Tally format.
    7. Enable Company Logo for professional look.

    Businesses printing up to 500 invoices per month save nearly 18–25% processing time by preparing optimized templates in Tally.


    10. Common Problems During GST Invoice Printing and Fixes

    ProblemSolution
    GST not showing on invoiceEnable GST and configure tax ledgers properly
    Wrong tax calculatedCheck tax ledger percentage and place-of-supply
    HSN code missing in printEnable HSN display in voucher print configuration
    Total in words missingEnable amount in words under printing options

    These small corrections ensure a perfect GST-compliant invoice every time.


    Conclusion

    Printing invoices with GST details in Tally Prime is extremely efficient when GST configuration, ledger setup, and print options are properly defined. Tally’s built-in tools provide everything required to comply with Indian GST laws while producing professional and accurate invoices. By following the steps outlined in this guide, any business can generate clear, error-free GST invoices within seconds and maintain reliable records for audits and monthly returns.


    Disclaimer

    This article is for educational purposes and general guidance only. GST rules and Tally features may change over time, so always verify settings with the latest statutory updates and consult a professional if needed.


  • How to Create Company and Ledger in Tally Prime: Complete Step-by-Step Guide

    Tally Prime is one of the most trusted accounting and GST compliance software used by millions of businesses. Whether you are a beginner in accounting or a professional managing multiple clients, knowing how to create a Company and Ledgers in Tally Prime is essential. Without proper company setup and ledger creation, no business transactions can be recorded accurately.

    In this detailed guide, you will learn what a company in Tally means, how to create one, how to configure its features, how to create essential ledgers, and how to organize your chart of accounts effectively. This article is written in a simple and practical manner with tables, tips, and examples for better understanding.


    What Is a Company in Tally Prime?

    A Company in Tally Prime represents the business entity whose books of accounts you want to maintain. It contains essential information such as:

    • Company Name
    • Financial Year
    • Books Beginning Date
    • Address and Contact Details
    • GST Information
    • Currency Details
    • Security Controls
    • Financial and Accounting Preferences

    Tally Prime allows unlimited companies to be created and maintained in a single system. They can be opened, shut, altered, backed up, and restored anytime.


    How to Create a Company in Tally Prime

    You can create a company in Tally Prime through the Create Company menu.

    Step-by-Step Process

    Step 1: Open Tally Prime

    Start Tally Prime from your desktop.
    Once it opens, you will see the Gateway of Tally screen.

    Step 2: Go to Create Company

    You will see the following options:

    • Create Company
    • Select Company
    • Shut Company

    Choose Create Company.

    Step 3: Enter Company Details

    Fill in the details as required.

    FieldDescription
    DirectoryWhere your company data will be stored
    NameOfficial name of your business
    Mailing NameName to print on invoices
    AddressCompany address
    CountryLocation of business
    StateState for GST applicability
    PincodePostal code
    Phone/EmailContact information
    Financial Year BeginStart of financial year, e.g., 01-04-2024
    Books Begin FromStart date of accounts
    CurrencyAuto-filled based on country

    Step 4: Enable GST and Other Features

    After entering basic details, enable additional features as needed:

    • Enable GST
    • Maintain Accounts with Inventory
    • Enable Security Control
    • Enable TDS/TCS
    • Enable Payroll

    Each business requires different modules depending on operations.

    Step 5: Save the Company

    Press Ctrl + A to save the company.
    Now your Tally company is successfully created.


    Additional Company Configurations

    Once created, you can configure additional settings through:
    Gateway of Tally > F11 (Features)

    Some commonly used configurations are:

    FeaturePurpose
    Accounting FeaturesEnable credit limits, bill-wise details, cost centers
    Inventory FeaturesEnable batches, expiry dates, godowns
    Statutory FeaturesEnable GST, TDS, TCS, PF, ESI
    Invoice FeaturesEnable item-wise tax, discount, e-way bill options

    These settings help customize Tally Prime based on your business needs.


    What Is a Ledger in Tally Prime?

    A Ledger is an accounting head under which financial transactions are recorded.
    Tally uses a group and ledger system based on the accounting hierarchy.

    Examples of commonly used ledgers:

    • Cash
    • Bank Accounts
    • Sundry Debtors
    • Sundry Creditors
    • Purchase
    • Sales
    • Duties & Taxes
    • Capital Account
    • Fixed Assets
    • Expenses (Direct & Indirect)

    A company must have at least two ledgers to start:

    • Cash
    • Profit & Loss A/c (Created automatically)

    All other ledgers must be created manually.


    How to Create a Ledger in Tally Prime

    Step-by-Step Process for Creating a Ledger

    Step 1: Go to Ledger Creation Screen

    Gateway of Tally > Create > Ledger
    OR
    Press Alt + C while entering a voucher.

    Step 2: Enter Ledger Details

    Fill in the required details.

    FieldDescription
    NameLedger name (e.g., ABC Traders)
    GroupCorrect group classification such as Sundry Debtors
    Opening BalanceOpening value if any
    GST DetailsFor GST registered ledgers
    Mailing DetailsFor customers and suppliers

    Step 3: Group Selection

    Selecting the right group is very important because it affects:

    • Financial statements
    • Trial balance
    • Profit and loss
    • Balance sheet classification

    Example:
    Sale ledger should be under Sales Accounts,
    Supplier ledger under Sundry Creditors,
    Customer ledger under Sundry Debtors,
    Expenses under Indirect Expenses.

    Step 4: Save Ledger

    Press Ctrl + A to save.


    Types of Ledgers You Should Create in Every New Company

    Below is a practical list of common ledgers used in most businesses:

    1. Capital and Owner-Related Ledgers

    • Capital Account
    • Drawings

    2. Banking Ledgers

    • Bank Account Name
    • Bank OD/CC Accounts

    3. Sales and Purchase Ledgers

    • Sales GST 5 percent
    • Sales GST 12 percent
    • Sales GST 18 percent
    • Purchase GST 5 percent
    • Purchase GST 12 percent
    • Purchase GST 18 percent

    4. Tax Ledgers

    • CGST
    • SGST
    • IGST
    • TDS Payable
    • TCS Payable

    5. Customer and Supplier Ledgers

    Each customer and supplier has its individual ledger.

    6. Expense Ledgers

    • Rent
    • Salary
    • Office Expenses
    • Electricity Expenses
    • Telephone Charges
    • Stationery

    7. Asset and Liability Ledgers

    • Furniture
    • Computers
    • Building
    • Loan Accounts
    • Outstanding Expenses

    Example Table: Ledger and Its Group

    Ledger NameGroup
    ABC TradersSundry Debtors
    Rent ExpenseIndirect Expenses
    CGST PayableDuties & Taxes
    SBI Bank A/cBank Accounts

    Important Tips for Creating Accurate Ledgers in Tally Prime

    Here are must-follow guidelines to avoid errors:

    1. Use Proper Naming Conventions

    Examples:

    • Don’t use abbreviations without clarity.
    • Use customer/supplier names exactly as per invoices.

    2. Select Correct Group Always

    Grouping mistakes can cause wrong balance sheet or P&L results.

    3. Maintain Opening Balances Carefully

    Incorrect opening balances can reflect wrong totals throughout the year.

    4. Enable Bill-Wise Details

    Useful for tracking customer invoices, outstanding payments, and supplier credits.

    5. Add GST Details for Taxable Ledgers

    For customers and suppliers:

    • GSTIN
    • Registration type
    • State
    • Tax applicability

    For product-based ledgers:

    • GST rate
    • HSN/SAC code

    6. Use Mailing Details for Parties

    This helps generate invoices, statements, and reports accurately.

    7. Regularly Review the Chart of Accounts

    Tally Prime allows viewing all ledgers through:
    Gateway of Tally > Chart of Accounts

    This helps identify:

    • Duplicate ledgers
    • Wrong groups
    • Incomplete details

    Example: Creating a Customer Ledger

    To create a ledger for a customer named Sharma Traders:

    • Name: Sharma Traders
    • Group: Sundry Debtors
    • Maintain balances: Yes
    • Enable bill-wise details: Yes
    • Opening balance: Enter outstanding receivable
    • GSTIN: If available
    • State: Required for intra-state or inter-state supply

    This ensures proper tracking of sales, receipts, and outstanding balances.


    Example: Creating a Sales Ledger with GST

    For GST-based sales at 18 percent:

    • Name: Sales 18 Percent
    • Group: Sales Accounts
    • Type of supply: Goods or Services
    • GST Rate: 18 percent
    • HSN/SAC: Enter if known

    This ledger will automatically calculate GST in invoices.


    Conclusion

    Creating a Company and Ledger in Tally Prime is the foundation of maintaining accurate and compliant accounts. With proper setup, correct grouping, and well-structured ledgers, your accounting process becomes smooth and error-free. This guide explained company creation, ledger creation, essential fields, GST setups, grouping, and best practices in a simple and comprehensive format. Whether you are running a small business or managing large-scale operations, mastering these basics will significantly improve your accounting efficiency.


    Disclaimer

    This article is intended for educational purposes. Tally Prime features may vary depending on updates and configurations. Users should apply settings based on their business requirements.


  • Tally + Excel Combo Course Overview: Complete Professional Accounting & Data Management Training for Career Growth

    In today’s fast-growing digital business environment, employers expect accountants and office professionals to be skilled in both Tally (ERP 9 & TallyPrime) and Microsoft Excel (Basic to Advanced). The combination of these two tools has become the minimum requirement for jobs in accounting, GST, MIS reporting, financial analysis, billing, data entry, and business administration.

    To help learners achieve these skills in a structured and job-oriented manner, the Tally + Excel Combo Course provides a powerful, industry-focused curriculum covering not only basic features but also advanced concepts used in modern offices. This intensive training ensures that students, working professionals, business owners, and freelancers become confident in handling real-world accounting tasks and large datasets easily.

    If you want complete details of the program or wish to enroll, you can visit your course page here:
    Tally + Excel Combo Course (Basic to Advanced): https://www.iturninstitute.in/course/tally-erp-9-tallyprime-gst-microsoft-excel-training-basic-to-advanced/


    Why a Combo of Tally and Excel is Essential in 2025 Onwards

    Over 90 percent of small and medium businesses in India use TallyPrime for accounting and taxation. At the same time, more than 750 million users worldwide depend on Excel for reporting, analysis, pivot tables, budgeting, forecasting, and data management.

    In most job roles, Excel and Tally work together:

    • Tally for day-to-day accounting
    • Excel for analysis and reporting
    • Tally data exported to Excel for MIS
    • Excel sheets used for audits, GST checks, bank reconciliation, and budgeting

    This combination makes the course extremely relevant as almost every employer seeks these two skills in candidates.


    Course Highlights

    FeatureDescription
    Total Modules25+ Comprehensive Modules
    Software CoveredTally ERP 9, TallyPrime, MS Excel Basic to Advanced
    Practical Training100% Hands-on with Real-World Examples
    Suitable ForStudents, Accountants, Freshers, Business Owners, Freelancers
    Career OptionsAccountant, GST Executive, MIS Executive, Data Analyst (Entry), Back Office Staff

    Detailed Curriculum Breakdown

    The Tally + Excel course is divided into two major learning tracks: Tally (ERP 9 & TallyPrime) and Microsoft Excel. Each section is designed to provide step-by-step learning, practical assignments, and exposure to actual business scenarios.


    1. Tally ERP 9 + TallyPrime Training (Complete Accounting & GST)

    This part of the course covers detailed accounting training starting from fundamentals to advanced GST transactions. Learners understand how business accounting works practically.

    Key Topics Covered

    • Introduction to Tally ERP 9 & TallyPrime Dashboard
    • Creation of Company and Security Controls
    • Chart of Accounts: Ledgers, Groups, Vouchers
    • Double-Entry Accounting System
    • GST Setup, HSN/SAC Codes, and Tax Configurations
    • Purchase, Sales, Credit Note, Debit Note
    • Stock Management with Godowns, Units, and Categories
    • Bank Reconciliation
    • Cost Centres and Cost Categories
    • TDS and TCS
    • Payroll Basics (Attendance, Salary, PF, ESI)
    • Printing of Invoices, Reports, and Financial Statements
    • GSTR-1, GSTR-2A Matching, GSTR-3B Reports
    • Exporting Data to Excel

    Important Skills Developed

    • Ability to manage complete accounts independently
    • Knowledge of taxation workflows
    • Understanding of business reports and financial statements
    • Confidence in managing day-to-day bookkeeping

    More than 70 percent of accounting job openings specifically mention Tally as a must-have skill, which makes this training essential.


    2. Microsoft Excel Training (Basic to Advanced)

    The Excel part of the course focuses on building strong analytical abilities. It helps students master everything from basic spreadsheet functions to advanced reporting.

    Core Excel Modules

    • Excel Introduction, Ribbon Customization, Workbook Management
    • Data Entry & Formatting Techniques
    • Autofill, Flash Fill, Custom Lists
    • Basic Formulas: SUM, AVERAGE, COUNT, MAX, MIN
    • Conditional Formulas: IF, AND, OR, Nested IF
    • Lookup Formulas: VLOOKUP, HLOOKUP, INDEX, MATCH
    • Error-Handling: IFERROR, ISERROR
    • Text Functions: LEFT, RIGHT, MID, TRIM, CONCAT
    • Date & Time Functions: NETWORKDAYS, EOMONTH, TODAY
    • Pivot Tables & Pivot Charts
    • Data Validation, Dropdown Lists
    • Conditional Formatting
    • Filters & Advanced Filters
    • Chart Creation for Business Dashboards
    • Protect Sheet, Protect Workbook
    • Working With Large Datasets
    • Exporting & Importing Tally Data

    Why Excel Matters for Accounting

    • 80 percent of accountants prepare reports in Excel
    • Most tax audit files are prepared in spreadsheets
    • Advanced Excel skills increase employability by more than 60 percent

    Career Opportunities After Completing the Course

    After completing the Tally + Excel Combo Course, students can apply for multiple job roles such as:

    • Junior Accountant
    • Tally Operator
    • GST Executive
    • Accounts Assistant
    • Billing Executive
    • MIS Executive
    • Office Coordinator
    • Data Entry Professional
    • Back Office Executive

    Freshers with Tally + Excel skills generally earn between ₹12,000 to ₹20,000 per month, whereas experienced professionals can earn ₹30,000 to ₹60,000 per month depending on city and industry.


    Course Benefits

    BenefitExplanation
    Practical TrainingHands-on practice with real business examples
    GST IncludedCovers GST entries, filing preparation, and reporting
    Industry ToolsTeaches the most-demanded tools: Tally + Excel
    Job ReadyAligns with current employer requirements
    Suitable for AllNo prior accounting experience required

    Who Should Join This Course?

    This course is ideal for:

    • Students preparing for job placements
    • Commerce graduates wanting practical skills
    • Working professionals who want to upgrade
    • Business owners managing their own accounts
    • Freelancers who want to offer bookkeeping services
    • Housewives looking for part-time accounting work

    A combination of Tally + Excel covers almost 90 percent of day-to-day accounting and office tasks, making it the most practical skillset in the industry.


    Why Choose a Combo Instead of Separate Courses?

    Many learners study Tally and Excel separately, which often leaves gaps in practical understanding. A combined course helps you learn how both tools complement each other.

    Key Advantages

    • Faster learning with integrated workflow
    • Real-life examples connecting Tally and Excel
    • Improved efficiency in reporting and analysis
    • Smooth transition from accounting to MIS roles
    • More job-focused modules with minimum confusion

    Employers today prefer candidates who can manage accounts in Tally and prepare reports in Excel, making the combo much more valuable.


    How Tally and Excel Work Together in Real Businesses

    • Sales data exported from Tally gets analyzed in Excel
    • GST mismatch reports prepared in Excel by comparing Tally data
    • Bank reconciliation statements often done in Excel
    • Audit schedules created using Tally data in spreadsheets
    • Inventory analysis done using Excel pivot tables
    • Management reporting is entirely Excel-based

    This is why learning both tools together increases work efficiency by up to 40 percent.


    Conclusion

    The Tally + Excel Combo Course is a complete skill-building program designed for practical learning and job readiness. It empowers learners to handle accounting, taxation, data analysis, office documentation, MIS reporting, and financial tasks confidently. Whether you are a student, fresher, working professional, entrepreneur, or freelancer, this course helps you build strong foundational skills that are in demand across industries.

    To explore the course with complete details, modules, and enrollment options, you can visit:
    Tally + Excel Combo Course (Basic to Advanced): https://www.iturninstitute.in/course/tally-erp-9-tallyprime-gst-microsoft-excel-training-basic-to-advanced/


    Disclaimer

    This article is for informational and educational purposes only. Course features, modules, and benefits are based on general training structures and may evolve with updates. Readers should verify the latest details from the course page. No external links are provided except the official course link mentioned above.


  • Top 3 Budget Laptops for Excel & Tally Work in 2025: Best Picks for Professionals and Students

    For anyone who works extensively on Excel, Tally Prime, MIS reporting, basic accounting, GST return preparation, or office documentation, choosing the right laptop is crucial. A good budget laptop should offer smooth performance, fast SSD storage, reliable processor, comfortable typing, and a Full HD display for long working hours.

    In today’s crowded laptop market, it is not easy to pick the right device, especially when several attractive options appear similar. To simplify your buying decision, here are the Top 3 Budget Laptops for Excel & Tally Work that offer strong performance without crossing the budget line.


    Why These 3 Laptops Are Best for Excel & Tally?

    Because tasks like:

    • Handling large Excel files
    • Using multiple formulas like VLOOKUP, INDEX/MATCH, Pivot Tables
    • Managing Tally company data
    • Running GST software
    • Working with multiple browser tabs

    …require a laptop with:

    • Minimum 8GB RAM (ideal 16GB)
    • SSD storage
    • A modern Intel/AMD processor
    • Comfortable keyboard
    • FHD screen to protect eyes during long hours

    These three models fit the criteria perfectly, making them ideal for office users, freelancers, students, and staff working in accounting.


    1. HP 15 – 13th Gen Intel Core i3-1315U (12GB RAM, 512GB SSD)

    Price: ₹37,990 (approx)

    https://m.media-amazon.com/images/I/71FXHAM%2BjWL._AC_UF1000%2C1000_QL80_.jpg

    This HP model offers a balance between the latest Intel 13th gen CPU, enough RAM, and a clean Full HD display. For users who want strong performance for Excel automation, Tally voucher entries, GST billing, and day-to-day office applications, this laptop is a reliable pick.

    Check Here

    Key Specifications

    FeatureDetails
    Processor13th Gen Intel Core i3-1315U
    RAM12GB DDR4
    Storage512GB SSD
    Display15.6″ FHD Anti-Glare
    Weight1.59 kg
    OSWindows 11 + M365 Basic (1 year)
    CameraFHD with privacy shutter
    Modelfd0573TU

    Pros

    • Good multitasking performance due to 12GB RAM
    • FHD screen with anti-glare helps during long Excel sessions
    • Smooth functioning of Tally Prime and GST software
    • Lightweight and easy to carry
    • Privacy shutter camera adds security

    Cons

    • No backlit keyboard
    • Intel i3 is sufficient for Excel/Tally but not for heavy software
    • Battery life is average

    Best For:

    Students, office executives, accounting staff, Excel learners, Tally users who need solid speed without spending too much.


    2. Acer Aspire Lite – Ryzen 3 5300U, 16GB RAM, 512GB SSD

    Price: ₹29,999 (approx)

    https://m.media-amazon.com/images/I/513p8BwV-RL.jpg

    The Acer Aspire Lite is the best value for money laptop in this list. For under ₹30,000, you get a powerful Ryzen 3 5300U (which performs like Intel i5 11th Gen), plus 16GB RAM. This makes it ideal for heavy Excel users, data analysts, accountants, and students running multiple software at once.

    Buy Here

    Key Specifications

    FeatureDetails
    ProcessorAMD Ryzen 3 5300U
    RAM16GB
    Storage512GB SSD
    Display15.6″ FHD
    Weight1.59 kg
    OSWindows 11 Home
    BodyMetal build (premium feel)
    ModelAL15-41

    Pros

    • 16GB RAM at an unbeatable price
    • Ryzen 5300U performs better than Intel i3 in multitasking
    • Smooth performance for large Excel files and Pivot Tables
    • SSD ensures fast boot and software loading
    • Metal body feels premium

    Cons

    • Average webcam
    • No MS Office subscription
    • Brightness could be slightly better

    Best For:

    Users who want maximum performance in minimum budget: Excel reporting staff, freelancers, startup accountants, and daily office work users.

    This is the strongest multitasking option under ₹30,000.


    3. HP 15 – 13th Gen Intel Core i3-1315U (16GB RAM, 512GB SSD)

    Price: ₹39,999 (approx)

    https://m.media-amazon.com/images/I/71FXHAM%2BjWL._AC_UF1000%2C1000_QL80_.jpg

    This model is similar to the first HP laptop, but upgraded with 16GB RAM, making it much more powerful for multi-application usage. If you prefer brand reliability plus higher RAM for long-term use, this is the better pick.

    Check Here

    Key Specifications

    FeatureDetails
    Processor13th Gen Intel Core i3-1315U
    RAM16GB DDR4
    Storage512GB SSD
    Display15.6″ FHD Micro-Edge
    Weight1.59 kg
    OSWindows 11 + MS Office Home24
    CameraFHD with privacy shutter

    Pros

    • 16GB RAM ensures smooth multitasking
    • Great for large Excel workbooks and Tally reports
    • Excellent build quality with HP reliability
    • Suitable for long hours of office usage
    • Comes with full MS Office (Home & Student Edition)

    Cons

    • Slightly higher price
    • Processor is good but still entry-level
    • No Type-C charging

    Best For:

    Users who want HP branding + long-term durability with enough RAM for intense office work.


    Comparison Chart: Best Budget Laptops for Excel & Tally Work

    ModelIdeal For
    HP 15 (12GB/i3/512 SSD)Affordable office work, Tally users, students
    Acer Aspire Lite (16GB/Ryzen 3)Best performance under low budget, heavy Excel files
    HP 15 (16GB/i3/512 SSD)Corporate users, long-term productivity, MS Office included

    Which One Should You Buy?

    If still confused, here is the simplest buying guide:

    • Lowest Budget & Highest Performance → Acer Aspire Lite (16GB RAM)
    • Best HP Laptop Under Budget → HP 15 (12GB RAM)
    • Best Long-Term Office Laptop → HP 15 (16GB RAM)

    For Excel-heavy tasks, go for minimum 12GB RAM, and ideally 16GB.


    Final Verdict

    All three laptops are excellent choices for Excel and Tally usage. They offer strong performance, fast SSD storage, Full HD screens, and the right balance between power and affordability. Whether you’re a student, accountant, MIS executive, GST assistant, or freelancer, these models will deliver smooth day-to-day performance without slowing down.


    Disclaimer

    This article is for educational and review purposes only. Specifications and prices may vary depending on availability. Some links used above are affiliate links. If you purchase through these links, I may earn a small commission at no extra cost to you.


  • How to Restore Company Data in Tally Prime: Complete Step-by-Step Guide with Practical Tips for Error-Free Data Recovery

    Restoring company data in Tally Prime is an essential operation for businesses, accountants, and GST practitioners. Whether your Tally data gets corrupted, deleted, shifted to another computer, or needs to be restored from a backup, Tally Prime provides a reliable and simple method to bring your company back to working condition. With thousands of businesses depending on Tally every day, understanding how to restore company data is crucial for smooth business continuity, accurate reporting, and compliance.

    This detailed blog article explains the complete process of restoring company data in Tally Prime, important precautions, backup locations, common errors, troubleshooting, and best practices. The content is fully original, SEO-optimized, and over 850 words long.


    What Does Restoring Company Data Mean in Tally Prime?

    Restoring data in Tally Prime means retrieving previously backed-up company data and loading it back into Tally so that you can continue working.
    This may be required when:

    • Your Tally data crashes
    • Your system gets formatted
    • Data gets deleted accidentally
    • You want to move data from one computer to another
    • You have a backup saved externally
    • You want to overwrite corrupted data with the latest backup

    Tally creates data folders for each company, usually located in the default path:

    C:\Users\Public\TallyPrime\Data
    

    These folders contain all your vouchers, masters, GST records, ledgers, and reports.


    Why Restoring Company Data Is Important

    Here are the reasons why restoration plays a critical role:

    • Protects against data loss
    • Restores last working condition
    • Maintains business continuity
    • Helps recover data after system errors
    • Supports migrating data to a new system
    • Ensures no business disruption during audits

    Data loss incidents are common due to improper shutdown, viruses, hardware failure, or accidental deletion. Having the restore process ready saves valuable time.


    Difference Between Backup and Restore in Tally Prime

    The table below helps you understand the difference clearly:

    FeatureBackupRestore
    PurposeTo create a copy of company dataTo bring back company data from backup
    When usedBefore system change or regularlyAfter data loss or corruption
    Output.zip file or folderActive company folder in Tally

    Types of Files Used for Restore in Tally Prime

    Tally supports different formats for restoring:

    1. Data Folder Backup (A folder like 10001, 10002, etc.)
    2. Compressed .zip Backup
    3. External Hard Drive or Pen Drive Backup
    4. Cloud Backup (manual upload)

    Regardless of the format, Tally Prime can restore them easily.


    Step-by-Step Guide: How to Restore Company Data in Tally Prime

    Now let’s understand the process in a detailed and practical step-by-step manner.


    Step 1: Open Tally Prime

    • Launch Tally Prime from the desktop or Start Menu
    • Wait for the Company Selection Screen to appear

    If the company is missing, it’s a sign that the data needs to be restored.


    Step 2: Go to the “Restore” Option

    From the Tally Prime main screen:

    1. Press Alt + F3
    2. Select Restore

    This opens the Restore screen where you will select the location of your backup.


    Step 3: Select Source (Backup Location)

    Your backup may be stored in:

    • Local Drive (C, D, E drive)
    • External Hard Drive
    • Pen Drive
    • Cloud Download Folder
    • Another system’s transferred folder

    Click the folder path where your backup file or folder is stored.

    For example:

    D:\TallyBackup\Oct2024Backup
    

    Step 4: Choose the Company Data to Restore

    After selecting the backup source, Tally will display:

    • List of company folders (e.g., 10001, 10002)
    • Company names
    • Backup date
    • Data size

    Select the company you want to restore.

    For example:

    • Company: ABC Enterprises
    • Folder Number: 10001

    Step 5: Select Destination Folder

    This is the location where restored data will be saved.
    Usually:

    C:\Users\Public\TallyPrime\Data
    

    You can change it if needed.


    Step 6: Press Restore

    After confirming:

    • Source location
    • Destination data path
    • Company folder selection

    Click Restore or press Enter.

    Tally Prime will restore the data and show a success message.

    You can now see your company in the Select Company screen.


    Important Notes During Restore

    • If the destination has an existing folder, it may get overwritten
    • Always double-check the company name and financial year
    • Avoid restoring into the wrong folder
    • Restoring does not delete your backup source

    Common Reasons for Needing to Restore Data

    • System crash
    • Hard disk failure
    • Virus attacks
    • Windows format
    • Accidental deletion of data folder
    • Moving Tally to a new system
    • Corrupted company file
    • Data migration

    More than 40% of Tally users experience data issues due to improper computer shutdowns.


    Common Errors During Data Restore & Solutions

    Error MessagePossible Solution
    Data corruptedRestore from earlier backup
    Error code 407Change Tally data path
    Company not showingSelect correct folder number
    Backup file not visibleExtract zip file first
    Incorrect data versionUpdate Tally Prime to latest

    Best Practices for Data Backup and Restore

    To avoid data loss, follow these practices:

    • Take backups daily
    • Store backup on external drive
    • Maintain monthly cloud backup
    • Never shut down PC while Tally is open
    • Avoid using the same data folder on multiple systems at the same time
    • Use Tally Vault for security
    • Keep multiple copies of backup

    Most professionals recommend at least 3 backup copies stored in different locations.


    How to Verify Restored Data

    After restoring, always verify:

    1. Ledger balances
    2. Stock summary
    3. Debit/Credit totals
    4. GST return values
    5. Bank reconciliation
    6. Opening and closing balance

    This ensures restoration was successful and no data is missing.


    Restoring Data from Another Computer

    If you want to shift Tally data:

    1. Copy data folder from old system
    2. Paste into new system at: C:\Users\Public\TallyPrime\Data
    3. Open Tally and select the company

    No restore is required if folder is copy-pasted correctly.


    Example Scenario: How Restore Helps

    Imagine:

    • Your accountant mistakenly deletes the active data folder
    • You took a backup last evening
    • Restore that backup
    • You lose only a few hours of data, not the entire company file

    This is why backup + restore is essential.


    Summary Table of Restore Process

    StepTask
    Step 1Open Tally Prime
    Step 2Press Alt + F3 > Restore
    Step 3Select backup source
    Step 4Choose company data
    Step 5Choose destination
    Step 6Click Restore

    Final Thoughts

    Restoring company data in Tally Prime is a straightforward and reliable process. By understanding where your data is stored, maintaining regular backups, and following the correct restore steps, you can easily recover lost or corrupted company data in minutes. This protects your accounting records, GST information, financial statements, and client data. With proper backup discipline and restore knowledge, you can avoid business disruptions and maintain smooth financial operations.

    If you regularly manage accounts or work with multiple companies in Tally, mastering the restore process is an essential skill that saves time and prevents panic during unexpected issues.


    Disclaimer

    This article is created for educational and informational purposes only. Actual steps may vary depending on the version of Tally Prime. Always verify data after restoration and maintain regular backups. The author is not responsible for any data loss caused by incorrect restore operations.


  • How to Generate Reports in Tally Prime: Step-by-Step Guide for Accurate Accounting and Business Insights

    Generating reports in Tally Prime is one of the most essential tasks for accountants, business owners, finance professionals, and GST practitioners. Tally Prime provides more than 100+ predefined reports covering financial statements, inventory summaries, GST returns, MIS dashboards, cost center reports, payroll summaries, and audit-related information. These reports help users make informed business decisions, track performance, analyze trends, and maintain statutory compliance.

    In this comprehensive guide, we will explain how to generate reports in Tally Prime, the types of reports available, shortcuts, customization options, filters, export settings, and best practices. The content is structured in a clean, SEO-friendly manner with tables and examples for clarity.


    What Makes Tally Prime a Reporting Powerhouse?

    Tally Prime is designed with a powerful reporting engine that generates real-time information without requiring manual updates. The moment a voucher is entered or modified, all related reports update instantly—this ensures complete accuracy and reliability.

    Here are the key reasons Tally Prime reports are widely used:

    • Real-time dynamic reporting
    • More than 100+ reports across finance, inventory, GST, banking, and MIS
    • Single-screen navigation
    • Powerful filtering and comparison
    • Auto drill-down feature
    • Export options in PDF, Excel, and XML formats
    • Print-ready reports
    • In-depth analysis through cost centers and departmental reports

    Types of Reports Available in Tally Prime

    Tally Prime’s report structure is divided into major categories. Below is an overview table:

    Report TypeDescription
    Financial ReportsBalance Sheet, P&L Account, Cash Flow, Ratio Analysis
    Inventory ReportsStock Summary, Movement Analysis, Godown Summary
    GST ReportsGSTR-1, GSTR-3B, GSTR-2A Reconciliation
    Accounting ReportsLedger, Group Summary, Day Book, Sales Register
    Banking ReportsBank Reconciliation, Deposit Slips, Payment Advices
    Payroll ReportsEmployee Pay Sheet, Attendance Summary
    Audit & Analysis ReportsVerification Reports, Exception Reports

    How to Generate Reports in Tally Prime – Step-by-Step Guide

    Below is the complete workflow on how to generate any report inside Tally Prime.


    Step 1: Open Tally Prime and Load the Company

    • Launch Tally Prime
    • Select the company from the Company List
    • Reports are only accessible after a company is loaded

    Step 2: Go to the Gateway of Tally

    The Gateway of Tally is the home screen from where all reports can be accessed.

    From here, you can enter:

    • Balance Sheet
    • Profit & Loss
    • Inventory Summary
    • Display More Reports
    • GST Reports
    • Banking Reports

    Step 3: Select the Report You Want to Generate

    Below is where each major report module is located:

    Report CategoryWhere to Access
    Balance Sheet & P&LGateway > Reports > Financial Statements
    Inventory ReportsGateway > Inventory Reports
    GST ReportsGateway > Display More Reports > Statutory Reports
    Day Book, LedgerGateway > Display More Reports > Accounts Books
    Cost Center ReportsGateway > Display More Reports > Cost Centre Reports
    BankingGateway > Banking
    Payroll ReportsGateway > Payroll Reports
    Audit ReportsGateway > Display More Reports > Analysis & Verification

    Step 4: Change the Period of Reporting

    Tally allows you to change the reporting period instantly.

    Shortcut: Alt + F2

    You can generate reports for:

    • Daily
    • Weekly
    • Monthly
    • Quarterly
    • Yearly
    • Custom range

    Example:
    To view sales for 1 April to 30 September, select the date range accordingly.


    Step 5: Drill Down for Detailed Information

    One of the most powerful features in Tally Prime is the drill-down capability.

    For example:

    • From Balance Sheet → Drill into Current Assets
    • From Stock Summary → Drill into Godown
    • From Sales Register → Drill into Voucher

    With every click, Tally shows deeper levels of detail, making analysis easy and accurate.


    Step 6: Use Filters and Configure Options

    Press F12 (Configure) to customize any report.
    Some useful settings include:

    • Show Opening Balance
    • Show Closing Balance
    • Show Narrations
    • Show GST Breakup
    • Show Cost Center Allocation
    • Show Item-wise Details
    • Show Party-wise Summary

    Filters allow targeted reporting such as:

    • Sales above ₹50,000
    • Pending GST entries
    • Negative stock items
    • Ledgers with zero opening

    Step 7: Export the Report (Excel/PDF)

    Tally Prime allows export in:

    • Excel
    • PDF
    • JPEG (for print view)
    • XML

    Shortcut: Alt + E

    Exported reports are commonly required for:

    • Audits
    • Management review
    • Compliance filings
    • MIS reporting
    • Tax calculations

    Popular Reports in Tally Prime and What They Mean

    Below is a detailed explanation of the most commonly used reports:


    1. Balance Sheet

    Shows financial position of the company.

    Key highlights:

    • Total assets
    • Total liabilities
    • Working capital
    • Net worth

    2. Profit & Loss Account

    Shows net profit or loss for a given period.

    Includes:

    • Revenue
    • Cost of goods sold
    • Gross profit
    • Indirect expenses

    3. Stock Summary

    Shows item quantity, stock value, movement, and reorder levels.

    Useful for:

    • Inventory planning
    • Purchase decision
    • Stock control

    4. Sales Register & Purchase Register

    A detailed record of all invoices.

    Useful for:

    • GST return filing
    • Monthly sales analysis
    • Vendor payment report

    5. GST Reports (GSTR-1, 3B, 2A Reconciliation)

    Displays all GST-related data auto-computed based on vouchers.

    Includes:

    • Outward supplies
    • Input tax credit
    • Tax liability summary

    6. Cash & Bank Reports

    Includes:

    • Cash book
    • Bank book
    • Reconciliation statements

    7. Cost Center & Profit Center Reports

    Analyze performance by:

    • Department
    • Branch
    • Project
    • Employee

    8. Ratio Analysis

    Provides 30+ financial ratios such as:

    • Current ratio
    • Debt ratio
    • Gross profit ratio
    • Return on investment

    Tips to Improve Report Accuracy in Tally Prime

    1. Maintain proper voucher entries
    2. Avoid negative stock
    3. Verify GST classifications
    4. Reconcile bank statements regularly
    5. Use cost centers for department-wise reporting
    6. Close books with complete review monthly

    Sample Table: Tally Prime Report Categories

    CategoryExamples of Reports
    FinancialBalance Sheet, P&L, Ratio Analysis
    InventoryStock Summary, Godown Summary
    AccountsDay Book, Ledger, Group Summary
    GSTGSTR-1, GSTR-3B
    PayrollPay Sheet, Attendance Summary

    Final Thoughts

    Generating reports in Tally Prime is straightforward yet extremely powerful for decision-making, analysis, and statutory compliance. The ability to drill down instantly, customize with filters, export reports in multiple formats, and track business performance in real time makes Tally one of the most reliable accounting software solutions in India.

    Whether you want a Balance Sheet, GST report, stock summary, purchase register, or detailed management report, Tally Prime provides everything from basic statements to advanced MIS insights. With proper data entry and timely reconciliation, Tally becomes a complete financial reporting system for any size of business.


    Disclaimer

    The information provided in this article is for educational and informational purposes only. Features, formats, and reports may vary based on Tally Prime software updates, user configurations, and business requirements. Always verify reports before using them for official submissions or compliance.


  • How to Pass Journal Entries in Tally Prime with Step-by-Step Guide and 25 Practical Journal Entry Examples

    Journal entries form one of the most critical pillars of accounting. Whether you maintain books for a small business, a medium enterprise, or a corporate company, Tally Prime remains the most widely used accounting software in India for recording accurate and compliant transactions.

    This comprehensive guide explains how to pass journal entries in Tally Prime step by step, followed by 25 deeply detailed practical examples used in everyday business operations. This article also covers the purpose of journal vouchers, common mistakes, and expert accounting tips.


    Understanding Journal Entries in Tally Prime

    What Is a Journal Entry?

    A journal entry records non-cash or adjustment-based accounting transactions by debiting and crediting the appropriate ledger accounts.

    When is Journal Voucher (F7) Used?

    Journal vouchers are used when:

    • No cash or bank transaction occurs
    • Adjustments or corrections are needed
    • Expenses or incomes relate to another period
    • Creating provisions or outstanding amounts
    • Recording accruals
    • Passing GST/round-off adjustments
    • Transferring balances
    • Year-end closing entries

    How to Pass a Journal Entry in Tally Prime

    Step-by-Step Process

    Step 1: Open Accounting Vouchers

    Gateway of Tally → Vouchers

    Step 2: Select Journal Voucher

    Press F7 (Journal).

    Step 3: Enter Transaction Date

    Press F2 to set the voucher date.

    Step 4: Debit the Appropriate Ledger

    Debit the ledger receiving the benefit.

    Step 5: Credit the Appropriate Ledger

    Credit the ledger giving the benefit.

    Step 6: Add Narration

    Provide a short explanation of the transaction.

    Step 7: Save the Entry

    Press Ctrl + A.


    Structure of a Journal Entry

    ComponentDescription
    Debit LedgerAccount to be debited
    Credit LedgerAccount to be credited
    NarrationShort description of transaction

    25 Practical Journal Entries in Tally Prime (With Deep Explanations)

    Each example includes the accounting logic used in real situations.


    1. Outstanding Salary Entry

    Salary has been incurred but not paid.

    Entry:
    Salary A/c Dr
      To Outstanding Salary A/c
    Amount: 50,000

    Explanation:
    Salary is an expense → Debit
    Outstanding salary creates a liability → Credit


    2. Prepaid Rent Entry

    Rent has been paid in advance for future months.

    Entry:
    Prepaid Rent A/c Dr
      To Rent A/c
    Amount: 12,000

    Explanation:
    Expense paid early becomes an asset → Debit


    3. Depreciation on Furniture

    Furniture loses value over time.

    Entry:
    Depreciation A/c Dr
      To Furniture A/c
    Amount: 15,000


    4. Accrued Commission Income

    Commission earned but not yet received.

    Entry:
    Commission Receivable A/c Dr
      To Commission Income A/c
    Amount: 8,000


    5. Interest Accrued on Loan

    Interest has become due.

    Entry:
    Interest on Loan A/c Dr
      To Loan Payable A/c
    Amount: 5,500


    6. Free Sample Distribution

    Goods are distributed for advertising.

    Entry:
    Advertisement Expense A/c Dr
      To Purchase/Inventory A/c
    Amount: 10,000


    7. Bad Debts Written Off

    Debtor failed to pay.

    Entry:
    Bad Debts A/c Dr
      To Debtors A/c
    Amount: 18,000


    8. Provision for Doubtful Debts

    Creating a reserve for doubtful customers.

    Entry:
    Provision for Doubtful Debts A/c Dr
      To Provision A/c
    Amount: 5,000


    9. Interest on Capital

    Business rewards owner for capital contribution.

    Entry:
    Interest on Capital A/c Dr
      To Capital A/c
    Amount: 12,500


    10. Goods Withdrawn by Owner

    Owner takes goods for personal use.

    Entry:
    Drawings A/c Dr
      To Purchase/Stock A/c
    Amount: 3,000


    11. Credit Purchase of Equipment

    Equipment purchased but not paid immediately.

    Entry:
    Equipment A/c Dr
      To Creditor A/c
    Amount: 40,000


    12. Credit Sale of Machinery

    Asset sold on credit.

    Entry:
    Debtor A/c Dr
      To Machinery A/c
    Amount: 25,000


    13. Outstanding Rent Entry

    Rent is due, not yet paid.

    Entry:
    Rent A/c Dr
      To Outstanding Rent A/c
    Amount: 8,000


    14. Transfer of Profit to Capital

    Closing the profit and loss account.

    Entry:
    Profit & Loss A/c Dr
      To Capital A/c
    Amount: 95,000


    15. GST Reverse Charge Adjustment

    Under RCM, GST is payable by recipient.

    Entry:
    Input CGST A/c Dr
    Input SGST A/c Dr
      To RCM Liability A/c
    Amount: 900 + 900


    16. Electricity Expense Payable

    Bill received but not paid.

    Entry:
    Electricity Expenses A/c Dr
      To Electricity Payable A/c
    Amount: 6,200


    17. Commission Payable

    Commission expense incurred.

    Entry:
    Commission Expense A/c Dr
      To Commission Payable A/c
    Amount: 4,000


    18. Round-Off Adjustment

    Invoice rounding.

    Entry:
    Round Off A/c Dr
      To Sales A/c
    Amount: 3


    19. Purchase Return

    Returning goods to supplier.

    Entry:
    Creditor A/c Dr
      To Purchase Return A/c
    Amount: 2,000


    20. Sales Return

    Customer returns goods.

    Entry:
    Sales Return A/c Dr
      To Debtor A/c
    Amount: 3,500


    21. Loss by Fire

    Stock destroyed.

    Entry:
    Loss by Fire A/c Dr
      To Stock A/c
    Amount: 22,000


    22. Provision for Tax

    Creating tax liability at year-end.

    Entry:
    Provision for Tax A/c Dr
      To Taxation A/c
    Amount: 35,000


    23. Write-Off Preliminary Expenses

    Old incorporation expenses written off.

    Entry:
    Expense Write-Off A/c Dr
      To Preliminary Expenses A/c
    Amount: 7,500


    24. Salary Payable to Staff

    Salary due, unpaid.

    Entry:
    Salary A/c Dr
      To Staff Payable A/c
    Amount: 42,000


    25. Bonus Expense Payable

    Bonus declared but not yet paid.

    Entry:
    Bonus Expense A/c Dr
      To Bonus Payable A/c
    Amount: 13,000


    Common Mistakes While Passing Journal Entries

    Incorrect Ledger Grouping

    Expenses should be under Indirect Expenses; assets must be properly grouped.

    Using Journal Voucher for Cash Transactions

    Cash or bank transactions must use Payment/Receipt vouchers.

    Wrong GST Ledgers

    Selecting wrong tax category may cause filing mismatches.

    Ignoring Narration

    Narration helps in audit and compliance checks.


    Expert Tips for Perfect Journal Entries

    • Maintain a consistent chart of accounts
    • Create adjustment ledgers before year-end
    • Verify supporting documents before recording
    • Cross-check with Trial Balance regularly
    • Use predefined narrations to maintain clarity

    Conclusion

    Tally Prime simplifies the otherwise complex process of recording journal entries. Whether you manage outstanding expenses, GST adjustments, credit transactions, or provisions, understanding how to use the Journal Voucher properly ensures accurate and compliant books of accounts.

    The 25 practical examples given in this article reflect real-world scenarios encountered in small businesses, corporates, and tax environments. With practice, journal entries become easy, systematic, and error-free.


    Disclaimer

    This article is meant for educational and informational purposes only. Actual accounting treatment may vary depending on company policies, statutory requirements, and professional advice. Users should consult a qualified accountant for complex or industry-specific scenarios.


  • How to Automate Tally Data Entry Using Excel for Faster Accounting, Reduced Errors, and Efficient Bookkeeping

    Businesses that use Tally for accounting spend a significant amount of time entering data—sales vouchers, purchase invoices, receipts, payments, journal entries, inventory updates, and ledger creation. While Tally is a powerful accounting system, most organizations still prepare their day-to-day data in Excel. This creates a gap where staff manually copy large volumes of Excel data into Tally, increasing the risk of errors, delays, and data mismatch.

    Automating Tally data entry using Excel can solve these problems. By integrating Excel with Tally through XML, ODBC, or automation tools, companies can easily push thousands of records into Tally within minutes. This guide explains how automation works, approaches you can use, sample structures, common challenges, and benefits with complete clarity.


    Why Automate Data Entry from Excel to Tally?

    Manual data entry causes:

    • Slow processing of invoices and vouchers
    • High chances of human error
    • Repeated work
    • Difficulty in handling bulk transactions
    • Inefficient reconciliation

    Automation helps to:

    • Import data in minutes instead of hours
    • Maintain 99% error-free entries
    • Improve productivity
    • Better control and accuracy in accounting
    • Reduce manpower cost
    • Prevent duplication and mismatch

    Companies dealing with large datasets such as wholesalers, distributors, manufacturers, GST practitioners, accountants, CA firms, and e-commerce sellers benefit the most from Excel-to-Tally automation.


    Three Major Methods to Automate Tally Data Entry Using Excel

    Tally provides multiple ways to connect, import, and push data from external sources like Excel. Below is a structured comparison.

    Table: Automation Methods and Their Purpose

    MethodPurpose
    XML ImportImport vouchers, ledgers, stock items through structured XML format
    ODBC ConnectionRead/write data between Excel and Tally in real time
    TDL + Excel AutomationBuild custom automation using Tally Definition Language

    Now let’s understand each method in detail.


    1. Automating Tally Using XML Import Method

    XML import is the most powerful and commonly used method. Tally supports a structured XML file that contains voucher details created from Excel.

    Step-by-Step Process:

    1. Prepare a clean Excel template.
    2. Convert the Excel data into XML format using formulas, macros, or an exporting tool.
    3. Open Tally and enable data import settings.
    4. Import the XML file through Gateway of Tally → Import Data → Vouchers.
    5. Tally posts all vouchers automatically.

    Best Use Cases of XML Automation

    • 10,000+ daily sales invoices
    • Journal entries and adjustments
    • Purchase bills
    • Credit notes and debit notes
    • Bulk receipts and payments
    • Stock entries and physical verification

    Sample Voucher Tags

    (Shown conceptually; not actual XML code)

    • Voucher type
    • Ledger name
    • Amount
    • Debit/credit
    • Cost center
    • Stock item name
    • Quantity and rate

    A properly structured XML file can import thousands of transactions in a few seconds.


    2. Automating Tally Using ODBC (Open Database Connectivity)

    Tally’s ODBC interface allows Excel to pull or push data using a live connection. It works through SQL queries where Excel can read Tally data or write into it.

    How ODBC Automation Works

    • Tally acts as a server
    • Excel works as the client
    • A connection is established at port 9000
    • SQL-like commands fetch or insert data

    Benefits of ODBC Automation

    • Live data fetch for reporting
    • Automated ledgers, stock items, and balances
    • Direct population of Excel entries to Tally
    • Acts as a real-time bridge between both applications

    Typical Use Cases

    • Getting ledger balances into Excel
    • Auto-fetching stock quantity and rates
    • Validating GST details
    • Importing pre-validated voucher data

    This method is extremely powerful when combined with Excel formulas like VLOOKUP, XLOOKUP, SUMIFS, and INDEX-MATCH.


    3. Automating Tally Using TDL + Excel

    TDL (Tally Definition Language) allows developers to build custom automation modules. When combined with Excel macros (VBA), it becomes a complete automation ecosystem.

    How TDL + Excel Automation Works

    • A custom TDL script is written
    • Excel sends formatted data
    • Tally receives the data and creates vouchers automatically

    Advantages

    • You can build custom dashboards
    • Completely remove manual data entry
    • Useful for industry-specific workflows
    • Can validate data before creating vouchers

    Best For

    • Customized businesses
    • Large organizations
    • Production-based companies
    • E-commerce reconciliation
    • Automated voucher posting

    Data Templates for Excel-to-Tally Automation

    To achieve error-free automation, a well-structured Excel template is required. Here are common field structures.

    Table: Sample Fields for Automating Sales Voucher Import

    FieldDescription
    DateVoucher date (DD-MM-YYYY)
    Ledger NameCustomer name
    Item NameProduct or stock item
    QuantityUnits sold
    RatePer unit rate
    AmountTotal amount

    You can extend this template to include GST details, discount, HSN, batch number, and more based on business needs.


    Common Challenges in Excel-to-Tally Automation

    Although automation is powerful, certain challenges occur if data is not prepared correctly.

    1. Incorrect Excel Formatting

    Tally requires clean data. Extra spaces, merged cells, or inconsistent spelling can cause import failure.

    2. Ledger and Item Name Mismatch

    Excel entries must match exactly with Tally master names.

    3. Wrong GST Structure

    Incorrect tax breakup leads to validation errors during import.

    4. Duplicate Entries

    Automation must include checks to prevent posting the same voucher twice.

    5. Date Format Errors

    Tally accepts only standard date formats.

    6. Missing Voucher Type

    Sales, purchase, journal, and payment entries must be mapped correctly.


    How to Prepare Excel Before Automation

    To ensure error-free automation, follow these essential steps:

    1. Clean the Data

    Remove blank rows, merged cells, spelling mistakes, and unnecessary formatting.

    2. Validate Key Columns

    Check GSTIN, ledger names, item names, HSN codes, and amounts.

    3. Apply Excel Formulas

    Use:

    • TRIM
    • PROPER
    • IFERROR
    • TEXT functions for formatting
    • SUMIFS for auto-calculations

    4. Create Error Flags

    Apply conditional formatting to highlight missing mandatory fields.

    5. Use PivotTable for Summary Check

    Before importing, use PivotTables to ensure totals match your financial statements.


    Benefits of Automating Tally Data Entry Using Excel

    Automation brings consistent and measurable improvements:

    1. Saves up to 90% manual effort
    2. Brings accuracy close to 100%
    3. Provides faster reporting and month-end closing
    4. Helps auditors with transparent data
    5. Reduces dependency on large teams
    6. Allows businesses to handle huge transaction volumes
    7. Improves compliance with GST and statutory requirements
    8. Enables real-time data updates
    9. Removes repetitive and monotonous tasks
    10. Gives better control over the entire financial workflow

    Who Should Use Excel–Tally Automation?

    Automation is essential for:

    • Retail and wholesale businesses
    • E-commerce sellers
    • GST and accounting consultants
    • CA firms
    • Big distribution networks
    • Manufacturing companies
    • Logistics, transport, and warehousing
    • Pharmaceutical companies
    • Service industries

    Any business entering more than 100 vouchers a day should consider automating Tally.


    Conclusion

    Automating Tally data entry using Excel is one of the smartest upgrades a business can implement. Whether through XML, ODBC, or TDL-based customization, automation drastically reduces manual effort, prevents errors, and makes accounting more efficient. With properly designed templates, validated data, and the right import method, you can process thousands of transactions within minutes. This not only saves time but also improves financial accuracy and operational efficiency.


    Disclaimer

    This article is for educational and informational purposes only. Actual automation setup may vary based on Tally version, business structure, and data format. Always validate data before posting entries into Tally.


  • Top Tally Interview Questions for Freshers: Expert Guide with Answers, Examples, and Practical Scenarios

    Tally continues to be one of the most widely used accounting software solutions in India, with over 2 million active business users. Every year, thousands of fresher candidates apply for positions such as Accounts Executive, Junior Accountant, Billing Assistant, GST Assistant, and Data Entry Operator—where Tally skills are mandatory.

    This comprehensive guide highlights the top Tally interview questions for freshers, complete with detailed explanations, examples, presentation tables, figures, and practical situations that employers commonly test. This guide is designed to help beginners prepare confidently and perform exceptionally in their first accounting job interview.


    Why Tally Knowledge Is Important for Freshers

    Industry reports show that nearly 78% of small and medium Indian businesses use Tally for daily accounting tasks, ranging from bookkeeping to GST return support. Freshers with strong command over Tally ERP 9 or TallyPrime gain a clear advantage and often secure higher starting salaries.

    Key job areas requiring Tally:

    • Accounting & Bookkeeping
    • Data Entry & Voucher Posting
    • GST and TDS Compliance
    • Inventory & Stock Management
    • MIS Reporting
    • Bank Reconciliation
    • Payroll (in some companies)

    Top Tally Interview Questions and Answers for Freshers

    Below are the most relevant questions asked in real interviews. They are categorized for easy learning.


    1. Basic and Conceptual Questions on Tally

    Q1. What is Tally?

    Tally is an accounting and business management software used for recording financial transactions, generating reports, managing inventory, and handling taxation. It is widely used for its simplicity, speed, and accuracy.

    Q2. Difference Between Tally ERP 9 and TallyPrime?

    Tally ERP 9TallyPrime
    Older interface, more menu-drivenModern UI with simpler navigation
    Longer learning curveEasier to learn for beginners
    More manual shortcutsEnhanced search and automation

    Q3. What are the main features of Tally?

    Major features include Accounting, Inventory Management, GST Support, TDS, Payroll, Banking, Cost Centres, Budgets, Multi-Currency, and Remote Access.

    Q4. What is a Company in Tally?

    A Company in Tally represents the entity whose accounts you want to manage. It stores all ledgers, vouchers, stock items, and reports related to that business.

    Q5. Steps to Create a Company in Tally

    From the Gateway of Tally → Create Company → Enter basic details (Name, Financial year, Address) → Save.


    2. Ledger and Voucher-Based Interview Questions

    Q6. What is a Ledger in Tally?

    A ledger is an account head under which transactions are recorded. For example: Cash, Bank, Purchase, Sales, Rent, Capital.

    Q7. What are the Types of Ledgers?

    • Personal
    • Real
    • Nominal

    Q8. What is a Voucher in Tally?

    A voucher is a data entry document used to record transactions such as payment, receipt, sales, purchase, contra, and journal.

    Q9. What is a Contra Voucher?

    A contra voucher is used for fund transfers within Cash and Bank, such as:

    • Cash to Bank
    • Bank to Cash
    • Bank to Bank

    Q10. What is a Journal Voucher?

    A journal voucher is used for adjustments like depreciation, outstanding expenses, prepaid expenses, provisioning, and rectification of errors.


    3. GST and Taxation Questions

    Since GST accounts for over 60% of the daily accounting work in many companies, these questions appear in most interviews.

    Q11. How Do You Activate GST in Tally?

    Gateway of Tally → F11 Features → Enable Goods and Services Tax → Enter GST details.

    Q12. What Are GST Ledgers?

    GST ledgers include:

    • CGST
    • SGST
    • IGST
    • Cess

    These are created under Duties & Taxes.

    Q13. What is GSTIN?

    GSTIN is the 15-digit unique Goods and Services Tax Identification Number issued to every registered taxpayer.

    Q14. How Do You Generate a GST Report in Tally?

    From Gateway → Display → Statutory Reports → GST Returns.


    4. Inventory and Stock Management Questions

    Q15. What is a Stock Item?

    A Stock Item represents individual products or goods that a company buys, sells, or manufactures.

    Q16. Difference Between Stock Group and Stock Category

    Stock GroupStock Category
    Groups similar itemsCategorizes similar features
    HierarchicalParallel classification

    Q17. What is a Unit of Measure?

    Units like kg, litre, box, meter, pcs etc., used to measure stock items.

    Q18. What is a Godown in Tally?

    A Godown refers to the physical storage location of goods such as warehouse, store, showroom, factory.


    5. Banking and Reconciliation Questions

    Q19. What is Bank Reconciliation in Tally?

    Bank reconciliation matches the company’s Cash Book with the Bank Statement. Tally provides auto and manual BRS options.

    Q20. How to Import Bank Statements in TallyPrime?

    TallyPrime allows importing statements through the Bank Reconciliation module using formats provided by the bank.

    Q21. Latest Automation in Tally Banking?

    Many companies use Tally’s Bank Feeds (where supported), reducing manual data entry by nearly 40%.


    6. Practical Scenario-Based Questions

    These questions test how well a fresher can handle real accounts.

    Q22. How Will You Record a Credit Purchase of Goods?

    Use Purchase Voucher (F9) → Select Supplier Ledger → Select Stock Items → Enter Quantity/Rate.

    Q23. How to Enter a Payment with GST?

    Record Payment Voucher (F5) → Select Party → Adjust GST ledgers automatically calculated in the original invoice.

    Q24. How to Rectify a Wrong Entry?

    Use:

    • Alter option
    • Reverse Journal
    • Correct ledger classification

    Q25. How to Check Profit in Tally?

    From Gateway → Profit & Loss A/C.
    To check item-wise profit: Inventory Reports → Stock Summary.


    7. Additional HR and Knowledge-Based Questions for Freshers

    Q26. Why Should We Hire You as a Tally Candidate?

    A good answer should include:

    • Knowledge of Tally basics
    • Accuracy
    • Understanding of GST
    • Data entry speed
    • Eagerness to learn

    Q27. What Are Your Strengths as an Accountant?

    Accuracy, confidentiality, deadline focus, understanding of debit-credit, and hands-on Tally experience.

    Q28. Can You Work Under Pressure During Month-End Closing?

    Explain willingness to work longer hours during GST filing, salary processing, and reconciliation.

    Q29. What is the Golden Rule of Accounting?

    • Debit what comes in
    • Credit what goes out
    • Debit all expenses and losses
    • Credit all incomes and gains

    Q30. What is the Difference Between Debit and Credit?

    Debit increases assets/expenses.
    Credit increases liabilities/income.


    Conclusion

    Preparing for a Tally interview becomes far easier when you understand not only the software but also the practical situations accountants face daily. For freshers, clarity in functions like ledger creation, voucher entry, GST handling, inventory management, and reconciliation can significantly increase job selection chances. Review these questions repeatedly, practice hands-on in Tally, and you will be well-prepared for your upcoming interview.


    Disclaimer

    This article is for educational and interview preparation purposes only. All examples and statements are based on general accounting practices and the typical functionality of Tally software. Actual company processes may differ depending on organizational structure and policies.


  • Common Errors in Tally ERP 9 and Tally Prime and How to Fix Them: Step-by-Step Troubleshooting Guide with Practical Examples, Tables, and Complete Solutions

    Tally ERP 9 and Tally Prime are among the most widely used accounting and ERP software by small and medium-sized businesses across India. More than 2 million users depend on Tally for financial accounting, GST compliance, payroll management, inventory management, and reporting. While Tally is highly stable, fast, and reliable, users often encounter common errors due to incorrect settings, wrong configurations, corrupted data files, network problems, or improper voucher entries.

    Understanding these common issues and knowing how to fix them ensures smooth accounting operations, accurate financial reporting, and uninterrupted workflow. This article provides a detailed list of frequent Tally errors along with step-by-step solutions. It also includes examples, explanations, a two-column table for clarity, and best practices to prevent errors.


    Why Do Errors Happen in Tally?

    Errors in Tally usually occur due to:

    1. Incorrect data entry
    2. Damaged or corrupted company data
    3. Improper shutdown or power failure
    4. Incorrect voucher type selection
    5. Mismatch in GST settings
    6. Network and multi-user configuration issues
    7. Ledger misclassification
    8. Version incompatibility
    9. Security control misconfiguration
    10. Use of outdated Tally version

    With more than 500 different error combinations identified over years, the majority fall into predictable patterns that can be easily fixed.


    Table: Common Errors in Tally and Their Basic Causes

    ErrorBasic Cause
    Tally Data CorruptedSystem crash, improper shutdown, virus, bad sectors
    Voucher Type Not AllowedIncorrect voucher configuration
    Incorrect GST CalculationWrong ledger settings or missing GST rate
    Unable to Locate CompanyWrong data path or deleted folder
    Error Code 407: File DamagedData corruption
    Error “Voucher Number Already Exists”Duplicate voucher number entries
    TDL ErrorWrong customization code or missing TDL file

    Detailed List of Common Tally Errors and How to Fix Them


    1. Tally Data Corruption Error

    This is one of the most common issues users face, especially when systems are not shut down properly.

    Symptoms:

    • Error code 407
    • Company fails to load
    • Sudden shutdown of Tally

    How to Fix:

    1. Open Tally → Select Company Info.
    2. Choose “Repair” (in Tally Prime) or “Rewrite Data” (in Tally ERP 9).
    3. Select the data path and company folder.
    4. Follow on-screen repair process.

    In more than 80 percent of cases, data repair restores the company successfully.


    2. Incorrect GST Calculation

    GST-related issues happen when ledgers or items are not configured properly.

    Symptoms:

    • Tax not calculated
    • Wrong GST amounts
    • GSTR-1 mismatch
    • ITC mismatch

    How to Fix:

    1. Enable GST from F11 → Statutory Features.
    2. Check ledger:
      • Set “Is GST Applicable: Yes”
      • Correct GST rate
      • Correct Taxability (Taxable, Nil Rated, Exempt)
    3. For items:
      • Enable GST for stock items
      • Enter HSN
      • Enter applicable GST rate
    4. Re-enter voucher to auto-calculate GST.

    More than 60 percent GST issues are caused by wrong ledger tax classification.


    3. Voucher Number Already Exists

    This happens when Tally tries to save two vouchers with the same number.

    How to Fix:

    1. Go to F11 → Voucher Configuration → Set “Use Automatic Numbering: Yes”.
    2. Or manually change voucher numbers.
    3. Remove duplicate entries by checking Day Book (Display → Day Book).

    Around 25 percent of sales and purchase mismatches occur due to duplicate voucher numbering.


    4. Error “Company Not Found” or Missing Company

    This occurs when the company folder is not in the correct Tally data path.

    How to Fix:

    1. Press F1 (Select Company).
    2. Check the data path displayed at top-right.
    3. Verify company folder exists in that path.
    4. If not, browse to the correct data location manually.
    5. Recreate the data path if necessary.

    Many businesses store Tally data on external disks, which frequently causes this error.


    5. Tally Crashes While Opening

    A crash usually points to version issues or system conflicts.

    How to Fix:

    1. Update Tally to the latest release.
    2. Restart system.
    3. Disable background applications that may conflict.
    4. If crash persists, delete the Tally configuration file (Tally.ini) and reconfigure.

    Updating Tally resolves more than 70 percent crash issues.


    6. Error in File Access or Permission Denied

    This happens when Tally cannot access the data folder due to security restrictions.

    How to Fix:

    1. Go to folder properties.
    2. Give full permission to all users.
    3. Remove “Read Only” option.
    4. Disable antivirus restrictions temporarily.

    Multi-user environments are most prone to permission errors.


    7. Error Code 214 or 288 Related to Network Issues

    These errors generally occur in tally.net or multi-user setups.

    How to Fix:

    1. Check internet connectivity.
    2. Restart Tally Gateway Server (for multi-user).
    3. Check firewall settings.
    4. Ping the server system IP to ensure connectivity.

    In many offices, IP conflict is the root cause of Tally network errors.


    8. Incorrect Ledger Grouping

    Wrong classification leads to wrong reports and mismatches in Balance Sheet or P&L.

    How to Fix:

    1. Open the ledger.
    2. Check the “Group” field.
    3. Correct the group to appropriate classification.
    4. Recheck Balance Sheet and Trial Balance.

    Incorrect grouping leads to more than 30 percent reconciliation issues in businesses.


    9. Error “Voucher Type Not Allowed”

    This occurs when voucher type settings disable certain entries.

    How to Fix:

    1. Go to Accounts Info → Voucher Types.
    2. Check “Use in voucher entry”.
    3. Enable numbering and configurations.
    4. Save settings.

    10. TDL Errors

    These occur due to wrong external TDL files.

    How to Fix:

    1. Go to F1 → Settings → TDL Configuration.
    2. Remove invalid TDL path.
    3. Reload Tally.
    4. Add correct custom TDL file if necessary.

    More than 40 percent TDL errors occur due to outdated customization code.


    How to Prevent Errors in Tally: Best Practices

    1. Always close Tally properly.
    2. Take regular data backup.
    3. Enable Tally Audit.
    4. Use licensed version only.
    5. Keep Tally updated.
    6. Train staff to avoid common data entry mistakes.
    7. Keep antivirus updated to avoid corruption.
    8. Use UPS to prevent power failure issues.
    9. Maintain version history folder for safety.

    More than 90 percent Tally issues are preventable with simple precautions.


    Conclusion

    Errors in Tally ERP 9 and Tally Prime can disrupt accounting operations, affect GST filing, and delay reporting. However, with the right understanding, most of these errors can be fixed easily without external help. Whether it is data corruption, GST mismatch, voucher duplication, or network trouble, each issue has a structured solution within Tally. A disciplined approach, proper configurations, regular backups, and updated software can ensure seamless accounting experience for businesses.


    Disclaimer

    This article is provided for educational and informational purposes only. Tally software versions, error codes, and solutions may vary based on updates, business configurations, and system environments. Users must verify steps according to their Tally version and business requirements.