Creating a ledger in Tally is a fundamental part of accounting, as all financial transactions are recorded through ledgers. In TallyPrime, ledgers are created under Groups (like Capital Account, Sales, Purchase, Cash-in-Hand, etc.).
🎯 What is a Ledger in Tally?
A Ledger in Tally is a record of all transactions related to a specific account, such as a bank account, customer, supplier, or expense type.
Every transaction in Tally must be linked to at least two ledgers.
🛠️ Steps to Create a Ledger in TallyPrime
🔹 Method 1: Single Ledger Creation
Gateway of Tally → Create → Accounts Info → Ledgers → Create (Single Ledger)
Fill in the following fields:
Name: Name of the ledger (e.g., Cash, State Bank of India, Rent A/c).
Alias (Optional): Short name for easier reference.
Under: Select the appropriate group (e.g., Cash under Cash-in-Hand, SBI under Bank Accounts, Rent under Indirect Expenses).
Inventory values are affected?: Choose Yes only if you’re creating stock-related accounts.
Opening Balance: If any, enter it with the correct sign (Dr/Cr).
Press Ctrl + A to save.
🔹 Method 2: Multiple Ledgers Creation
Gateway of Tally → Create → Accounts Info → Ledgers → Create (Multiple Ledgers)
Select group as “All Items” or a specific group (e.g., Sundry Debtors).
Enter ledger names, group, and opening balances for each.
Press Ctrl + A to save.
📋 Common Ledger Examples with Groups
Ledger Name
Group
Opening Balance
Nature
Cash
Cash-in-Hand
₹10,000 Dr
Asset
State Bank of India
Bank Accounts
₹25,000 Dr
Asset
Purchase A/c
Purchase Accounts
₹0
Expense
Sales A/c
Sales Accounts
₹0
Income
Rent Paid A/c
Indirect Expenses
₹0
Expense
Electricity Charges
Indirect Expenses
₹0
Expense
Capital A/c
Capital Account
₹1,00,000 Cr
Liability
Raj Traders
Sundry Creditors
₹15,000 Cr
Liability
Om Enterprises
Sundry Debtors
₹8,000 Dr
Asset
🧾 Explanation of Some Ledgers
1. Cash Ledger
Group: Cash-in-Hand
Used to record all cash transactions.
Only one cash ledger can be created in Tally.
2. Bank Ledger (e.g., State Bank of India)
Group: Bank Accounts
Used for bank-related transactions like deposits, withdrawals, cheques, etc.
3. Customer Ledger (e.g., Om Enterprises)
Group: Sundry Debtors
Used when you sell goods/services on credit.
4. Supplier Ledger (e.g., Raj Traders)
Group: Sundry Creditors
Used for purchases made on credit.
5. Indirect Expenses (e.g., Rent, Electricity)
Group: Indirect Expenses
Used to record operational expenses not directly linked to production.
6. Sales & Purchase Ledger
Group: Sales Accounts / Purchase Accounts
Required to record daily sales and purchases.
✅ Important Notes
Avoid duplicating ledger names.
Ensure the “Group” selected is correct—Tally uses this for reporting.
You can alter, display or delete a ledger anytime through:
Gateway of Tally → Alter / Display / Delete → Ledgers
📌 Practical Example Scenario
Let’s say you’re starting a business with ₹1,00,000 capital and opening a bank account with ₹25,000 and keeping ₹10,000 as cash.
You purchase goods worth ₹15,000 on credit from Raj Traders and sell items worth ₹8,000 to Om Enterprises on credit.
You pay ₹2,000 for Rent and ₹1,000 for Electricity.
Here’s how you’d create ledgers:
Capital A/c (Under Capital Account, Cr ₹1,00,000)
Cash (Under Cash-in-Hand, Dr ₹10,000)
State Bank of India (Under Bank Accounts, Dr ₹25,000)
Raj Traders (Under Sundry Creditors, Cr ₹15,000)
Om Enterprises (Under Sundry Debtors, Dr ₹8,000)
Purchase A/c (Under Purchase Accounts)
Sales A/c (Under Sales Accounts)
Rent Paid (Under Indirect Expenses)
Electricity Charges (Under Indirect Expenses)
🧠 Pro Tips
Use Alt + G → Chart of Accounts to see all created ledgers.
Regularly back up your company data after creating or modifying ledgers.
Use Gateway of Tally → Display → Account Books → Ledger to view ledger reports.
Here are 10 interview questions on the topic of Ledger Creation in Tally, suitable for beginner to intermediate levels:
✅ Interview Questionnaire: Ledger Creation in Tally
1. What is a ledger in Tally? Why is it important in accounting?
Expected Answer: A ledger is an account used to record all financial transactions related to a specific item or party. Every transaction in Tally is recorded using ledgers, making them essential for maintaining accurate accounts.
2. How do you create a single ledger in TallyPrime?
Expected Answer: Path: Gateway of Tally → Accounts Info → Ledgers → Create (Single Ledger) Fill in fields like Name, Under Group, Opening Balance, etc., then press Ctrl + A to save.
3. What is the difference between Single Ledger and Multiple Ledger creation in Tally?
Expected Answer: Single Ledger allows creation of one ledger at a time with detailed input. Multiple Ledger allows creation of several ledgers on one screen quickly under the same or different groups.
4. Which group will you select while creating the following ledgers?
a) Cash b) State Bank of India c) Rent Paid d) Raj Traders e) Om Enterprises
Expected Answer: a) Cash-in-Hand b) Bank Accounts c) Indirect Expenses d) Sundry Creditors e) Sundry Debtors
5. Can you create more than one cash ledger in Tally? Why or why not?
Expected Answer: No, Tally allows only one cash ledger under the “Cash-in-Hand” group because cash must be tracked centrally for compliance and reporting.
6. What happens if you select the wrong group while creating a ledger?
Expected Answer: Reports and financial statements will be inaccurate. For example, if Rent Paid is placed under Assets instead of Expenses, it will distort profit & loss calculations.
7. What is the significance of ‘Opening Balance’ in ledger creation? How do you decide if it’s debit or credit?
Expected Answer: Opening Balance shows the existing amount in the account. Assets and Expenses usually have Debit (Dr) balances, while Liabilities and Incomes have Credit (Cr) balances.
8. How do you display or alter an existing ledger in Tally?
Expected Answer: Path: Gateway of Tally → Accounts Info → Ledgers → Alter / Display Select the ledger from the list to modify or view.
9. Name five common groups used while creating ledgers in Tally.
Expected Answer:
Capital Account
Bank Accounts
Cash-in-Hand
Sundry Debtors
Indirect Expenses
10. What are the consequences of duplicating ledger names in Tally?
Expected Answer: Tally does not allow exact duplicates, but similar names may cause confusion and errors in data entry, misreporting, and incorrect voucher classification.
VAT entry in Tally.ERP 9 is essential for businesses to accurately record Value Added Tax transactions. Below, I will guide you through the process step-by-step, including examples and explanations:
Step 1: Create VAT Ledgers
Access Ledger Creation: Open Tally.ERP 9 and navigate to Gateway of Tally > Accounts Info > Ledgers > Create.
Create VAT Ledger: Create a ledger named ‘VAT Input’ and ‘VAT Output’ under the group ‘Duties & Taxes’.
Step 2: Enable VAT in Tally
Activate VAT: Go to Gateway of Tally > F11: Features > F3: Statutory & Taxation.
Enable VAT: Set ‘Enable Value Added Tax (VAT)’ to ‘Yes’.
Step 3: Make Sales Entry with VAT
Create Sales Voucher: Go to Gateway of Tally > Accounting Vouchers > F8: Sales.
Enter Sales Details: Fill in the necessary details like the party’s name, invoice number, date, and sales amount (e.g., Rs. 10,000).
Select VAT Ledger: In the Accounting Voucher screen, under Particulars, select the sales ledger and enter the sales amount.
Specify VAT Rate: In the Tax Analysis screen, select the VAT ledger and enter the applicable VAT rate (e.g., 12.5%).
Step 4: Record Purchase Entry with VAT
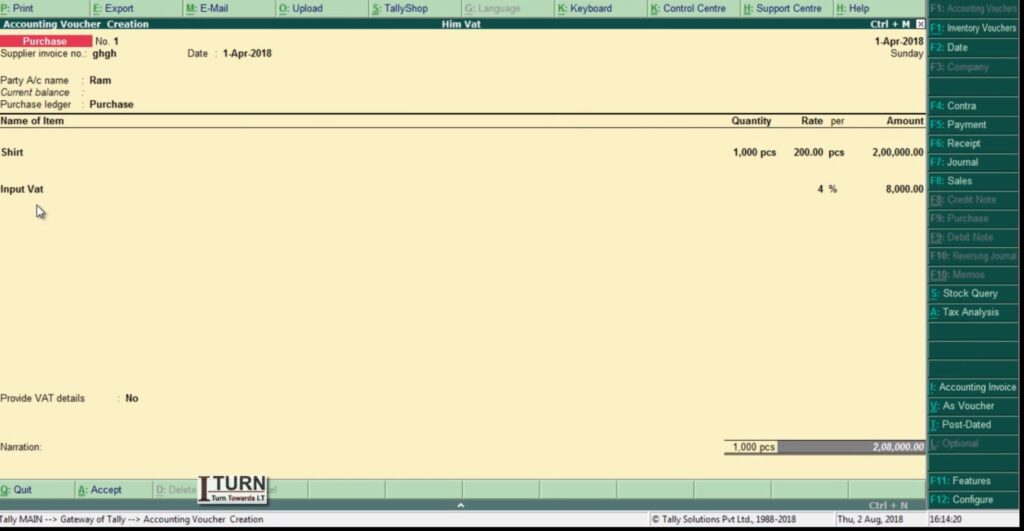
Create Purchase Voucher: Go to Gateway of Tally > Accounting Vouchers > F9: Purchase.
Enter Purchase Details: Fill in the necessary details like the supplier’s name, invoice number, date, and purchase amount (e.g., Rs. 8,000).
Select VAT Ledger: In the Accounting Voucher screen, under Particulars, select the purchase ledger and enter the purchase amount.
Specify VAT Rate: In the Tax Analysis screen, select the VAT ledger and enter the applicable VAT rate (e.g., 12.5%).
Step 5: View VAT Reports
Access VAT Reports: Go to Gateway of Tally > Display > Statutory Reports > VAT.
Generate VAT Computation: Select the period for which you want to view the VAT computation.
Review VAT Details: You can view details like total sales, total purchases, input VAT, output VAT, and VAT payable.
Example:
Let’s consider a scenario:
Sales amount: Rs. 50,000
Purchase amount: Rs. 30,000
VAT rate: 12.5%
Sales Entry:
Create a sales voucher.
Enter the sales details: Party name, invoice number, date, and sales amount (Rs. 50,000).
Select the sales ledger and enter the sales amount.
Specify the VAT rate as 12.5%.
Purchase Entry:
Create a purchase voucher.
Enter the purchase details: Supplier’s name, invoice number, date, and purchase amount (Rs. 30,000).
Select the purchase ledger and enter the purchase amount.
Specify the VAT rate as 12.5%.
Summary:
Enable VAT in Tally.
Create VAT ledgers for input and output.
Record sales and purchase transactions separately.
Specify the VAT rate for each transaction.
Review VAT reports to ensure accurate computation.
By following these steps and example, you can effectively manage VAT entries in Tally.ERP 9 for your business transactions.
Let’s walk through the stages and voucher entries in the sales order process in Tally ERP 9:
1. Sales Order:
Definition: A sales order is a document issued by a seller to a buyer, confirming the details of the products or services the buyer intends to purchase.
Steps to Create a Sales Order in Tally ERP 9:
Navigate to Gateway of Tally > Inventory Vouchers > F5: Sales Order.
Enter the sales order number, date, and other relevant details.
Select the customer from the list.
Enter details of the items to be sold including quantity, rate, and any applicable taxes.
Save the sales order.
Example: ABC Company receives a sales order from Customer XYZ for 50 units of Product A at a rate of $20 per unit. They create a sales order with these details.
2. Delivery Note:
Definition: A delivery note is prepared by the seller to confirm the delivery of goods to the buyer. It serves as an acknowledgment of the transfer of goods.
Steps to Create a Delivery Note in Tally ERP 9:
Go to Gateway of Tally > Inventory Vouchers > F8: Delivery Note.
Select the sales order against which goods are to be delivered.
Enter the delivery note number, date, and other relevant details.
Specify the quantity and condition of goods being delivered.
Save the delivery note.
Example: ABC Company prepares a delivery note to confirm the delivery of 50 units of Product A to Customer XYZ as per the sales order.
3. Rejection In:
Definition: If the goods delivered are not as per the buyer’s specifications or are damaged, a rejection in voucher is prepared to return the goods to the seller.
Steps to Create a Rejection In Voucher in Tally ERP 9:
Navigate to Gateway of Tally > Inventory Vouchers > F7: Rejection In.
Select the delivery note against which goods are to be rejected.
Specify the quantity and condition of goods being returned.
Save the rejection in voucher.
Example: Customer XYZ rejects 5 units of Product A delivered by ABC Company due to damage. They create a rejection in voucher to return these 5 units.
4. Sales Bill:
Definition: A sales bill is issued by the seller to the buyer, requesting payment for the goods or services supplied.
Steps to Create a Sales Bill in Tally ERP 9:
Go to Gateway of Tally > Accounting Vouchers > F8: Sales.
Select the customer from the list.
Enter the sales bill number, date, and other relevant details.
Specify the details of the items sold including quantity, rate, and taxes.
Save the sales bill.
Example: ABC Company sends a sales bill to Customer XYZ for the 45 units of Product A that were accepted.
5. Credit Note:
Definition: If there are discrepancies in the sales bill, such as over-delivery or damaged goods, the seller may issue a credit note to the buyer for adjustments in the amount owed.
Steps to Create a Credit Note in Tally ERP 9:
Navigate to Gateway of Tally > Accounting Vouchers > F7: Journal.
Select Credit Note as the voucher type.
Enter the credit note number, date, and other relevant details.
Specify the reason for issuing the credit note and the amount to be adjusted.
Save the credit note.
Example: If ABC Company over-delivered 5 units of Product A, they issue a credit note to Customer XYZ to adjust the sales bill accordingly.
These are the stages and voucher entries involved in the sales order process in Tally ERP 9. Each step ensures proper documentation and tracking of transactions between the seller and the buyer.
Reports
After completing the stages and voucher entries for sales orders in Tally ERP 9, you can view various reports related to sales transactions and inventory management. Here’s where you can find relevant reports:
Description: The Sales Register provides a comprehensive view of all sales transactions, including sales bills and credit notes, within a specified period.
Description: The Stock Summary report provides an overview of all stock items, including opening balance, inward and outward movements, and closing balance.
Description: The Inventory Ageing Analysis report helps identify slow-moving or obsolete inventory items based on their age.
These reports in Tally ERP 9 enable you to monitor sales transactions, track inventory movements, analyze receivables, and manage customer accounts effectively. They provide valuable insights into your business operations and help in making informed decisions for business growth and optimization.
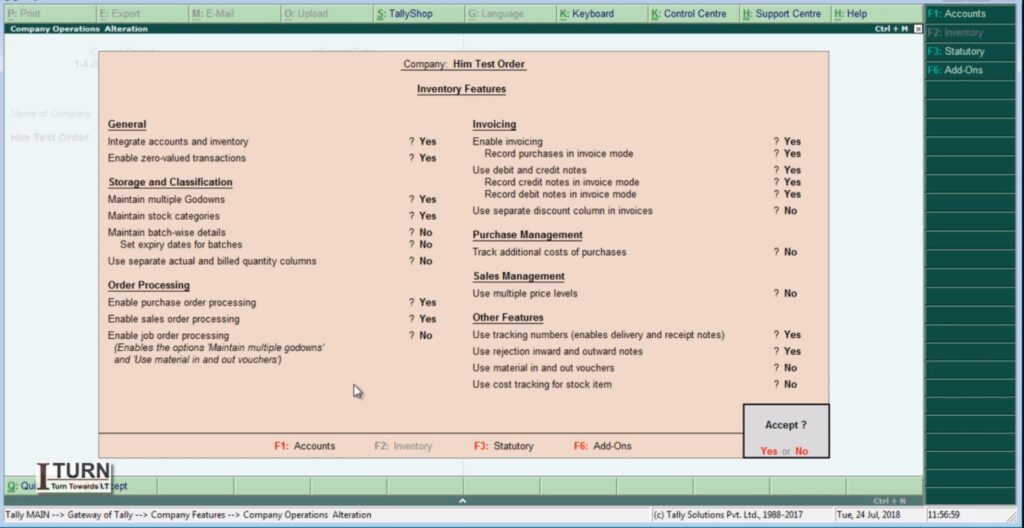
Before performing the entries related to purchase orders, receipt notes, rejection outs, purchase bills, and debit notes in Tally ERP 9, it’s important to ensure that relevant features are activated. Here’s how you can activate these features:
1. Enable Inventory Management:
Go to Gateway of Tally.
Select ‘F11: Features’ or press F11.
Under ‘F1: Accounting Features’, ensure that ‘Maintain Accounts only’ is set to ‘No’.
Set ‘Maintain Inventory’ to ‘Yes’.
2. Set Up Inventory Features:
Go to Gateway of Tally.
Select ‘F11: Features’ or press F11.
Under ‘F2: Inventory Features’, ensure that the required options such as ‘Maintain Multiple Godowns’, ‘Use Tracking Numbers (Batch Numbers)’, ‘Use Expiry Dates for Batches’, etc., are set according to your business needs.
3. Configure Purchase and Sales Vouchers:
Go to Gateway of Tally.
Select ‘F12: Configure’ or press F12.
Under ‘Accounting Features’, ensure that ‘Allow Purchase Orders’ and ‘Allow Sales Orders’ are set to ‘Yes’.
4. Activate Rejection In and Out Vouchers:
Go to Gateway of Tally.
Select ‘F11: Features’ or press F11.
Under ‘Inventory Features’, ensure that ‘Enable Rejection In/Out Voucher’ is set to ‘Yes’.
5. Enable Debit and Credit Notes:
Go to Gateway of Tally.
Select ‘F11: Features’ or press F11.
Under ‘Accounting Features’, ensure that ‘Enable Invoicing’ is set to ‘Yes’.
Additionally, check if ‘Use Rejection In/Out for Purchase Returns’ and ‘Use Debit/Credit Notes’ are set to ‘Yes’ as required.
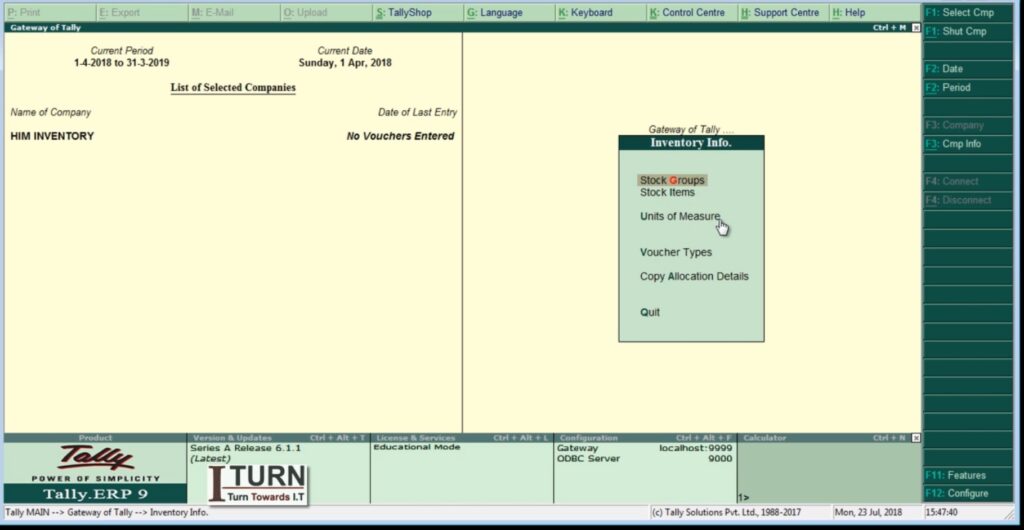
6. Set Up Stock Groups, Stock Categories, and Units of Measure:
Go to Gateway of Tally.
Under ‘Inventory Info’, set up stock groups, stock categories, and units of measure as per your business requirements.
7. Configure Godowns (if applicable):
Go to Gateway of Tally.
Under ‘Inventory Info’, set up multiple godowns if your business involves maintaining inventory at different locations.
By activating these features and configuring settings in Tally ERP 9, you ensure that the software is ready to handle inventory management, purchase orders, sales orders, rejection vouchers, purchase bills, and debit notes efficiently. This setup enables seamless recording and tracking of transactions related to inventory and purchase/sales operations.
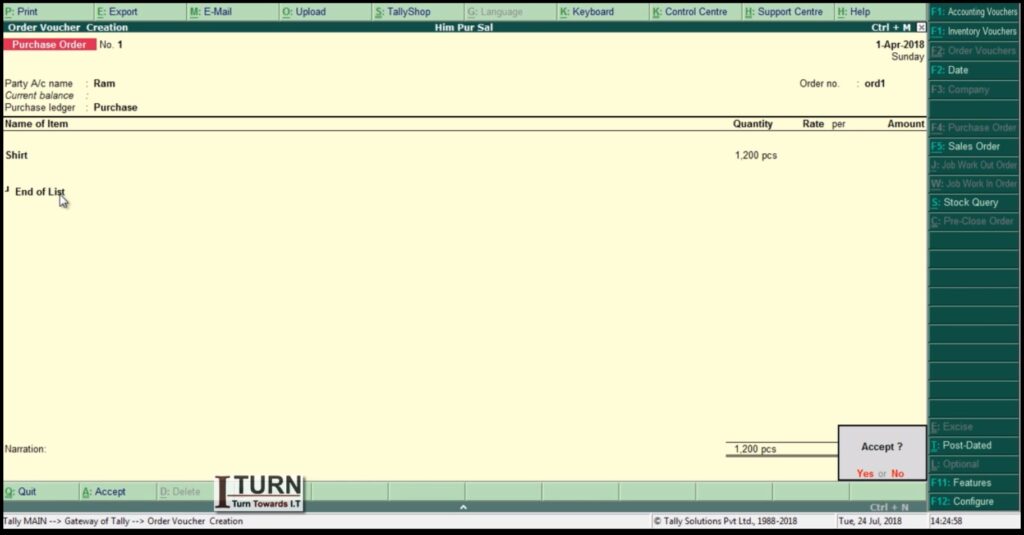
1. Purchase Order (PO):
Definition: A purchase order is a document issued by a buyer to a seller, specifying the details of the goods or services the buyer intends to purchase.
Steps to Create a Purchase Order in Tally ERP 9:
Navigate to Gateway of Tally > Inventory Vouchers > F4: Purchase Order.
Enter the purchase order number, date, and other relevant details.
Select the supplier/vendor from the list.
Enter details of the items to be purchased including quantity, rate, and any applicable taxes.
Save the purchase order.
Example: Let’s say your company, XYZ Enterprises, needs to purchase 100 units of Product A from Supplier ABC at a rate of $10 per unit. The purchase order would specify these details along with other terms such as delivery date and payment terms.
2. Receipt Note:
Definition: A receipt note is prepared by the buyer upon receiving goods from the seller. It serves as acknowledgment of receipt of goods.
Steps to Create a Receipt Note in Tally ERP 9:
Go to Gateway of Tally > Inventory Vouchers > F9: Purchase Order.
Select the purchase order for which goods have been received.
Enter the receipt note number, date, and other relevant details.
Specify the quantity and condition of goods received.
Save the receipt note.
Example: Using the previous example, if Supplier ABC delivers 100 units of Product A, XYZ Enterprises creates a receipt note to acknowledge the receipt of these goods.
3. Rejection Out:
Definition: If the goods received are damaged or do not meet the buyer’s specifications, a rejection out voucher is prepared to return the goods to the seller.
Steps to Create a Rejection Out Voucher in Tally ERP 9:
Navigate to Gateway of Tally > Inventory Vouchers > F6: Rejection Out.
Select the receipt note against which goods are to be rejected.
Specify the quantity and condition of goods being returned.
Save the rejection out voucher.
Example: If XYZ Enterprises finds that 10 units of Product A received from Supplier ABC are damaged, they create a rejection out voucher to return these 10 units to the supplier.
4. Purchase Bill:
Definition: A purchase bill is issued by the seller to the buyer, requesting payment for the goods or services supplied.
Steps to Create a Purchase Bill in Tally ERP 9:
Go to Gateway of Tally > Accounting Vouchers > F9: Purchase.
Select the supplier/vendor from the list.
Enter the purchase bill number, date, and other relevant details.
Specify the details of the items purchased including quantity, rate, and taxes.
Save the purchase bill.
Example: Supplier ABC sends a purchase bill to XYZ Enterprises for the 90 units of Product A that were accepted.
5. Debit Note:
Definition: If there are discrepancies in the purchase bill, such as overcharging or damaged goods, the buyer may issue a debit note to the seller requesting adjustments to the amount owed.
Steps to Create a Debit Note in Tally ERP 9:
Navigate to Gateway of Tally > Accounting Vouchers > F7: Journal.
Select Debit Note as the voucher type.
Enter the debit note number, date, and other relevant details.
Specify the reason for issuing the debit note and the amount to be adjusted.
Save the debit note.
Example: If XYZ Enterprises finds that Supplier ABC has overcharged for 5 units of Product A, they issue a debit note requesting a reduction in the purchase amount accordingly.
These are the stages and voucher entries involved in the purchase order process in Tally ERP 9. Each step ensures proper documentation and tracking of transactions between the buyer and the seller.
Check Reports
After completing the entries for purchase orders, receipt notes, rejection out, purchase bills, and debit notes in Tally ERP 9, you can check various stock-related aspects including reports to ensure accurate inventory management. Here’s where you can find relevant information and reports:
Stock Summary:
Go to Gateway of Tally > Display > Inventory Books > Stock Summary.
This report provides a summary of all stock items, including their opening balance, inward and outward movements, and closing balance.
Stock Item Vouchers:
Navigate to Gateway of Tally > Display > Inventory Books > Stock Item Vouchers.
Here, you can view all transactions related to a specific stock item including purchase orders, receipts, sales, rejection outs, etc.
Inventory Reports:
Under Gateway of Tally > Display > Inventory Books, you can access various reports such as Stock Item Vouchers, Movement Analysis, and Inventory Ageing Analysis.
These reports provide insights into the movement and status of inventory items over time.
Stock Query:
You can use the Stock Query feature in Tally ERP 9 to check the availability, location, and other details of specific stock items.
Go to Gateway of Tally > Display > Inventory Books > Stock Query.
Stock Valuation Reports:
To analyze the valuation of your inventory, you can access reports such as Stock Valuation Summary and Stock Valuation Tally.
These reports help you understand the total value of your inventory based on different valuation methods (FIFO, LIFO, Weighted Average, etc.).
Movement Analysis:
This report provides insights into the movement of goods in and out of the organization over a specified period.
Go to Gateway of Tally > Display > Inventory Books > Movement Analysis.
Sales and Purchase Register:
You can review the sales and purchase registers to track transactions, invoices, and payments.
Go to Gateway of Tally > Display > Account Books > Journal Register / Purchase Register / Sales Register.
By utilizing these reports and features in Tally ERP 9, you can effectively monitor your inventory, track stock movements, analyze valuation, and ensure accurate financial reporting. It helps in making informed decisions related to inventory management and optimizing stock levels to meet business requirements.
Set up inventory features such as units of measure, stock categories, and stock groups.
Add a few sample inventory items with different units of measure.
Task 2: Purchase Entry
Record the purchase of inventory items from a supplier.
Enter the purchase invoice details including item name, quantity, rate, and taxes.
Ensure that the inventory stock is updated after the purchase transaction.
Task 3: Sales Entry
Record the sales of inventory items to customers.
Enter the sales invoice details including item name, quantity sold, rate, and taxes.
Ensure that the inventory stock is updated after the sales transaction.
Task 4: Inventory Reorder Level
Set up reorder levels for inventory items to maintain optimum stock levels.
Generate a report that shows inventory items falling below the reorder level.
Analyze the report and understand the importance of maintaining reorder levels.
Task 5: Inventory Valuation
Explore different methods of inventory valuation such as FIFO, LIFO, and Weighted Average.
Calculate the valuation of inventory using each method for a set of sample transactions.
Compare the results and understand how inventory valuation affects financial statements.
Task 6: Inventory Aging Analysis
Generate an inventory aging report to analyze the age of inventory items in stock.
Classify inventory items based on their age (e.g., 0-30 days, 31-60 days, 61-90 days, etc.).
Interpret the aging report to identify slow-moving or obsolete inventory items.
Task 7: Inventory Adjustment
Perform inventory adjustments for damaged, lost, or stolen items.
Record the adjustments in Tally ERP 9 by increasing or decreasing the quantity of affected inventory items.
Analyze the impact of inventory adjustments on inventory valuation and financial statements.
These tasks cover various aspects of inventory management in Tally ERP 9 and provide students with hands-on experience in using the software for inventory-related transactions and analysis.
Solutions
Solution 1: Inventory Setup
Open Tally ERP 9 and create a new company.
Go to Gateway of Tally > Inventory Info > Units of Measure to set up units of measure.
Next, navigate to Inventory Info > Stock Categories to define stock categories.
Then, go to Inventory Info > Stock Groups to create stock groups.
Finally, under Inventory Info > Stock Items, add sample inventory items with their respective units of measure, stock categories, and stock groups.
Solution 2: Purchase Entry
Go to Gateway of Tally > Accounting Vouchers > F9: Purchase.
Enter the supplier’s invoice number, date, and other relevant details.
Select the inventory items purchased along with their quantities, rates, and applicable taxes.
Save the voucher to record the purchase transaction and update the inventory stock.
Solution 3: Sales Entry
Navigate to Gateway of Tally > Accounting Vouchers > F8: Sales.
Enter the customer’s invoice number, date, and other necessary details.
Choose the inventory items sold with their quantities, rates, and applicable taxes.
Save the voucher to record the sales transaction and update the inventory stock.
Solution 4: Inventory Reorder Level
Go to Gateway of Tally > Inventory Info > Reorder Levels.
Set up reorder levels for each inventory item by specifying the minimum quantity to maintain.
Generate the Reorder Level report from Inventory Info to view items falling below the reorder level.
Solution 5: Inventory Valuation
Explore different methods of inventory valuation such as FIFO, LIFO, and Weighted Average.
Use the appropriate features in Tally ERP 9 to calculate inventory valuation based on each method.
Compare the valuation results to understand the impact on financial statements.
Solution 6: Inventory Aging Analysis
Generate an Inventory Aging report from Inventory Info to analyze the age of inventory items.
Classify inventory items based on their age ranges (e.g., 0-30 days, 31-60 days, etc.).
Interpret the report to identify slow-moving or obsolete inventory items that may need attention.
Solution 7: Inventory Adjustment
Go to Gateway of Tally > Inventory Vouchers > F7: Stock Journal.
Record inventory adjustments by increasing or decreasing the quantity of affected items.
Provide reasons for adjustments such as damages, losses, or thefts.
Analyze the impact of adjustments on inventory valuation and financial statements.
These solutions provide step-by-step guidance on how to perform each task in Tally ERP 9 related to inventory management.
Managing inventory information in Tally ERP 9 involves creating and organizing stock groups, stock categories, stock items, units of measurement, godowns, batch numbers, and recording stock transactions. Here are detailed steps along with five practical examples:
Steps for Managing Inventory Information:
Step 1: Creating Stock Groups
Go to Gateway of Tally > Inventory Info > Stock Groups.
Select “Create” (Alt + C) to create a new stock group.
Enter the Name of the stock group (e.g., Electronics) and Subgroup if needed.
Save the details (Ctrl + A).
Step 2: Creating Stock Categories
Go to Gateway of Tally > Inventory Info > Stock Categories.
Select “Create” (Alt + C) to create a new stock category.
Enter the Name of the stock category (e.g., Mobile Phones) and select the parent stock group (Electronics).
Save the details (Ctrl + A).
Step 3: Creating Stock Items
Go to Gateway of Tally > Inventory Info > Stock Items.
Select “Create” (Alt + C) to create a new stock item.
Enter the Name of the stock item (e.g., iPhone 12 Pro) and select the parent stock category (Mobile Phones).
Specify details like Units of Measurement, Standard Rate, etc.
Save the details (Ctrl + A).
Step 4: Creating Units of Measurement (UOM)
Go to Gateway of Tally > Inventory Info > Units of Measurement.
Select “Create” (Alt + C) to create a new unit of measurement (e.g., Dozen).
Enter the Symbol and Full Form for the unit (Dozen).
Save the details (Ctrl + A).
Step 5: Creating Godowns
Go to Gateway of Tally > Inventory Info > Godowns.
Select “Create” (Alt + C) to create a new godown (e.g., Main Warehouse).
Enter the Name and Address of the godown.
Save the details (Ctrl + A).
Step 6: Enabling Batch Numbers
Go to Gateway of Tally > F11: Features > F2: Inventory Features.
Enable the option “Maintain Batch-wise Details.”
Save the settings (Ctrl + A).
Practical Examples:
Example 1: Stock Transfer Between Godowns
Go to Gateway of Tally > Inventory Vouchers > F7: Stock Journal.
Select the source and destination godowns.
Enter the stock item details and quantity.
Save the voucher (Ctrl + A).
Example 2: Stock Receipt (Purchase) with Batch Number
Go to Gateway of Tally > Inventory Vouchers > F9: Purchase.
Select the supplier, stock item, and enter quantity and rate.
Enable batch details, enter batch numbers, and save the voucher (Ctrl + A).
Example 3: Stock Issuance (Sales) with Batch Number
Go to Gateway of Tally > Inventory Vouchers > F8: Sales.
Select the customer, stock item, and enter quantity and rate.
Enable batch details, select the appropriate batch, and save the voucher (Ctrl + A).
Example 4: Stock Adjustment for Damaged Goods
Go to Gateway of Tally > Inventory Vouchers > F7: Stock Journal.
Select the stock item and adjust quantity for damaged goods.
Save the voucher (Ctrl + A).
Example 5: Stock Opening Balances Entry
Go to Gateway of Tally > Inventory Info > Opening Balances.
Select the stock item, enter opening quantity, and rate.
Specify godown details if applicable and save (Ctrl + A).
These steps and examples provide a comprehensive guide for managing inventory information in Tally ERP 9, covering stock groups, stock categories, stock items, units of measurement, godowns, batch numbers, and various stock transactions.
Inventory information in Tally ERP 9 encompasses a range of data related to the management of goods, products, and materials within a business. It allows businesses to track stock levels, monitor inventory movements, and manage purchase and sales orders efficiently. Here’s a detailed explanation of inventory information in Tally ERP 9:
Components of Inventory Information:
1. Stock Groups:
Stock groups are categories used to classify similar types of products or items.
For example, you might have stock groups like “Electronics,” “Clothing,” “Stationery,” etc.
2. Stock Categories:
Stock categories are further subdivisions within stock groups.
They help in organizing inventory hierarchically.
For example, within the “Electronics” stock group, you might have categories like “Mobile Phones,” “Laptops,” “Televisions,” etc.
3. Stock Items:
Stock items are individual products or items that the business buys, sells, or manufactures.
Each stock item has a unique name, code, and other attributes.
For example, within the “Mobile Phones” category, specific stock items might include “iPhone 12 Pro,” “Samsung Galaxy S21,” etc.
4. Units of Measurement:
Units of measurement define how quantities of stock items are measured and represented.
Tally ERP 9 supports various units of measurement such as pieces, kilograms, meters, liters, etc.
For example, a stock item like “Pencil” might have units of measurement like “Dozen” or “Each.”
5. Godowns:
Godowns are physical locations where inventory is stored or managed.
They can represent warehouses, storage facilities, or any other designated storage areas.
For example, you might have godowns named “Main Warehouse,” “Retail Store,” “Backroom,” etc.
6. Batch Numbers:
Batch numbers are used to track and manage groups of identical items that were produced or received together.
They are particularly useful for products with expiration dates or manufacturing dates.
For example, pharmaceuticals, food items, and cosmetics often use batch numbers for tracking purposes.
7. Stock Vouchers:
Stock vouchers are used to record inventory-related transactions such as stock transfers, stock receipts, stock issuances, and stock adjustments.
These vouchers ensure accurate recording of inventory movements within the business.
Features of Inventory Information in Tally ERP 9:
Stock Valuation: Tally ERP 9 supports various methods of stock valuation including FIFO (First In First Out), LIFO (Last In First Out), Weighted Average, and Standard Cost.
Stock Aging Analysis: Businesses can analyze the age of their inventory to identify slow-moving or obsolete stock items.
Inventory Reports: Tally ERP 9 provides a range of inventory reports such as stock summary, stock item-wise reports, godown-wise reports, and batch-wise reports for effective inventory management.
Inventory Control: Businesses can set reorder levels, minimum stock levels, and maximum stock levels to ensure optimal inventory levels and prevent stockouts or overstock situations.
Overall, inventory information in Tally ERP 9 plays a critical role in managing and controlling the flow of goods and materials within a business, ultimately contributing to efficient operations and improved financial performance.
In Tally ERP 9, voucher entry is the process of recording financial transactions such as payments, receipts, sales, purchases, journal entries, contra entries, debit notes, credit notes, and payment advices. Here’s how to do voucher entry in Tally ERP 9:
Steps to Perform Voucher Entry:
Open Tally ERP 9: Double-click the Tally ERP 9 icon on your desktop to launch the software.
Select Company: Choose the company for which you want to perform voucher entry from the list of available companies.
Access Voucher Entry Screen:
Go to the Gateway of Tally (main screen).
Navigate to the appropriate voucher entry screen based on the type of transaction you want to record. You can access voucher entry screens using shortcut keys or through the menu options.
For example, press F9 for purchase voucher, F8 for sales voucher, F5 for payment voucher, F6 for receipt voucher, F7 for journal voucher, F4 for contra voucher, F10 for debit note voucher, F11 for credit note voucher, and so on.
Enter Voucher Details:
Once you are in the voucher entry screen, you’ll see various fields where you can enter details about the transaction.
Fill in the date of the transaction in the appropriate field.
Select the account (ledger) that is being debited or credited in the transaction. You can type the first few letters of the account name to search for it.
Enter the amount of the transaction in the relevant field.
Repeat the process for additional accounts involved in the transaction.
Save the Voucher:
After entering all the necessary details, press Ctrl + A or click on the “Accept” button to save the voucher.
Tally will validate the entries and save the voucher if there are no errors.
View or Print Vouchers:
After saving the voucher, you can view it by going to the “Display” menu and selecting “Day Book” or “Vouchers.”
You can also print vouchers by selecting the voucher you want to print and clicking on the “Print” button.
Tips for Voucher Entry in Tally:
Always ensure that the transactions are recorded accurately to maintain the integrity of your financial data.
Use appropriate ledger accounts for each transaction to ensure proper classification and reporting.
Review the voucher entries periodically to identify any errors or discrepancies.
Take regular backups of your Tally data to prevent data loss.
Example:
Suppose you want to record a payment transaction where you paid rent amounting to ₹10,000. Here’s how you would do it in Tally ERP 9:
Press F5 to access the Payment Voucher screen.
Enter the date of the transaction.
Select the bank account from which the payment is made.
Enter ₹10,000 in the “Payment” field.
Select the “Rent Expense” ledger under “Particulars” and enter ₹10,000 in the “Amount” field.
Press Ctrl + A to save the voucher.
That’s it! You have successfully recorded the payment transaction in Tally ERP 9. Repeat these steps for other transactions as needed.
Voucher Entry Examples:
Type 1: Payment Voucher:
Example: Payment of electricity bill amounting to ₹5,000.
Go to Gateway of Tally > Accounting Vouchers > F5: Payment.
Select the appropriate bank or cash account under “Account” field.
Enter the amount of ₹5,000 in the “Payment” field.
Select “Electricity Expense” under “Particulars” and enter ₹5,000 in the “Amount” field.
Press Enter to save the voucher.
Type 2: Receipt Voucher:
Example: Receipt of rent from tenant amounting to ₹10,000.
Go to Gateway of Tally > Accounting Vouchers > F6: Receipt.
Select the appropriate bank or cash account under “Account” field.
Enter the amount of ₹10,000 in the “Receipt” field.
Select “Rent Income” under “Particulars” and enter ₹10,000 in the “Amount” field.
Press Enter to save the voucher.
Type 3: Sales Voucher:
Example: Sales of goods to ABC Traders amounting to ₹20,000.
Go to Gateway of Tally > Accounting Vouchers > F8: Sales.
Select the sales ledger under “Account” field.
Enter the amount of ₹20,000 in the “Amount” field.
Select “ABC Traders” under “Particulars” and enter ₹20,000 in the “Amount” field.
Press Enter to save the voucher.
Type 4: Purchase Voucher:
Example: Purchase of raw materials from XYZ Suppliers amounting to ₹15,000.
Go to Gateway of Tally > Accounting Vouchers > F9: Purchase.
Select the purchase ledger under “Account” field.
Enter the amount of ₹15,000 in the “Amount” field.
Select “XYZ Suppliers” under “Particulars” and enter ₹15,000 in the “Amount” field.
Press Enter to save the voucher.
Type 5: Journal Voucher:
Example: Recording depreciation expense for the month amounting to ₹2,000.
Go to Gateway of Tally > Accounting Vouchers > F7: Journal.
Select the depreciation ledger under “Account” field.
Enter the amount of ₹2,000 in the “Amount” field.
Select the appropriate ledger under “Particulars” and enter ₹2,000 in the “Amount” field.
Press Enter to save the voucher.
Type 6: Contra Voucher:
Example: Transfer of funds from Bank Account A to Bank Account B amounting to ₹50,000.
Go to Gateway of Tally > Accounting Vouchers > F4: Contra.
Select Bank Account A under “From” field and Bank Account B under “To” field.
Enter the amount of ₹50,000 in the “Amount” field.
Press Enter to save the voucher.
Type 7: Debit Note Voucher:
Example: Debit note issued to supplier for returned goods amounting to ₹7,000.
Go to Gateway of Tally > Accounting Vouchers > F10: Debit Note.
Select the supplier’s ledger under “Account” field.
Enter the amount of ₹7,000 in the “Amount” field.
Select the appropriate ledger under “Particulars” and enter ₹7,000 in the “Amount” field.
Press Enter to save the voucher.
Type 8: Credit Note Voucher:
Example: Credit note issued to customer for returned goods amounting to ₹3,000.
Go to Gateway of Tally > Accounting Vouchers > F11: Credit Note.
Select the customer’s ledger under “Account” field.
Enter the amount of ₹3,000 in the “Amount” field.
Select the appropriate ledger under “Particulars” and enter ₹3,000 in the “Amount” field.
Press Enter to save the voucher.
Type 9: Payment Advice Voucher:
Example: Payment advice issued to a vendor for the upcoming payment.
Go to Gateway of Tally > Accounting Vouchers > F10: Payment Advice.
Select the vendor’s ledger under “Account” field.
Enter the amount and other relevant details.
Press Enter to save the voucher.
These steps illustrate how to enter different types of voucher entries in Tally ERP 9 for various financial transactions. Make sure to select the appropriate ledgers and fill in the necessary details accurately to ensure accurate accounting records.
Purpose: Used to record payments made by the company, such as expenses, utility bills, salaries, etc.
Example: Payment of electricity bill amounting to ₹5,000.
Type 2: Receipt Voucher:
Purpose: Used to record any incoming cash or cheques received by the company, including receipts from customers, interest received, etc.
Example: Receipt of rent from tenant amounting to ₹10,000.
Type 3: Sales Voucher:
Purpose: Used to record sales transactions where goods or services are sold to customers.
Example: Sales of goods to ABC Traders amounting to ₹20,000.
Type 4: Purchase Voucher:
Purpose: Used to record purchases made by the company, including inventory purchases, raw materials, etc.
Example: Purchase of raw materials from XYZ Suppliers amounting to ₹15,000.
Type 5: Journal Voucher:
Purpose: Used for any miscellaneous transactions that don’t fit into the other voucher types, such as adjustments, provisions, depreciation entries, etc.
Example: Recording depreciation expense for the month amounting to ₹2,000.
Type 6: Contra Voucher:
Purpose: Used to record transactions involving bank accounts or cash, such as bank transfers, cash deposits, cash withdrawals, etc.
Example: Transfer of funds from Bank Account A to Bank Account B amounting to ₹50,000.
Type 7: Debit Note Voucher:
Purpose: Used to record transactions where the company receives goods returned from a customer or a supplier, resulting in a debit to the supplier’s account.
Example: Debit note issued to supplier for returned goods amounting to ₹7,000.
Type 8: Credit Note Voucher:
Purpose: Used to record transactions where the company returns goods to a supplier or issues a credit to a customer, resulting in a credit to the customer’s account.
Example: Credit note issued to customer for returned goods amounting to ₹3,000.
Type 9: Payment Advice Voucher:
Purpose: Used to record payment advices given to parties to facilitate payments, usually used in banking transactions.
Example: Payment advice issued to a vendor for the upcoming payment.
These examples illustrate the various types of voucher entries available in Tally ERP 9 and their respective purposes in recording financial transactions.
In accounting, a ledger is a principal book or record where all financial transactions of a business are recorded. It is essentially a collection of accounts, each representing a specific aspect of the business’s financial activities. Ledgers serve as the foundation for preparing financial statements and analyzing the financial health of a business.
Components of a Ledger:
Account Name: Each ledger account has a unique name that represents the type of transaction it records. For example, “Cash Account,” “Accounts Receivable,” “Sales,” etc.
Date: The date of the transaction is recorded in the ledger to track when the transaction occurred.
Description: A brief description of the transaction is included to provide context and clarity.
Debit and Credit Columns: The ledger typically has separate columns for debit and credit entries. Debits represent amounts added to the account, while credits represent amounts deducted from the account.
Creating a Ledger in Tally ERP 9:
Here’s a detailed explanation of how to create a ledger in Tally ERP 9:
Launch Tally ERP 9: Open the Tally ERP 9 software on your computer.
Select “Accounting Vouchers”: From the gateway of Tally, navigate to “Accounting Vouchers” by pressing F2 or by selecting it from the menu.
Choose “Ledger”: In the “Accounting Vouchers” screen, select the option for creating a new ledger. This is typically done by pressing Alt + C or selecting “Create” from the menu.
Enter Ledger Details:
Name: Enter the name of the ledger. For example, if you’re creating a ledger for cash transactions, you might name it “Cash Account.”
Under: Specify the group under which the ledger will be categorized. Groups help organize similar types of accounts together. For example, a cash account might be categorized under the “Cash-in-Hand” group.
Address: Optionally, you can enter the address associated with the ledger.
GST Details: If applicable, enter GST-related details such as GSTIN, State, etc.
Opening Balance: If you’re creating the ledger at the beginning of a financial period and there’s an opening balance, you can enter it here.
Save: After entering all the necessary details, save the ledger by pressing Ctrl + A or selecting “Yes” when prompted to save.
Examples of Creating Ledgers:
Example 1: Cash Account:
Name: Cash Account
Under: Cash-in-Hand
Opening Balance: ₹1000
Example 2: Sales Account:
Name: Sales Account
Under: Direct Income
Opening Balance: ₹0 (Sales accounts typically start with zero balance)
Example 3: Accounts Receivable:
Name: Accounts Receivable
Under: Sundry Debtors
Opening Balance: ₹5000
Example 4: Accounts Payable:
Name: Accounts Payable
Under: Sundry Creditors
Opening Balance: ₹2000
Example 5: Bank Account:
Name: Bank Account
Under: Bank Accounts
Opening Balance: ₹5000
Example 6: Rent Expense:
Name: Rent Expense
Under: Indirect Expenses
Opening Balance: ₹0
Example 7: Salary Payable:
Name: Salary Payable
Under: Current Liabilities
Opening Balance: ₹0
Example 8: Purchase Account:
Name: Purchase Account
Under: Direct Expenses
Opening Balance: ₹0
Example 9: Office Equipment:
Name: Office Equipment
Under: Fixed Assets
Opening Balance: ₹50000
Example 10: Loan Payable:
Name: Loan Payable
Under: Loans (Long-term Liabilities)
Opening Balance: ₹100000
Example 11: Advertising Expenses:
Name: Advertising Expenses
Under: Indirect Expenses
Opening Balance: ₹0
Example 12: Equity Capital:
Name: Equity Capital
Under: Capital Account
Opening Balance: ₹0
These examples cover various aspects of a business’s financial transactions, including accounts for cash, sales, accounts receivable, accounts payable, bank balances, expenses, assets, liabilities, and equity. Properly setting up and maintaining ledgers in Tally ERP 9 ensures accurate financial record-keeping and reporting.
Tally ERP 9 is a widely used accounting software that offers various features for managing financial transactions, inventory, and payroll, among other functions. It is often used by businesses of all sizes to streamline their accounting processes.
When learning Tally ERP 9, users can access an “Education Mode” that allows them to familiarize themselves with the software’s functionalities without the constraints of real-world data. In Education Mode, users can explore all the features available in the software, but with certain limitations, primarily related to the dates.
In Education Mode, the software restricts the user from entering dates beyond a certain range, typically limited to the first two days and the last two days of any given month. This restriction ensures that users focus on learning the software without inadvertently entering erroneous or irrelevant data.
Here are some key points about Education Mode in Tally ERP 9:
Feature Accessibility: All features of Tally ERP 9 are accessible in Education Mode. Users can explore various modules such as accounting, inventory management, taxation, and reporting.
Date Limitations: The primary restriction in Education Mode is related to the dates. Users cannot input dates beyond the first two days and the last two days of any month. This limitation encourages users to practice within a controlled environment and prevents accidental data entry errors.
Learning Environment: Education Mode provides a safe environment for users to learn and experiment with the software without the risk of affecting real financial data. It allows beginners to familiarize themselves with the software interface, navigation, and functionality.
Training and Certification: Many educational institutions and training centers use Tally ERP 9 Education Mode to teach accounting and financial management principles. Students can practice accounting procedures, voucher entries, inventory management, and other tasks as part of their curriculum.
Transition to Regular Mode: Once users gain proficiency and confidence in using Tally ERP 9, they can transition to the regular mode of the software, where they can work with actual financial data and perform accounting tasks for real-world scenarios.
Education Mode in Tally ERP 9 serves as a valuable tool for beginners to learn accounting principles and software functionality in a controlled environment, enabling them to build skills and expertise in financial management.
To create a new company in Tally ERP 9, you typically follow these steps:
Launch Tally ERP 9: Open the Tally ERP 9 software on your computer.
Select the Company Info Menu: Once Tally ERP 9 is open, you’ll see various options in the main menu. From the main menu, select “Company Info” or press Alt + F3.
Create Company: In the “Company Info” menu, you’ll find an option to create a new company. Select the option that says “Create Company” or press Alt + C.
Enter Company Details: After selecting the option to create a new company, you’ll be prompted to enter details about the company. These details typically include:
Company Name: Enter the name of your company.
Mailing Name: This is an optional field where you can enter a different name for mailing purposes.
Address: Enter the address of your company.
Country: Select the country where your company is located.
State: Select the state where your company is located.
PIN Code: Enter the PIN code or postal code of your company’s address.
Email: Enter the email address associated with your company.
Telephone: Enter the telephone number of your company.
Mobile: Enter the mobile number of your company.
Financial Year: Specify the financial year for your company. Tally ERP 9 will use this information for financial reporting purposes.
Books Beginning From: Enter the start date for your company’s books. This is typically the beginning of the financial year.
Security Control: Set up security controls such as password protection if desired.
Save Company Details: After entering all the necessary details, review them to ensure accuracy. Once you’re satisfied, save the company details.
Select Company: Once the company details are saved, you’ll be prompted to select the company you just created. Select the company from the list to start working in it.
Begin Using Tally: Once you’ve selected the company, you can start using Tally ERP 9 to perform accounting and other financial tasks for your company.
That’s it! You have successfully created a new company in Tally ERP 9 and can now begin managing your company’s finances using the software.
Managing Companies in Tally
In Tally ERP 9, managing companies involves tasks such as opening an existing company, altering company details, and deleting a company. Here’s a guide on how to perform these actions:
Opening an Existing Company:
Launch Tally ERP 9: Open the Tally ERP 9 software on your computer.
Select Company Info Menu: From the main menu, go to “Company Info” or press Alt + F3.
Select “Select Company”: In the “Company Info” menu, choose the option that says “Select Company” or press Alt + F1.
Choose the Company: A list of existing companies will be displayed. Highlight the company you want to open and press Enter. Alternatively, you can double-click on the company name.
Enter Company Password (if applicable): If the company is password-protected, you will be prompted to enter the password. Enter the correct password to access the company.
Altering Company Details:
Launch Tally ERP 9: Open the Tally ERP 9 software.
Select Company Info Menu: From the main menu, go to “Company Info” or press Alt + F3.
Select “Alter Company”: In the “Company Info” menu, choose the option that says “Alter Company” or press Alt + F4.
Choose the Company: A list of existing companies will be displayed. Highlight the company for which you want to alter details and press Enter.
Make Changes: You will now be in the alter mode. Make the necessary changes to the company details, such as the company name, address, or contact information.
Save Changes: After making the alterations, save the changes by pressing Ctrl + A or selecting “Yes” when prompted to save.
Deleting a Company:
Note: Be cautious when deleting a company as this action is irreversible, and all data associated with the company will be permanently removed.
Launch Tally ERP 9: Open the Tally ERP 9 software.
Select Company Info Menu: From the main menu, go to “Company Info” or press Alt + F3.
Select “Alter Company”: In the “Company Info” menu, choose the option that says “Alter Company” or press Alt + F4.
Choose the Company: A list of existing companies will be displayed. Highlight the company you want to delete and press Enter.
Delete Company: In the alter mode, press Alt + D or choose the option that says “Delete Company.” Confirm the deletion when prompted.
Confirm Deletion: Tally ERP 9 will ask for confirmation. Confirm that you want to delete the company, and the company will be permanently removed.
Remember to exercise caution, especially when deleting a company, as it removes all associated data. Always ensure you have a backup before making significant changes.