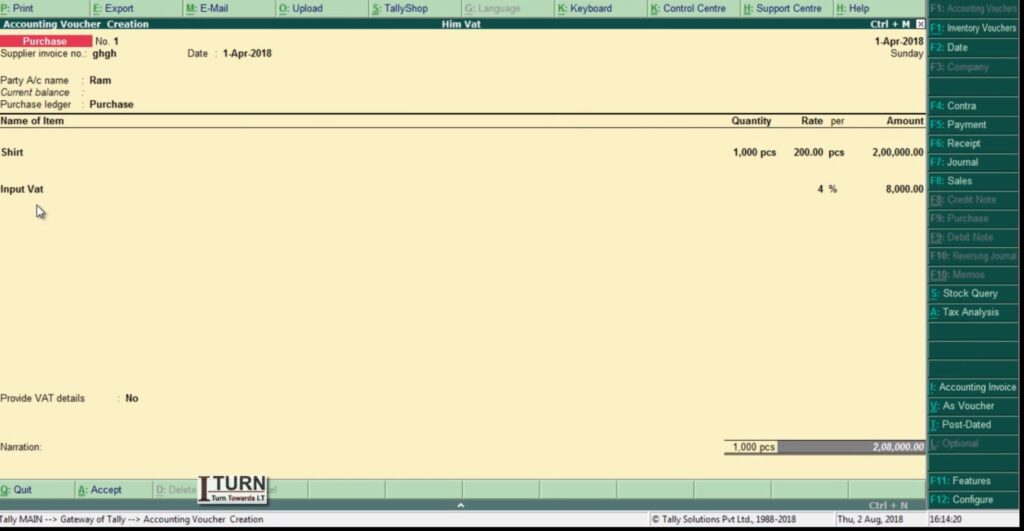
Creating a ledger in Tally is a fundamental part of accounting, as all financial transactions are recorded through ledgers. In TallyPrime, ledgers are created under Groups (like Capital Account, Sales, Purchase, Cash-in-Hand, etc.).
🎯 What is a Ledger in Tally?
A Ledger in Tally is a record of all transactions related to a specific account, such as a bank account, customer, supplier, or expense type.
Every transaction in Tally must be linked to at least two ledgers.
🛠️ Steps to Create a Ledger in TallyPrime
🔹 Method 1: Single Ledger Creation
Gateway of Tally → Create → Accounts Info → Ledgers → Create (Single Ledger)
Fill in the following fields:
Name: Name of the ledger (e.g., Cash, State Bank of India, Rent A/c).
Alias (Optional): Short name for easier reference.
Under: Select the appropriate group (e.g., Cash under Cash-in-Hand, SBI under Bank Accounts, Rent under Indirect Expenses).
Inventory values are affected?: Choose Yes only if you’re creating stock-related accounts.
Opening Balance: If any, enter it with the correct sign (Dr/Cr).
Press Ctrl + A to save.
🔹 Method 2: Multiple Ledgers Creation
Gateway of Tally → Create → Accounts Info → Ledgers → Create (Multiple Ledgers)
Select group as “All Items” or a specific group (e.g., Sundry Debtors).
Enter ledger names, group, and opening balances for each.
Press Ctrl + A to save.
📋 Common Ledger Examples with Groups
Ledger Name
Group
Opening Balance
Nature
Cash
Cash-in-Hand
₹10,000 Dr
Asset
State Bank of India
Bank Accounts
₹25,000 Dr
Asset
Purchase A/c
Purchase Accounts
₹0
Expense
Sales A/c
Sales Accounts
₹0
Income
Rent Paid A/c
Indirect Expenses
₹0
Expense
Electricity Charges
Indirect Expenses
₹0
Expense
Capital A/c
Capital Account
₹1,00,000 Cr
Liability
Raj Traders
Sundry Creditors
₹15,000 Cr
Liability
Om Enterprises
Sundry Debtors
₹8,000 Dr
Asset
🧾 Explanation of Some Ledgers
1. Cash Ledger
Group: Cash-in-Hand
Used to record all cash transactions.
Only one cash ledger can be created in Tally.
2. Bank Ledger (e.g., State Bank of India)
Group: Bank Accounts
Used for bank-related transactions like deposits, withdrawals, cheques, etc.
3. Customer Ledger (e.g., Om Enterprises)
Group: Sundry Debtors
Used when you sell goods/services on credit.
4. Supplier Ledger (e.g., Raj Traders)
Group: Sundry Creditors
Used for purchases made on credit.
5. Indirect Expenses (e.g., Rent, Electricity)
Group: Indirect Expenses
Used to record operational expenses not directly linked to production.
6. Sales & Purchase Ledger
Group: Sales Accounts / Purchase Accounts
Required to record daily sales and purchases.
✅ Important Notes
Avoid duplicating ledger names.
Ensure the “Group” selected is correct—Tally uses this for reporting.
You can alter, display or delete a ledger anytime through:
Gateway of Tally → Alter / Display / Delete → Ledgers
📌 Practical Example Scenario
Let’s say you’re starting a business with ₹1,00,000 capital and opening a bank account with ₹25,000 and keeping ₹10,000 as cash.
You purchase goods worth ₹15,000 on credit from Raj Traders and sell items worth ₹8,000 to Om Enterprises on credit.
You pay ₹2,000 for Rent and ₹1,000 for Electricity.
Here’s how you’d create ledgers:
Capital A/c (Under Capital Account, Cr ₹1,00,000)
Cash (Under Cash-in-Hand, Dr ₹10,000)
State Bank of India (Under Bank Accounts, Dr ₹25,000)
Raj Traders (Under Sundry Creditors, Cr ₹15,000)
Om Enterprises (Under Sundry Debtors, Dr ₹8,000)
Purchase A/c (Under Purchase Accounts)
Sales A/c (Under Sales Accounts)
Rent Paid (Under Indirect Expenses)
Electricity Charges (Under Indirect Expenses)
🧠 Pro Tips
Use Alt + G → Chart of Accounts to see all created ledgers.
Regularly back up your company data after creating or modifying ledgers.
Use Gateway of Tally → Display → Account Books → Ledger to view ledger reports.
Here are 10 interview questions on the topic of Ledger Creation in Tally, suitable for beginner to intermediate levels:
✅ Interview Questionnaire: Ledger Creation in Tally
1. What is a ledger in Tally? Why is it important in accounting?
Expected Answer: A ledger is an account used to record all financial transactions related to a specific item or party. Every transaction in Tally is recorded using ledgers, making them essential for maintaining accurate accounts.
2. How do you create a single ledger in TallyPrime?
Expected Answer: Path: Gateway of Tally → Accounts Info → Ledgers → Create (Single Ledger) Fill in fields like Name, Under Group, Opening Balance, etc., then press Ctrl + A to save.
3. What is the difference between Single Ledger and Multiple Ledger creation in Tally?
Expected Answer: Single Ledger allows creation of one ledger at a time with detailed input. Multiple Ledger allows creation of several ledgers on one screen quickly under the same or different groups.
4. Which group will you select while creating the following ledgers?
a) Cash b) State Bank of India c) Rent Paid d) Raj Traders e) Om Enterprises
Expected Answer: a) Cash-in-Hand b) Bank Accounts c) Indirect Expenses d) Sundry Creditors e) Sundry Debtors
5. Can you create more than one cash ledger in Tally? Why or why not?
Expected Answer: No, Tally allows only one cash ledger under the “Cash-in-Hand” group because cash must be tracked centrally for compliance and reporting.
6. What happens if you select the wrong group while creating a ledger?
Expected Answer: Reports and financial statements will be inaccurate. For example, if Rent Paid is placed under Assets instead of Expenses, it will distort profit & loss calculations.
7. What is the significance of ‘Opening Balance’ in ledger creation? How do you decide if it’s debit or credit?
Expected Answer: Opening Balance shows the existing amount in the account. Assets and Expenses usually have Debit (Dr) balances, while Liabilities and Incomes have Credit (Cr) balances.
8. How do you display or alter an existing ledger in Tally?
Expected Answer: Path: Gateway of Tally → Accounts Info → Ledgers → Alter / Display Select the ledger from the list to modify or view.
9. Name five common groups used while creating ledgers in Tally.
Expected Answer:
Capital Account
Bank Accounts
Cash-in-Hand
Sundry Debtors
Indirect Expenses
10. What are the consequences of duplicating ledger names in Tally?
Expected Answer: Tally does not allow exact duplicates, but similar names may cause confusion and errors in data entry, misreporting, and incorrect voucher classification.
VAT entry in Tally.ERP 9 is essential for businesses to accurately record Value Added Tax transactions. Below, I will guide you through the process step-by-step, including examples and explanations:
Step 1: Create VAT Ledgers
Access Ledger Creation: Open Tally.ERP 9 and navigate to Gateway of Tally > Accounts Info > Ledgers > Create.
Create VAT Ledger: Create a ledger named ‘VAT Input’ and ‘VAT Output’ under the group ‘Duties & Taxes’.
Step 2: Enable VAT in Tally
Activate VAT: Go to Gateway of Tally > F11: Features > F3: Statutory & Taxation.
Enable VAT: Set ‘Enable Value Added Tax (VAT)’ to ‘Yes’.
Step 3: Make Sales Entry with VAT
Create Sales Voucher: Go to Gateway of Tally > Accounting Vouchers > F8: Sales.
Enter Sales Details: Fill in the necessary details like the party’s name, invoice number, date, and sales amount (e.g., Rs. 10,000).
Select VAT Ledger: In the Accounting Voucher screen, under Particulars, select the sales ledger and enter the sales amount.
Specify VAT Rate: In the Tax Analysis screen, select the VAT ledger and enter the applicable VAT rate (e.g., 12.5%).
Step 4: Record Purchase Entry with VAT
Create Purchase Voucher: Go to Gateway of Tally > Accounting Vouchers > F9: Purchase.
Enter Purchase Details: Fill in the necessary details like the supplier’s name, invoice number, date, and purchase amount (e.g., Rs. 8,000).
Select VAT Ledger: In the Accounting Voucher screen, under Particulars, select the purchase ledger and enter the purchase amount.
Specify VAT Rate: In the Tax Analysis screen, select the VAT ledger and enter the applicable VAT rate (e.g., 12.5%).
Step 5: View VAT Reports
Access VAT Reports: Go to Gateway of Tally > Display > Statutory Reports > VAT.
Generate VAT Computation: Select the period for which you want to view the VAT computation.
Review VAT Details: You can view details like total sales, total purchases, input VAT, output VAT, and VAT payable.
Example:
Let’s consider a scenario:
Sales amount: Rs. 50,000
Purchase amount: Rs. 30,000
VAT rate: 12.5%
Sales Entry:
Create a sales voucher.
Enter the sales details: Party name, invoice number, date, and sales amount (Rs. 50,000).
Select the sales ledger and enter the sales amount.
Specify the VAT rate as 12.5%.
Purchase Entry:
Create a purchase voucher.
Enter the purchase details: Supplier’s name, invoice number, date, and purchase amount (Rs. 30,000).
Select the purchase ledger and enter the purchase amount.
Specify the VAT rate as 12.5%.
Summary:
Enable VAT in Tally.
Create VAT ledgers for input and output.
Record sales and purchase transactions separately.
Specify the VAT rate for each transaction.
Review VAT reports to ensure accurate computation.
By following these steps and example, you can effectively manage VAT entries in Tally.ERP 9 for your business transactions.