Value Added Tax (VAT) on fixed assets refers to the imposition of VAT on the purchase of capital assets that a business intends to use for its operations over an extended period. Fixed assets include tangible assets like land, buildings, machinery, equipment, vehicles, and intangible assets like patents and trademarks, which are essential for the long-term functioning and growth of a business.
The concept of VAT on fixed assets operates within the broader framework of VAT regulations imposed by tax authorities in various jurisdictions. Here’s how it generally works:
1. VAT on Purchase of Fixed Assets:
When a business purchases a fixed asset, it incurs VAT on the purchase amount. The VAT is usually calculated as a percentage of the purchase price and is payable to the tax authority. For example, if the VAT rate is 12.5% and a company buys machinery for Rs. 1,00,000, it would need to pay Rs. 12,500 as VAT.
2. Input VAT:
The VAT paid on the purchase of fixed assets is termed as input VAT. It represents the VAT that a business pays to its suppliers while purchasing goods or assets. In the context of fixed assets, input VAT becomes a part of the cost of acquiring the asset.
3. Treatment of Input VAT:
In many jurisdictions, businesses can claim input VAT credits. This means they can deduct the VAT they’ve paid on purchases (including fixed assets) from the VAT they’ve collected on sales. Essentially, they can offset the VAT they’ve paid against the VAT they owe, thereby reducing their tax liability.
4. Capital Goods Scheme:
Some tax authorities implement a Capital Goods Scheme (CGS) to address the VAT treatment of capital assets. Under the CGS, businesses may be required to adjust the VAT they’ve claimed on the purchase of fixed assets over time. This adjustment is based on changes in the use of the asset for business purposes and is aimed at ensuring fair treatment of VAT over the asset’s useful life.
5. Output VAT:
When a business sells a fixed asset, it may be required to charge VAT on the sale price. This VAT charged on the sale of fixed assets is termed as output VAT. The rate of output VAT is usually the same as the rate of VAT applicable to the sale of goods and services in the jurisdiction.
6. VAT Reporting and Compliance:
Businesses are required to maintain accurate records of VAT transactions related to fixed assets. This includes recording input VAT paid on the purchase of fixed assets, reporting output VAT collected on the sale of fixed assets, and complying with VAT regulations regarding the treatment of fixed assets.
In summary, VAT on fixed assets involves the imposition of VAT on the purchase of long-term assets used for business purposes. Businesses need to understand the implications of VAT on fixed assets, including the treatment of input VAT, the potential application of the Capital Goods Scheme, and compliance with VAT reporting requirements. Proper accounting and compliance ensure that businesses accurately reflect the VAT treatment of fixed assets in their financial statements and tax filings.
In Tally.ERP 9, applying VAT (Value Added Tax) on fixed assets involves a few steps. Here’s a comprehensive guide on how to apply VAT on fixed assets in Tally.ERP 9:
Step 1: Creating Fixed Assets Ledger:
Go to Gateway of Tally > Accounts Info > Ledger > Create.
Create a ledger named “Fixed Assets” under the group “Fixed Assets”.
Step 2: Enabling VAT in Tally.ERP 9:
Go to Gateway of Tally > F11: Features > F3: Statutory & Taxation.
Enable VAT by selecting “Yes” in the option “Enable Value Added Tax (VAT)?”
Step 3: Creating VAT Ledger:
Go to Gateway of Tally > Accounts Info > Ledger > Create.
Create a ledger named “VAT @ X%” (replace X with your applicable VAT rate) under the group “Duties & Taxes”.
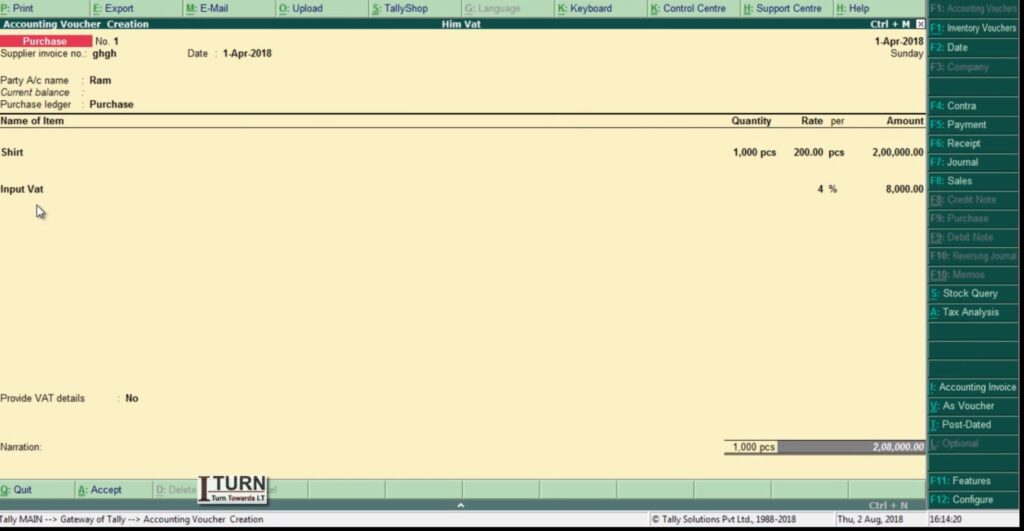
Step 4: Recording Purchase of Fixed Asset with VAT:
Go to Gateway of Tally > Accounting Vouchers > F9: Purchase.
Enter the date of purchase, supplier invoice number, and other details.
Debit the “Fixed Assets” ledger with the total amount (excluding VAT).
Debit the “VAT @ X%” ledger with the VAT amount.
Credit the supplier’s ledger with the total amount (including VAT).
Step 5: Calculating Input VAT Credit:
Go to Gateway of Tally > Display > Statutory Reports > VAT > VAT Computation.
Check the Input VAT credit available against the VAT ledger.
Step 6: Adjusting Input VAT Credit:
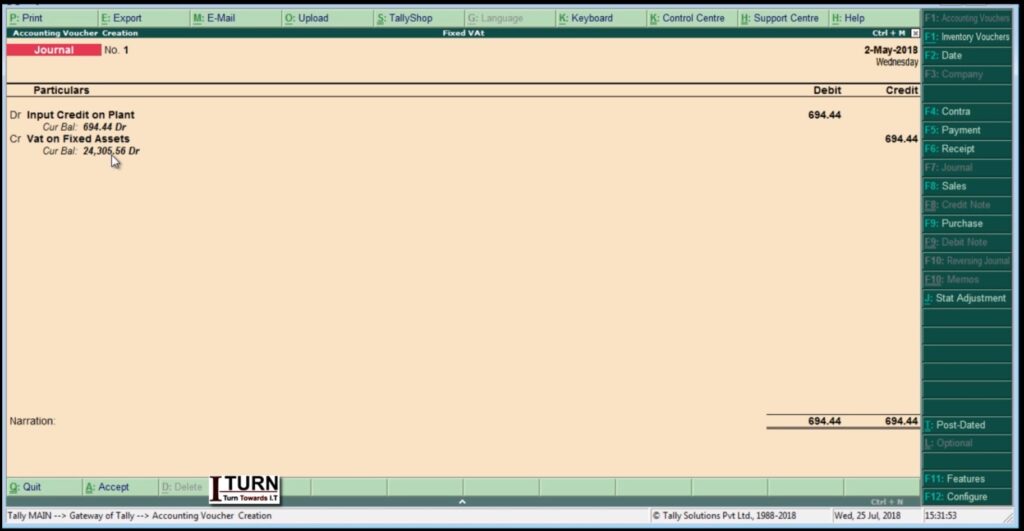
Go to Gateway of Tally > Accounting Vouchers > F7: Journal.
Debit the Input VAT ledger and credit the VAT Payable ledger to adjust the input VAT credit against the VAT liability.
Step 7: Calculating Depreciation:
Go to Gateway of Tally > Accounts Info > Ledger > Create.
Create a ledger named “Depreciation” under the group “Indirect Expenses”.
Record depreciation entries as per the applicable rates and methods.
Step 8: Recording Sale of Fixed Asset:
Go to Gateway of Tally > Accounting Vouchers > F8: Sales.
Enter the date of sale, buyer details, and other necessary information.
Debit the buyer’s ledger with the sales amount (excluding VAT).
Credit the “Fixed Assets” ledger with the original purchase cost.
Credit the “VAT @ X%” ledger with the VAT amount charged on the sale.
Step 9: Paying VAT Liability:
Go to Gateway of Tally > Display > Statutory Reports > VAT > VAT Challan Reconciliation.
Check the VAT payable amount.
Go to Gateway of Tally > Accounting Vouchers > F5: Payment.
Debit the VAT Payable ledger and credit the bank ledger for paying the VAT liability.
Step 10: Updating VAT Returns:
Go to Gateway of Tally > Display > Statutory Reports > VAT > VAT Returns.
Generate VAT returns and file them as per legal requirements.
Throughout these steps, ensure compliance with VAT regulations and consult with a tax advisor if needed.
VAT entry in Tally.ERP 9 is essential for businesses to accurately record Value Added Tax transactions. Below, I will guide you through the process step-by-step, including examples and explanations:
Step 1: Create VAT Ledgers
Access Ledger Creation: Open Tally.ERP 9 and navigate to Gateway of Tally > Accounts Info > Ledgers > Create.
Create VAT Ledger: Create a ledger named ‘VAT Input’ and ‘VAT Output’ under the group ‘Duties & Taxes’.
Step 2: Enable VAT in Tally
Activate VAT: Go to Gateway of Tally > F11: Features > F3: Statutory & Taxation.
Enable VAT: Set ‘Enable Value Added Tax (VAT)’ to ‘Yes’.
Step 3: Make Sales Entry with VAT
Create Sales Voucher: Go to Gateway of Tally > Accounting Vouchers > F8: Sales.
Enter Sales Details: Fill in the necessary details like the party’s name, invoice number, date, and sales amount (e.g., Rs. 10,000).
Select VAT Ledger: In the Accounting Voucher screen, under Particulars, select the sales ledger and enter the sales amount.
Specify VAT Rate: In the Tax Analysis screen, select the VAT ledger and enter the applicable VAT rate (e.g., 12.5%).
Step 4: Record Purchase Entry with VAT
Create Purchase Voucher: Go to Gateway of Tally > Accounting Vouchers > F9: Purchase.
Enter Purchase Details: Fill in the necessary details like the supplier’s name, invoice number, date, and purchase amount (e.g., Rs. 8,000).
Select VAT Ledger: In the Accounting Voucher screen, under Particulars, select the purchase ledger and enter the purchase amount.
Specify VAT Rate: In the Tax Analysis screen, select the VAT ledger and enter the applicable VAT rate (e.g., 12.5%).
Step 5: View VAT Reports
Access VAT Reports: Go to Gateway of Tally > Display > Statutory Reports > VAT.
Generate VAT Computation: Select the period for which you want to view the VAT computation.
Review VAT Details: You can view details like total sales, total purchases, input VAT, output VAT, and VAT payable.
Example:
Let’s consider a scenario:
Sales amount: Rs. 50,000
Purchase amount: Rs. 30,000
VAT rate: 12.5%
Sales Entry:
Create a sales voucher.
Enter the sales details: Party name, invoice number, date, and sales amount (Rs. 50,000).
Select the sales ledger and enter the sales amount.
Specify the VAT rate as 12.5%.
Purchase Entry:
Create a purchase voucher.
Enter the purchase details: Supplier’s name, invoice number, date, and purchase amount (Rs. 30,000).
Select the purchase ledger and enter the purchase amount.
Specify the VAT rate as 12.5%.
Summary:
Enable VAT in Tally.
Create VAT ledgers for input and output.
Record sales and purchase transactions separately.
Specify the VAT rate for each transaction.
Review VAT reports to ensure accurate computation.
By following these steps and example, you can effectively manage VAT entries in Tally.ERP 9 for your business transactions.
VAT, which stands for Value Added Tax, is a consumption tax levied on the value added to goods and services at each stage of production or distribution. It is an indirect tax, meaning that the tax is passed on to the end consumer as part of the purchase price. VAT is one of the most common forms of taxation used by governments worldwide. Here’s a detailed explanation of VAT:
1. Basic Concept:
Taxation at Each Stage: VAT is applied at each stage of the production and distribution process, from the raw material stage to the final sale to the consumer.
Tax on Value Added: VAT is calculated on the value added to a product or service at each stage of production or distribution. It is based on the difference between the sale price of a product or service and the cost of materials and services used to produce it.
2. How VAT Works:
Input Tax Credit (ITC): Businesses can claim credit for the VAT paid on their purchases (input tax) against the VAT they collect on their sales (output tax). This prevents double taxation and ensures that tax is only paid on the value added at each stage of production or distribution.
Taxable Supplies: Only certain goods and services are subject to VAT. Exempt and zero-rated goods and services may not attract VAT or may be subject to a VAT rate of zero percent.
3. VAT Rates:
Standard Rate: Most goods and services are subject to the standard rate of VAT. The rate varies by country and can range from 5% to 25% or more.
Reduced Rate: Some goods and services may be subject to a reduced rate of VAT, which is lower than the standard rate. These typically include essential items such as food, medicines, and books.
Zero Rate: Certain goods and services may be subject to a zero rate of VAT. This means that VAT is charged at 0%, effectively making the goods or services tax-free.
4. VAT Registration:
Threshold: Businesses must register for VAT once their taxable turnover exceeds a certain threshold set by the government.
VAT Number: Upon registration, businesses are assigned a unique VAT number by the tax authority, which they must include on their invoices and other relevant documents.
5. VAT Invoicing:
Compliance Requirements: Businesses must issue VAT-compliant invoices for all taxable supplies made to customers. Invoices must contain specific information such as the VAT number of the supplier, the amount of VAT charged, and a breakdown of the goods or services provided.
6. VAT Returns and Payments:
Filing Period: Businesses are required to file periodic VAT returns with the tax authority, typically on a monthly or quarterly basis, depending on the jurisdiction.
Payment: VAT payable is calculated based on the difference between the VAT collected on sales (output tax) and the VAT paid on purchases (input tax). Businesses must pay any VAT owed to the tax authority within the specified deadline.
7. VAT Exemptions and Zero Rating:
Exempt Supplies: Some goods and services may be exempt from VAT altogether. Examples include healthcare, education, and financial services.
Zero-Rated Supplies: Zero-rated supplies are goods and services that are subject to VAT at a rate of 0%. While VAT is technically charged, the rate is zero, resulting in no VAT being collected.
Understanding VAT is crucial for businesses as it impacts pricing, cash flow, and compliance requirements. Proper management of VAT ensures that businesses remain compliant with tax regulations while minimizing tax liabilities and maximizing input tax credits.
Example
Let’s consider a fictional company named “TechGadgets Ltd.” that sells electronic gadgets such as smartphones, laptops, and tablets. Here’s how TechGadgets Ltd. operates in relation to VAT:
TechGadgets Ltd.
Overview:
TechGadgets Ltd. is a retail company specializing in electronic gadgets.
The company purchases electronic devices from manufacturers and wholesalers and sells them to consumers through its retail outlets and online store.
VAT Registration:
As TechGadgets Ltd. exceeds the threshold for VAT registration in its country, it registers for VAT with the tax authority.
Upon registration, TechGadgets Ltd. obtains a unique VAT registration number.
VAT Rates:
In its country, electronic gadgets are subject to the standard rate of VAT, which is currently 20%.
VAT Invoicing:
TechGadgets Ltd. issues VAT-compliant invoices for all sales made to customers, whether through its retail stores or online platform.
Invoices include the company’s VAT registration number, details of the goods sold, VAT amount charged, and total amount payable.
Input Tax Credit (ITC):
TechGadgets Ltd. purchases electronic devices from manufacturers and wholesalers, paying VAT on these purchases.
The company tracks and records the VAT paid on its purchases as input tax credit, which can be offset against the VAT collected on its sales.
VAT Returns and Payments:
TechGadgets Ltd. files monthly VAT returns with the tax authority, reporting the VAT collected on its sales and the VAT paid on its purchases.
The company calculates the net VAT payable or refundable based on the VAT collected and paid during the reporting period.
VAT payments are made to the tax authority within the specified deadline.
Example Transaction:
TechGadgets Ltd. purchases 100 smartphones from a manufacturer at a cost of $300 each, totaling $30,000. The manufacturer charges VAT at the standard rate of 20%.
TechGadgets Ltd. pays $6,000 in VAT ($30,000 x 20%) on the purchase.
TechGadgets Ltd. sells the smartphones to customers through its retail stores, generating sales revenue of $50,000.
The company charges VAT at the standard rate of 20% on the sales, amounting to $10,000.
TechGadgets Ltd. reports total sales of $50,000 and input VAT of $6,000 on its VAT return.
After offsetting the input VAT of $6,000 against the output VAT of $10,000, TechGadgets Ltd. pays $4,000 ($10,000 – $6,000) in VAT to the tax authority.
In this way, TechGadgets Ltd. manages its VAT obligations while conducting its business operations in the retail sector.
Let’s walk through the stages and voucher entries in the sales order process in Tally ERP 9:
1. Sales Order:
Definition: A sales order is a document issued by a seller to a buyer, confirming the details of the products or services the buyer intends to purchase.
Steps to Create a Sales Order in Tally ERP 9:
Navigate to Gateway of Tally > Inventory Vouchers > F5: Sales Order.
Enter the sales order number, date, and other relevant details.
Select the customer from the list.
Enter details of the items to be sold including quantity, rate, and any applicable taxes.
Save the sales order.
Example: ABC Company receives a sales order from Customer XYZ for 50 units of Product A at a rate of $20 per unit. They create a sales order with these details.
2. Delivery Note:
Definition: A delivery note is prepared by the seller to confirm the delivery of goods to the buyer. It serves as an acknowledgment of the transfer of goods.
Steps to Create a Delivery Note in Tally ERP 9:
Go to Gateway of Tally > Inventory Vouchers > F8: Delivery Note.
Select the sales order against which goods are to be delivered.
Enter the delivery note number, date, and other relevant details.
Specify the quantity and condition of goods being delivered.
Save the delivery note.
Example: ABC Company prepares a delivery note to confirm the delivery of 50 units of Product A to Customer XYZ as per the sales order.
3. Rejection In:
Definition: If the goods delivered are not as per the buyer’s specifications or are damaged, a rejection in voucher is prepared to return the goods to the seller.
Steps to Create a Rejection In Voucher in Tally ERP 9:
Navigate to Gateway of Tally > Inventory Vouchers > F7: Rejection In.
Select the delivery note against which goods are to be rejected.
Specify the quantity and condition of goods being returned.
Save the rejection in voucher.
Example: Customer XYZ rejects 5 units of Product A delivered by ABC Company due to damage. They create a rejection in voucher to return these 5 units.
4. Sales Bill:
Definition: A sales bill is issued by the seller to the buyer, requesting payment for the goods or services supplied.
Steps to Create a Sales Bill in Tally ERP 9:
Go to Gateway of Tally > Accounting Vouchers > F8: Sales.
Select the customer from the list.
Enter the sales bill number, date, and other relevant details.
Specify the details of the items sold including quantity, rate, and taxes.
Save the sales bill.
Example: ABC Company sends a sales bill to Customer XYZ for the 45 units of Product A that were accepted.
5. Credit Note:
Definition: If there are discrepancies in the sales bill, such as over-delivery or damaged goods, the seller may issue a credit note to the buyer for adjustments in the amount owed.
Steps to Create a Credit Note in Tally ERP 9:
Navigate to Gateway of Tally > Accounting Vouchers > F7: Journal.
Select Credit Note as the voucher type.
Enter the credit note number, date, and other relevant details.
Specify the reason for issuing the credit note and the amount to be adjusted.
Save the credit note.
Example: If ABC Company over-delivered 5 units of Product A, they issue a credit note to Customer XYZ to adjust the sales bill accordingly.
These are the stages and voucher entries involved in the sales order process in Tally ERP 9. Each step ensures proper documentation and tracking of transactions between the seller and the buyer.
Reports
After completing the stages and voucher entries for sales orders in Tally ERP 9, you can view various reports related to sales transactions and inventory management. Here’s where you can find relevant reports:
Description: The Sales Register provides a comprehensive view of all sales transactions, including sales bills and credit notes, within a specified period.
Description: The Stock Summary report provides an overview of all stock items, including opening balance, inward and outward movements, and closing balance.
Description: The Inventory Ageing Analysis report helps identify slow-moving or obsolete inventory items based on their age.
These reports in Tally ERP 9 enable you to monitor sales transactions, track inventory movements, analyze receivables, and manage customer accounts effectively. They provide valuable insights into your business operations and help in making informed decisions for business growth and optimization.
Before performing the entries related to purchase orders, receipt notes, rejection outs, purchase bills, and debit notes in Tally ERP 9, it’s important to ensure that relevant features are activated. Here’s how you can activate these features:
1. Enable Inventory Management:
Go to Gateway of Tally.
Select ‘F11: Features’ or press F11.
Under ‘F1: Accounting Features’, ensure that ‘Maintain Accounts only’ is set to ‘No’.
Set ‘Maintain Inventory’ to ‘Yes’.
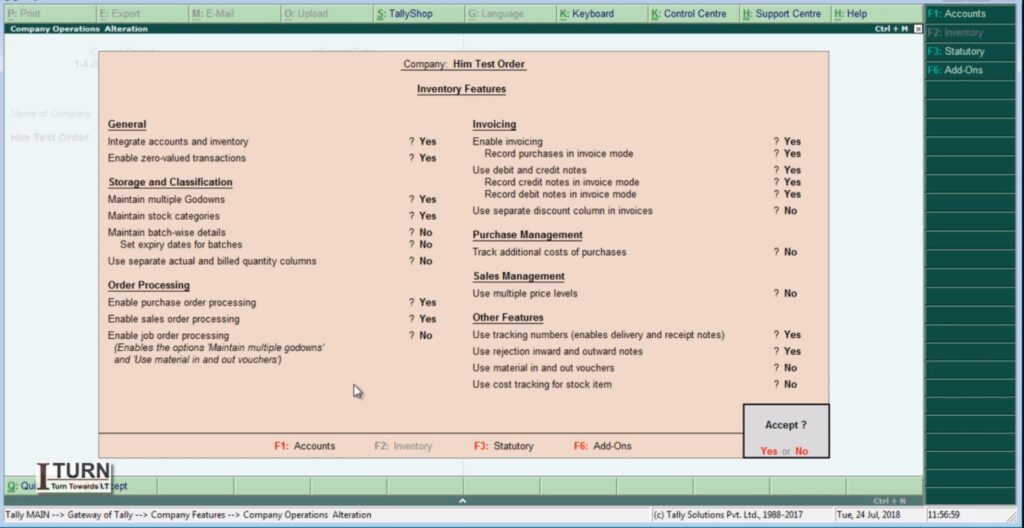
2. Set Up Inventory Features:
Go to Gateway of Tally.
Select ‘F11: Features’ or press F11.
Under ‘F2: Inventory Features’, ensure that the required options such as ‘Maintain Multiple Godowns’, ‘Use Tracking Numbers (Batch Numbers)’, ‘Use Expiry Dates for Batches’, etc., are set according to your business needs.
3. Configure Purchase and Sales Vouchers:
Go to Gateway of Tally.
Select ‘F12: Configure’ or press F12.
Under ‘Accounting Features’, ensure that ‘Allow Purchase Orders’ and ‘Allow Sales Orders’ are set to ‘Yes’.
4. Activate Rejection In and Out Vouchers:
Go to Gateway of Tally.
Select ‘F11: Features’ or press F11.
Under ‘Inventory Features’, ensure that ‘Enable Rejection In/Out Voucher’ is set to ‘Yes’.
5. Enable Debit and Credit Notes:
Go to Gateway of Tally.
Select ‘F11: Features’ or press F11.
Under ‘Accounting Features’, ensure that ‘Enable Invoicing’ is set to ‘Yes’.
Additionally, check if ‘Use Rejection In/Out for Purchase Returns’ and ‘Use Debit/Credit Notes’ are set to ‘Yes’ as required.
6. Set Up Stock Groups, Stock Categories, and Units of Measure:
Go to Gateway of Tally.
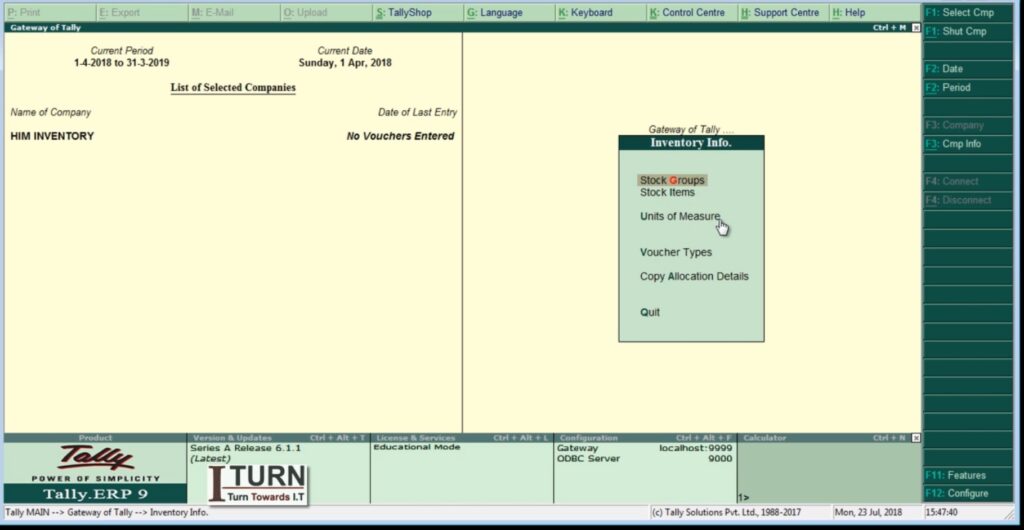
Under ‘Inventory Info’, set up stock groups, stock categories, and units of measure as per your business requirements.
7. Configure Godowns (if applicable):
Go to Gateway of Tally.
Under ‘Inventory Info’, set up multiple godowns if your business involves maintaining inventory at different locations.
By activating these features and configuring settings in Tally ERP 9, you ensure that the software is ready to handle inventory management, purchase orders, sales orders, rejection vouchers, purchase bills, and debit notes efficiently. This setup enables seamless recording and tracking of transactions related to inventory and purchase/sales operations.
1. Purchase Order (PO):
Definition: A purchase order is a document issued by a buyer to a seller, specifying the details of the goods or services the buyer intends to purchase.
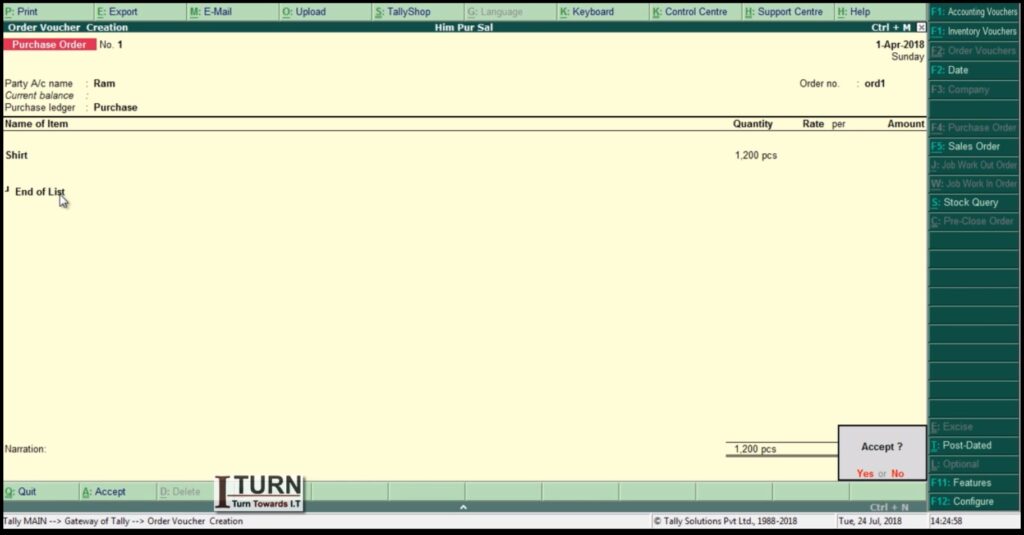
Steps to Create a Purchase Order in Tally ERP 9:
Navigate to Gateway of Tally > Inventory Vouchers > F4: Purchase Order.
Enter the purchase order number, date, and other relevant details.
Select the supplier/vendor from the list.
Enter details of the items to be purchased including quantity, rate, and any applicable taxes.
Save the purchase order.
Example: Let’s say your company, XYZ Enterprises, needs to purchase 100 units of Product A from Supplier ABC at a rate of $10 per unit. The purchase order would specify these details along with other terms such as delivery date and payment terms.
2. Receipt Note:
Definition: A receipt note is prepared by the buyer upon receiving goods from the seller. It serves as acknowledgment of receipt of goods.
Steps to Create a Receipt Note in Tally ERP 9:
Go to Gateway of Tally > Inventory Vouchers > F9: Purchase Order.
Select the purchase order for which goods have been received.
Enter the receipt note number, date, and other relevant details.
Specify the quantity and condition of goods received.
Save the receipt note.
Example: Using the previous example, if Supplier ABC delivers 100 units of Product A, XYZ Enterprises creates a receipt note to acknowledge the receipt of these goods.
3. Rejection Out:
Definition: If the goods received are damaged or do not meet the buyer’s specifications, a rejection out voucher is prepared to return the goods to the seller.
Steps to Create a Rejection Out Voucher in Tally ERP 9:
Navigate to Gateway of Tally > Inventory Vouchers > F6: Rejection Out.
Select the receipt note against which goods are to be rejected.
Specify the quantity and condition of goods being returned.
Save the rejection out voucher.
Example: If XYZ Enterprises finds that 10 units of Product A received from Supplier ABC are damaged, they create a rejection out voucher to return these 10 units to the supplier.
4. Purchase Bill:
Definition: A purchase bill is issued by the seller to the buyer, requesting payment for the goods or services supplied.
Steps to Create a Purchase Bill in Tally ERP 9:
Go to Gateway of Tally > Accounting Vouchers > F9: Purchase.
Select the supplier/vendor from the list.
Enter the purchase bill number, date, and other relevant details.
Specify the details of the items purchased including quantity, rate, and taxes.
Save the purchase bill.
Example: Supplier ABC sends a purchase bill to XYZ Enterprises for the 90 units of Product A that were accepted.
5. Debit Note:
Definition: If there are discrepancies in the purchase bill, such as overcharging or damaged goods, the buyer may issue a debit note to the seller requesting adjustments to the amount owed.
Steps to Create a Debit Note in Tally ERP 9:
Navigate to Gateway of Tally > Accounting Vouchers > F7: Journal.
Select Debit Note as the voucher type.
Enter the debit note number, date, and other relevant details.
Specify the reason for issuing the debit note and the amount to be adjusted.
Save the debit note.
Example: If XYZ Enterprises finds that Supplier ABC has overcharged for 5 units of Product A, they issue a debit note requesting a reduction in the purchase amount accordingly.
These are the stages and voucher entries involved in the purchase order process in Tally ERP 9. Each step ensures proper documentation and tracking of transactions between the buyer and the seller.
Check Reports
After completing the entries for purchase orders, receipt notes, rejection out, purchase bills, and debit notes in Tally ERP 9, you can check various stock-related aspects including reports to ensure accurate inventory management. Here’s where you can find relevant information and reports:
Stock Summary:
Go to Gateway of Tally > Display > Inventory Books > Stock Summary.
This report provides a summary of all stock items, including their opening balance, inward and outward movements, and closing balance.
Stock Item Vouchers:
Navigate to Gateway of Tally > Display > Inventory Books > Stock Item Vouchers.
Here, you can view all transactions related to a specific stock item including purchase orders, receipts, sales, rejection outs, etc.
Inventory Reports:
Under Gateway of Tally > Display > Inventory Books, you can access various reports such as Stock Item Vouchers, Movement Analysis, and Inventory Ageing Analysis.
These reports provide insights into the movement and status of inventory items over time.
Stock Query:
You can use the Stock Query feature in Tally ERP 9 to check the availability, location, and other details of specific stock items.
Go to Gateway of Tally > Display > Inventory Books > Stock Query.
Stock Valuation Reports:
To analyze the valuation of your inventory, you can access reports such as Stock Valuation Summary and Stock Valuation Tally.
These reports help you understand the total value of your inventory based on different valuation methods (FIFO, LIFO, Weighted Average, etc.).
Movement Analysis:
This report provides insights into the movement of goods in and out of the organization over a specified period.
Go to Gateway of Tally > Display > Inventory Books > Movement Analysis.
Sales and Purchase Register:
You can review the sales and purchase registers to track transactions, invoices, and payments.
Go to Gateway of Tally > Display > Account Books > Journal Register / Purchase Register / Sales Register.
By utilizing these reports and features in Tally ERP 9, you can effectively monitor your inventory, track stock movements, analyze valuation, and ensure accurate financial reporting. It helps in making informed decisions related to inventory management and optimizing stock levels to meet business requirements.
Sales and purchase orders are essential documents in the process of buying and selling goods and services. They serve as formal agreements between a buyer and a seller, outlining the details of the transaction. Here’s an explanation of sales and purchase orders in detail:
Purchase Order:
Definition: A purchase order (PO) is a commercial document issued by a buyer to a seller, indicating the types, quantities, and agreed prices for products or services the buyer wishes to purchase. It serves as an official offer to buy goods or services from a seller.
Key Components of a Purchase Order:
PO Number: A unique identifier assigned to each purchase order for tracking and reference purposes.
Date: The date when the purchase order is issued.
Vendor Information: Details about the seller including name, address, contact information, and any specific terms of the agreement.
Shipping Information: Information regarding the shipping address, delivery instructions, and preferred shipping method.
Product or Service Details: Description, quantity, unit price, and total cost of each item or service being purchased.
Terms and Conditions: Any special terms or conditions agreed upon by the buyer and seller, such as payment terms, delivery dates, warranties, etc.
Authorized Signature: The signature of the authorized person within the buyer’s organization, indicating approval and commitment to the terms of the purchase order.
Purpose of a Purchase Order:
Formalize the Agreement: It formalizes the agreement between the buyer and seller regarding the purchase of goods or services.
Record Keeping: It serves as a record of the transaction, providing documentation for accounting and auditing purposes.
Prevent Disputes: By detailing the terms and conditions of the purchase, it helps prevent misunderstandings or disputes between the buyer and seller.
Sales Order:
Definition: A sales order (SO) is a document issued by a seller to confirm the details of a transaction with a buyer. It outlines the products or services the buyer has requested along with the agreed-upon terms and conditions.
Key Components of a Sales Order:
SO Number: A unique identifier assigned to each sales order for tracking and reference purposes.
Date: The date when the sales order is issued by the seller.
Customer Information: Details about the buyer including name, address, contact information, and any specific terms of the agreement.
Billing and Shipping Information: Information regarding the billing address, shipping address, delivery instructions, and preferred shipping method.
Product or Service Details: Description, quantity, unit price, and total cost of each item or service being sold.
Terms and Conditions: Any special terms or conditions agreed upon by the buyer and seller, such as payment terms, delivery dates, warranties, etc.
Authorized Signature: The signature of the authorized person within the seller’s organization, indicating approval and commitment to the terms of the sales order.
Purpose of a Sales Order:
Confirmation of Order: It serves as confirmation to the buyer that their order has been received and accepted by the seller.
Internal Reference: It provides a reference point for the seller’s internal processes such as inventory management, production planning, and order fulfillment.
Legal Document: In some cases, a sales order can serve as a legally binding contract between the buyer and seller, especially when it contains terms and conditions agreed upon by both parties.
In summary, both purchase orders and sales orders play crucial roles in facilitating transactions between buyers and sellers, ensuring clarity, and formalizing agreements regarding the purchase and sale of goods and services.
Set up inventory features such as units of measure, stock categories, and stock groups.
Add a few sample inventory items with different units of measure.
Task 2: Purchase Entry
Record the purchase of inventory items from a supplier.
Enter the purchase invoice details including item name, quantity, rate, and taxes.
Ensure that the inventory stock is updated after the purchase transaction.
Task 3: Sales Entry
Record the sales of inventory items to customers.
Enter the sales invoice details including item name, quantity sold, rate, and taxes.
Ensure that the inventory stock is updated after the sales transaction.
Task 4: Inventory Reorder Level
Set up reorder levels for inventory items to maintain optimum stock levels.
Generate a report that shows inventory items falling below the reorder level.
Analyze the report and understand the importance of maintaining reorder levels.
Task 5: Inventory Valuation
Explore different methods of inventory valuation such as FIFO, LIFO, and Weighted Average.
Calculate the valuation of inventory using each method for a set of sample transactions.
Compare the results and understand how inventory valuation affects financial statements.
Task 6: Inventory Aging Analysis
Generate an inventory aging report to analyze the age of inventory items in stock.
Classify inventory items based on their age (e.g., 0-30 days, 31-60 days, 61-90 days, etc.).
Interpret the aging report to identify slow-moving or obsolete inventory items.
Task 7: Inventory Adjustment
Perform inventory adjustments for damaged, lost, or stolen items.
Record the adjustments in Tally ERP 9 by increasing or decreasing the quantity of affected inventory items.
Analyze the impact of inventory adjustments on inventory valuation and financial statements.
These tasks cover various aspects of inventory management in Tally ERP 9 and provide students with hands-on experience in using the software for inventory-related transactions and analysis.
Solutions
Solution 1: Inventory Setup
Open Tally ERP 9 and create a new company.
Go to Gateway of Tally > Inventory Info > Units of Measure to set up units of measure.
Next, navigate to Inventory Info > Stock Categories to define stock categories.
Then, go to Inventory Info > Stock Groups to create stock groups.
Finally, under Inventory Info > Stock Items, add sample inventory items with their respective units of measure, stock categories, and stock groups.
Solution 2: Purchase Entry
Go to Gateway of Tally > Accounting Vouchers > F9: Purchase.
Enter the supplier’s invoice number, date, and other relevant details.
Select the inventory items purchased along with their quantities, rates, and applicable taxes.
Save the voucher to record the purchase transaction and update the inventory stock.
Solution 3: Sales Entry
Navigate to Gateway of Tally > Accounting Vouchers > F8: Sales.
Enter the customer’s invoice number, date, and other necessary details.
Choose the inventory items sold with their quantities, rates, and applicable taxes.
Save the voucher to record the sales transaction and update the inventory stock.
Solution 4: Inventory Reorder Level
Go to Gateway of Tally > Inventory Info > Reorder Levels.
Set up reorder levels for each inventory item by specifying the minimum quantity to maintain.
Generate the Reorder Level report from Inventory Info to view items falling below the reorder level.
Solution 5: Inventory Valuation
Explore different methods of inventory valuation such as FIFO, LIFO, and Weighted Average.
Use the appropriate features in Tally ERP 9 to calculate inventory valuation based on each method.
Compare the valuation results to understand the impact on financial statements.
Solution 6: Inventory Aging Analysis
Generate an Inventory Aging report from Inventory Info to analyze the age of inventory items.
Classify inventory items based on their age ranges (e.g., 0-30 days, 31-60 days, etc.).
Interpret the report to identify slow-moving or obsolete inventory items that may need attention.
Solution 7: Inventory Adjustment
Go to Gateway of Tally > Inventory Vouchers > F7: Stock Journal.
Record inventory adjustments by increasing or decreasing the quantity of affected items.
Provide reasons for adjustments such as damages, losses, or thefts.
Analyze the impact of adjustments on inventory valuation and financial statements.
These solutions provide step-by-step guidance on how to perform each task in Tally ERP 9 related to inventory management.
Managing inventory information in Tally ERP 9 involves creating and organizing stock groups, stock categories, stock items, units of measurement, godowns, batch numbers, and recording stock transactions. Here are detailed steps along with five practical examples:
Steps for Managing Inventory Information:
Step 1: Creating Stock Groups
Go to Gateway of Tally > Inventory Info > Stock Groups.
Select “Create” (Alt + C) to create a new stock group.
Enter the Name of the stock group (e.g., Electronics) and Subgroup if needed.
Save the details (Ctrl + A).
Step 2: Creating Stock Categories
Go to Gateway of Tally > Inventory Info > Stock Categories.
Select “Create” (Alt + C) to create a new stock category.
Enter the Name of the stock category (e.g., Mobile Phones) and select the parent stock group (Electronics).
Save the details (Ctrl + A).
Step 3: Creating Stock Items
Go to Gateway of Tally > Inventory Info > Stock Items.
Select “Create” (Alt + C) to create a new stock item.
Enter the Name of the stock item (e.g., iPhone 12 Pro) and select the parent stock category (Mobile Phones).
Specify details like Units of Measurement, Standard Rate, etc.
Save the details (Ctrl + A).
Step 4: Creating Units of Measurement (UOM)
Go to Gateway of Tally > Inventory Info > Units of Measurement.
Select “Create” (Alt + C) to create a new unit of measurement (e.g., Dozen).
Enter the Symbol and Full Form for the unit (Dozen).
Save the details (Ctrl + A).
Step 5: Creating Godowns
Go to Gateway of Tally > Inventory Info > Godowns.
Select “Create” (Alt + C) to create a new godown (e.g., Main Warehouse).
Enter the Name and Address of the godown.
Save the details (Ctrl + A).
Step 6: Enabling Batch Numbers
Go to Gateway of Tally > F11: Features > F2: Inventory Features.
Enable the option “Maintain Batch-wise Details.”
Save the settings (Ctrl + A).
Practical Examples:
Example 1: Stock Transfer Between Godowns
Go to Gateway of Tally > Inventory Vouchers > F7: Stock Journal.
Select the source and destination godowns.
Enter the stock item details and quantity.
Save the voucher (Ctrl + A).
Example 2: Stock Receipt (Purchase) with Batch Number
Go to Gateway of Tally > Inventory Vouchers > F9: Purchase.
Select the supplier, stock item, and enter quantity and rate.
Enable batch details, enter batch numbers, and save the voucher (Ctrl + A).
Example 3: Stock Issuance (Sales) with Batch Number
Go to Gateway of Tally > Inventory Vouchers > F8: Sales.
Select the customer, stock item, and enter quantity and rate.
Enable batch details, select the appropriate batch, and save the voucher (Ctrl + A).
Example 4: Stock Adjustment for Damaged Goods
Go to Gateway of Tally > Inventory Vouchers > F7: Stock Journal.
Select the stock item and adjust quantity for damaged goods.
Save the voucher (Ctrl + A).
Example 5: Stock Opening Balances Entry
Go to Gateway of Tally > Inventory Info > Opening Balances.
Select the stock item, enter opening quantity, and rate.
Specify godown details if applicable and save (Ctrl + A).
These steps and examples provide a comprehensive guide for managing inventory information in Tally ERP 9, covering stock groups, stock categories, stock items, units of measurement, godowns, batch numbers, and various stock transactions.
Inventory information in Tally ERP 9 encompasses a range of data related to the management of goods, products, and materials within a business. It allows businesses to track stock levels, monitor inventory movements, and manage purchase and sales orders efficiently. Here’s a detailed explanation of inventory information in Tally ERP 9:
Components of Inventory Information:
1. Stock Groups:
Stock groups are categories used to classify similar types of products or items.
For example, you might have stock groups like “Electronics,” “Clothing,” “Stationery,” etc.
2. Stock Categories:
Stock categories are further subdivisions within stock groups.
They help in organizing inventory hierarchically.
For example, within the “Electronics” stock group, you might have categories like “Mobile Phones,” “Laptops,” “Televisions,” etc.
3. Stock Items:
Stock items are individual products or items that the business buys, sells, or manufactures.
Each stock item has a unique name, code, and other attributes.
For example, within the “Mobile Phones” category, specific stock items might include “iPhone 12 Pro,” “Samsung Galaxy S21,” etc.
4. Units of Measurement:
Units of measurement define how quantities of stock items are measured and represented.
Tally ERP 9 supports various units of measurement such as pieces, kilograms, meters, liters, etc.
For example, a stock item like “Pencil” might have units of measurement like “Dozen” or “Each.”
5. Godowns:
Godowns are physical locations where inventory is stored or managed.
They can represent warehouses, storage facilities, or any other designated storage areas.
For example, you might have godowns named “Main Warehouse,” “Retail Store,” “Backroom,” etc.
6. Batch Numbers:
Batch numbers are used to track and manage groups of identical items that were produced or received together.
They are particularly useful for products with expiration dates or manufacturing dates.
For example, pharmaceuticals, food items, and cosmetics often use batch numbers for tracking purposes.
7. Stock Vouchers:
Stock vouchers are used to record inventory-related transactions such as stock transfers, stock receipts, stock issuances, and stock adjustments.
These vouchers ensure accurate recording of inventory movements within the business.
Features of Inventory Information in Tally ERP 9:
Stock Valuation: Tally ERP 9 supports various methods of stock valuation including FIFO (First In First Out), LIFO (Last In First Out), Weighted Average, and Standard Cost.
Stock Aging Analysis: Businesses can analyze the age of their inventory to identify slow-moving or obsolete stock items.
Inventory Reports: Tally ERP 9 provides a range of inventory reports such as stock summary, stock item-wise reports, godown-wise reports, and batch-wise reports for effective inventory management.
Inventory Control: Businesses can set reorder levels, minimum stock levels, and maximum stock levels to ensure optimal inventory levels and prevent stockouts or overstock situations.
Overall, inventory information in Tally ERP 9 plays a critical role in managing and controlling the flow of goods and materials within a business, ultimately contributing to efficient operations and improved financial performance.
In Tally ERP 9, voucher entry is the process of recording financial transactions such as payments, receipts, sales, purchases, journal entries, contra entries, debit notes, credit notes, and payment advices. Here’s how to do voucher entry in Tally ERP 9:
Steps to Perform Voucher Entry:
Open Tally ERP 9: Double-click the Tally ERP 9 icon on your desktop to launch the software.
Select Company: Choose the company for which you want to perform voucher entry from the list of available companies.
Access Voucher Entry Screen:
Go to the Gateway of Tally (main screen).
Navigate to the appropriate voucher entry screen based on the type of transaction you want to record. You can access voucher entry screens using shortcut keys or through the menu options.
For example, press F9 for purchase voucher, F8 for sales voucher, F5 for payment voucher, F6 for receipt voucher, F7 for journal voucher, F4 for contra voucher, F10 for debit note voucher, F11 for credit note voucher, and so on.
Enter Voucher Details:
Once you are in the voucher entry screen, you’ll see various fields where you can enter details about the transaction.
Fill in the date of the transaction in the appropriate field.
Select the account (ledger) that is being debited or credited in the transaction. You can type the first few letters of the account name to search for it.
Enter the amount of the transaction in the relevant field.
Repeat the process for additional accounts involved in the transaction.
Save the Voucher:
After entering all the necessary details, press Ctrl + A or click on the “Accept” button to save the voucher.
Tally will validate the entries and save the voucher if there are no errors.
View or Print Vouchers:
After saving the voucher, you can view it by going to the “Display” menu and selecting “Day Book” or “Vouchers.”
You can also print vouchers by selecting the voucher you want to print and clicking on the “Print” button.
Tips for Voucher Entry in Tally:
Always ensure that the transactions are recorded accurately to maintain the integrity of your financial data.
Use appropriate ledger accounts for each transaction to ensure proper classification and reporting.
Review the voucher entries periodically to identify any errors or discrepancies.
Take regular backups of your Tally data to prevent data loss.
Example:
Suppose you want to record a payment transaction where you paid rent amounting to ₹10,000. Here’s how you would do it in Tally ERP 9:
Press F5 to access the Payment Voucher screen.
Enter the date of the transaction.
Select the bank account from which the payment is made.
Enter ₹10,000 in the “Payment” field.
Select the “Rent Expense” ledger under “Particulars” and enter ₹10,000 in the “Amount” field.
Press Ctrl + A to save the voucher.
That’s it! You have successfully recorded the payment transaction in Tally ERP 9. Repeat these steps for other transactions as needed.
Voucher Entry Examples:
Type 1: Payment Voucher:
Example: Payment of electricity bill amounting to ₹5,000.
Go to Gateway of Tally > Accounting Vouchers > F5: Payment.
Select the appropriate bank or cash account under “Account” field.
Enter the amount of ₹5,000 in the “Payment” field.
Select “Electricity Expense” under “Particulars” and enter ₹5,000 in the “Amount” field.
Press Enter to save the voucher.
Type 2: Receipt Voucher:
Example: Receipt of rent from tenant amounting to ₹10,000.
Go to Gateway of Tally > Accounting Vouchers > F6: Receipt.
Select the appropriate bank or cash account under “Account” field.
Enter the amount of ₹10,000 in the “Receipt” field.
Select “Rent Income” under “Particulars” and enter ₹10,000 in the “Amount” field.
Press Enter to save the voucher.
Type 3: Sales Voucher:
Example: Sales of goods to ABC Traders amounting to ₹20,000.
Go to Gateway of Tally > Accounting Vouchers > F8: Sales.
Select the sales ledger under “Account” field.
Enter the amount of ₹20,000 in the “Amount” field.
Select “ABC Traders” under “Particulars” and enter ₹20,000 in the “Amount” field.
Press Enter to save the voucher.
Type 4: Purchase Voucher:
Example: Purchase of raw materials from XYZ Suppliers amounting to ₹15,000.
Go to Gateway of Tally > Accounting Vouchers > F9: Purchase.
Select the purchase ledger under “Account” field.
Enter the amount of ₹15,000 in the “Amount” field.
Select “XYZ Suppliers” under “Particulars” and enter ₹15,000 in the “Amount” field.
Press Enter to save the voucher.
Type 5: Journal Voucher:
Example: Recording depreciation expense for the month amounting to ₹2,000.
Go to Gateway of Tally > Accounting Vouchers > F7: Journal.
Select the depreciation ledger under “Account” field.
Enter the amount of ₹2,000 in the “Amount” field.
Select the appropriate ledger under “Particulars” and enter ₹2,000 in the “Amount” field.
Press Enter to save the voucher.
Type 6: Contra Voucher:
Example: Transfer of funds from Bank Account A to Bank Account B amounting to ₹50,000.
Go to Gateway of Tally > Accounting Vouchers > F4: Contra.
Select Bank Account A under “From” field and Bank Account B under “To” field.
Enter the amount of ₹50,000 in the “Amount” field.
Press Enter to save the voucher.
Type 7: Debit Note Voucher:
Example: Debit note issued to supplier for returned goods amounting to ₹7,000.
Go to Gateway of Tally > Accounting Vouchers > F10: Debit Note.
Select the supplier’s ledger under “Account” field.
Enter the amount of ₹7,000 in the “Amount” field.
Select the appropriate ledger under “Particulars” and enter ₹7,000 in the “Amount” field.
Press Enter to save the voucher.
Type 8: Credit Note Voucher:
Example: Credit note issued to customer for returned goods amounting to ₹3,000.
Go to Gateway of Tally > Accounting Vouchers > F11: Credit Note.
Select the customer’s ledger under “Account” field.
Enter the amount of ₹3,000 in the “Amount” field.
Select the appropriate ledger under “Particulars” and enter ₹3,000 in the “Amount” field.
Press Enter to save the voucher.
Type 9: Payment Advice Voucher:
Example: Payment advice issued to a vendor for the upcoming payment.
Go to Gateway of Tally > Accounting Vouchers > F10: Payment Advice.
Select the vendor’s ledger under “Account” field.
Enter the amount and other relevant details.
Press Enter to save the voucher.
These steps illustrate how to enter different types of voucher entries in Tally ERP 9 for various financial transactions. Make sure to select the appropriate ledgers and fill in the necessary details accurately to ensure accurate accounting records.
Purpose: Used to record payments made by the company, such as expenses, utility bills, salaries, etc.
Example: Payment of electricity bill amounting to ₹5,000.
Type 2: Receipt Voucher:
Purpose: Used to record any incoming cash or cheques received by the company, including receipts from customers, interest received, etc.
Example: Receipt of rent from tenant amounting to ₹10,000.
Type 3: Sales Voucher:
Purpose: Used to record sales transactions where goods or services are sold to customers.
Example: Sales of goods to ABC Traders amounting to ₹20,000.
Type 4: Purchase Voucher:
Purpose: Used to record purchases made by the company, including inventory purchases, raw materials, etc.
Example: Purchase of raw materials from XYZ Suppliers amounting to ₹15,000.
Type 5: Journal Voucher:
Purpose: Used for any miscellaneous transactions that don’t fit into the other voucher types, such as adjustments, provisions, depreciation entries, etc.
Example: Recording depreciation expense for the month amounting to ₹2,000.
Type 6: Contra Voucher:
Purpose: Used to record transactions involving bank accounts or cash, such as bank transfers, cash deposits, cash withdrawals, etc.
Example: Transfer of funds from Bank Account A to Bank Account B amounting to ₹50,000.
Type 7: Debit Note Voucher:
Purpose: Used to record transactions where the company receives goods returned from a customer or a supplier, resulting in a debit to the supplier’s account.
Example: Debit note issued to supplier for returned goods amounting to ₹7,000.
Type 8: Credit Note Voucher:
Purpose: Used to record transactions where the company returns goods to a supplier or issues a credit to a customer, resulting in a credit to the customer’s account.
Example: Credit note issued to customer for returned goods amounting to ₹3,000.
Type 9: Payment Advice Voucher:
Purpose: Used to record payment advices given to parties to facilitate payments, usually used in banking transactions.
Example: Payment advice issued to a vendor for the upcoming payment.
These examples illustrate the various types of voucher entries available in Tally ERP 9 and their respective purposes in recording financial transactions.